Hello
Well sorry that didn't work out for you on the cluster replacement fixing the fuel gage.
As for the cluster... If the cluster is what I think it is... It would be normal that the odeometer is correct as this comes from the PCM. The trip will be off because it is a different cluster. So it is not that they drove it..... Just a different cluster.
As for the dropping the tank..... Are you going to try that yourself...I can send you the how-to-do? That way you are just paying for the pump. Well, my suggestion... Though it may just be the sending unit....... If it were me...I would replace the entire fuel pump... Your call. My reason...I hate to drop tanks..... It is a pain..... So I am there... It all gets new goodies... Hoses, clamps, it all..... Then I am good (Lord willing) for 100K +.
Have you only got the one tank?
I show a part number of 25315800 for the entire pump... Should be the sending/sock and all. From the dealer it will be about $410.17. It is only about $270.34. If you go this direction I would verify with the Chevy parts department that this part comes with everything. Then get it through the GM parts.
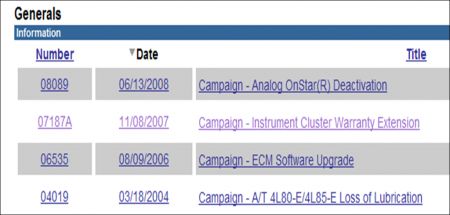
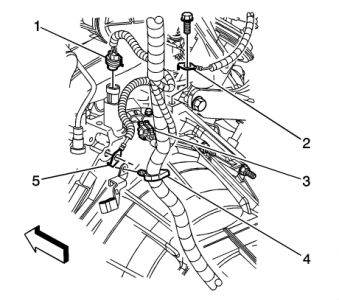
Well on the oil gauge... This is a new problem... Yes? It looks like there is a TSB on this. It may be the oil pressure sensor, even the wiring. I have attached that for your review.
My suggestion here since there is a TSB...I would replace the sensor first..... Not the wiring as it may not be the wiring. See what it does....... Then the wiring... Then last resort drop the pan.
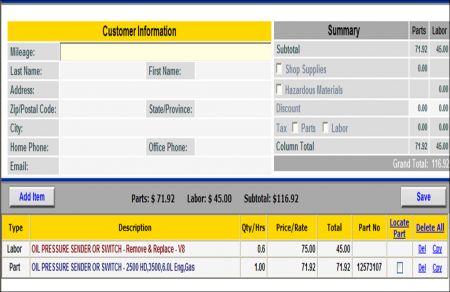
For that matter check both parts out on the GM site...I show it about $72 at the dealer and about $45 there... Part number 12573107.
Also, when you read the info on the TSB for the oil pump it may throw some codes. Are you able to run by a Auto Zone (AZ) or O'Reilly's (OR) and for FREE they can pull the codes to the car. Most important: Once they check your codes, if they find something and you don't get it fixed and need to get back with us, please make sure you tell us exactly what the code was, number and all. Example, if the code was E0568 O2 Sensor bad. Then make sure you give us all of that. While there for FREE also they can bring their tester out and check your battery, alternator and starter.
That way we can see if it throws those codes.
Okay review the info and see what you think....... We can chat about it a little more if you like...
Let me know.
Instruments - High/Low Erratic Oil Pressure Readings
Notes
File In Section: 06 - Engine/Propulsion System
Bulletin No: 04-06-04-065
Date: September, 2004
ADVANCED SERVICE INFORMATION
Subject:
ENGINEERING INVESTIGATION (EI # 04073) - High, Low or Erratic Oil Pressure Gauge Reading Setting DTCs P0522 and/or P0523
Models:
2004 Chevrolet Avalanche, Express, Silverado, Tahoe, Suburban
2004 GMC Savana, Sierra, Yukon, Yukon XL
2004 Isuzu W4
Equipped with 6.0L Engine ONLY (VIN Code U - RPO L04)
Attention: GM of Canada dealers are not authorized to utilize this service bulletin.
Condition
Important: This bulletin only applies to those vehicles identified in GM VIS by Engineering Investigation number 04073 AND the customer's concern is for an erratic gauge reading and DTC P0522 or P0523 is set. All other vehicles should not use this bulletin. If GM VIS shows an EI 04073 is open for this vehicle but the customer does not comment on an erratic gauge reading, DO NOT perform this bulletin.
The customer may comment about a high, low or erratic oil pressure gauge reading and the engine oil pressure indicator being illuminated. The technician will find DTCs P0522 and/or P0523 stored in the PCM. The PCM displays this information in the "Failure Records" on the scan tool.
Cause
GM Engineering is attempting to determine the root cause of Oil Pressure Sensor replacements. General Motors has a need to obtain technical information first hand from the dealer technician BEFORE and during diagnosis and repair. As a result, this information will be used by Engineering to help "root-cause" the customer's concern and develop/validate a field fix.
Important: By using the Tech 2, obtain the engine oil pressure sensor voltage reading. It is important to have this information PRIOR to contacting the engineer.
All U.S. Dealers, please contact engineer Brian Kozumplik. BEFORE proceeding. If Brian can not be reached immediately, leave a message with the VIN, Dealer Name, Dealer Phone Number, Caller's Name and Voltage Reading. Then proceed with the following corrective action.
Correction
Follow the diagnostic procedures for P0522 and/or P0523, found in SI.
If the SI diagnostics did not isolate the concern, OR if it leads to an oil pressure sensor connection concern, perform the following steps:
1. Cut off the oil pressure sensor wire harness 25.4 mm (1 in) from the connector.
Important: Do NOT disconnect the sensor from the connector.
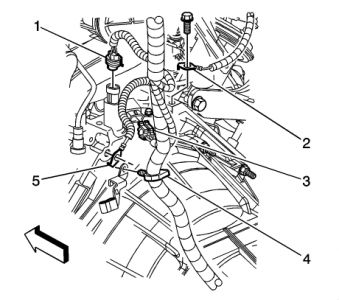
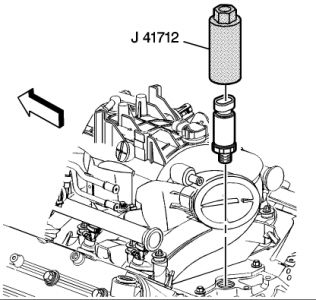
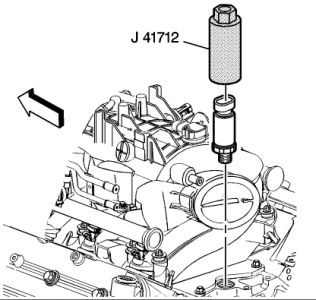
2. Remove the oil pressure sensor with the 25.4 mm (1 in) of harness and connector still connected.
3. Install a new oil pressure sensor using the one listed in the GMSPO parts catalog.
4. Repair the harness by installing an oil pressure sensor connector harness kit, P/N 12102748. This kit comes with a connector, attached leads and Duraseal splice sleeves. DO NOT solder the circuits when installing this service kit. Soldering the splice can impact the performance of the circuit. Instead, use the included splice sleeves and follow the procedure below:
4.1. Open the harness.
- If the harness is taped, remove the tape.
- To avoid wiring insulation damage, use a sewing ripper in order to cut open the harness.
- If the harness has a black plastic conduit, pull out the desired wire.
4.2. Cut the wire.
- Cut as little wire off the harness as possible.
- Ensure that each splice is at least 40 mm (1.5 in) away from other splices, harness branches and connectors. This helps prevent moisture from bridging adjacent splices and causing damage.
4.3. Select the proper size and type of wire.
- The wire must be of equal or greater size than the original.
- The wire's insulation must have the same or higher temperature rating (4). Use general purpose insulation for areas that are not subject to high temperatures. Use a cross-linked polyethylene insulated wire for areas where high temperatures are expected.
Important: Use cross-linked polyethylene wire to replace PVC, but do not replace cross-linked polyethylene with PVC.
Cross-linked polyethylene wire is not fuel resistant. Do not use to replace wire where there is the possibility of fuel contact.
4.4. Strip the insulation.
- Select the correct size opening in the wire stripper or work down from the largest size.
- Strip approximately 7.5 mm (5/16 in) of insulation from each wire to be spliced (1).
4.5. Select the proper Duraseal splice sleeve (2) and the required crimp nest tool. Refer to the Crimp and Seal Splice Table.
4.6. Place the Duraseal splice sleeve in the J 38125-8 crimp tool nest so that the crimp falls at point 1 on the splice.
4.7. Close the hand crimper handles slightly in order to hold the duraseal splice sleeve firmly in the proper crimp tool nest.
4.8. Insert the wires into the Duraseal splice sleeve until the wire hits the barrel stop. The splice sleeve has a stop in the middle of the barrel in order to prevent the wire from passing through the splice (3).
4.9. Close the handles of the J 38125-8 until the crimper handles open when released. The crimper handles will not open until the proper amount of pressure is applied to the splice sleeve.
4.10. Shrink the insulation around the splice.
- Using the heat torch, apply heat to the crimped area of the barrel.
- Gradually move the heat barrel to the open end of the tubing. The tubing will shrink completely as the heat is moved along the insulation. A small amount of sealant will come out of the end of the tubing when sufficient shrinkage is achieved.
SPONSORED LINKS
Friday, December 5th, 2008 AT 11:12 PM
