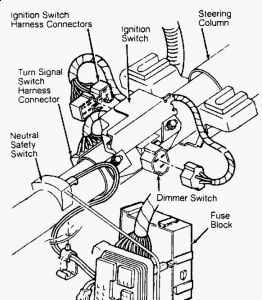
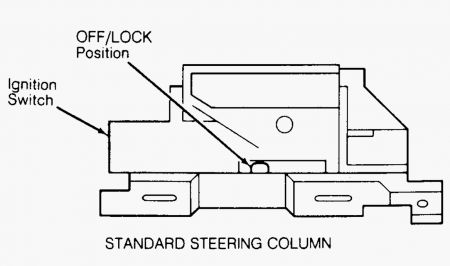
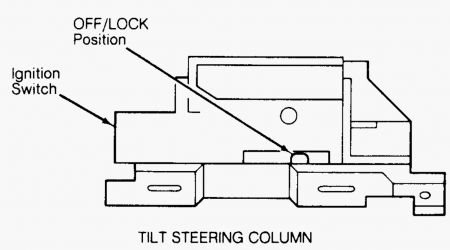
IGNITION & DIMMER SWITCHES Removal Remove steering column support bracket bolts and support bracket. Lower steering column. Disconnect dimmer switch electrical connector. Remove dimmer switch retaining screws and remove dimmer switch. Remove dimmer switch actuator rod. Remove ignition switch retaining screws. Disconnect ignition switch electrical connector. Remove ignition switch. See Fig. 1 . Installation 1. On standard column, move ignition switch slider to far left position, then back one detent to right. On tilt column, move ignition switch slider to far right position, then back one detent to left. See Fig. 2 . Ignition switch should now be in OFF/LOCK position. 2. Install ignition switch onto steering column. Ensure actuating rod is aligned with ignition switch. Install dimmer switch actuator rod. Connect dimmer switch to actuator rod. Place a 3/32" drill bit into hole on dimmer switch. Position dimmer switch onto steering column and push against actuator rod to remove lash. 3. Remove drill bit and tighten dimmer switch retaining screws. See TORQUE SPECIFICATIONS TABLE at the end of this article. Connect ignition switch and dimmer switch electrical connectors. NOTE: It is not necessary to remove steering wheel. Ignition and dimmer switches are mounted on top of steering column. NOTE: Install ignition switch with switch in OFF/LOCK position. NEW ignition switch will be pinned in OFF/LOCK position and plastic pin MUST be remove after installation of ignition switch to steering column.


Get switch in and working then if circuits still have problems, you need to go "parasite hunting"
Tuesday, May 4th, 2021 AT 1:33 PM


