1997 Cadillac Seville battery mot charging

Tiny
HOSEA101
  • MEMBER
  • 1997 CADILLAC SEVILLE
  • V8
  • FWD
  • MANUAL
  • 124,000 MILES
I got a battery not charging message and the car started running poorly, and the red battery light came on. After 10 mins. It went away and everything worked as it should. The car has done this twice now. We have a cold front now and the temp. Here is 5 degrees That is the only thing different from any other day. The message center says the car is charging at 13 + volts now. I did not check it when the problem hit.
Saturday, January 9th, 2010 AT 1:11 PM

7 Replies

Tiny
IMPALASS
  • MECHANIC
  • 3,112 POSTS
Hello -

To better assist you is your model the STS or the SLS and what is the engine size in liter?

Please go to Auto Zone (AZ) or O'Reilly's (OR) and for FREE they can pull the codes to the car. Most important: Once they check your codes, if they find something and you don't get it fixed and need to get back with us, please make sure you tell us exactly what the code was, number and all. Example, if the code was E0568 O2 Sensor bad. Then make sure you give us all of that. While there for FREE also they can bring their tester out and check your battery and alternator.

The BIG thing we are checking here is the battery and the alternator.........

Also, look your battery cables over really good for any corrosion and very good connections.

Let me know what you find.
Was this
answer
helpful?
Yes
No
-1
Saturday, January 9th, 2010 AT 11:19 PM
Tiny
HOSEA101
  • MEMBER
  • 7 POSTS
I had advantage auto to check the codes and we got
P0307
P0325
P0404
forgot to have them test the battery and alt. Car running ok now reading 14 + volts. Did check the connection to battery, cables tight and clean.
Was this
answer
helpful?
Yes
No
+2
Monday, January 11th, 2010 AT 12:33 PM
Tiny
HOSEA101
  • MEMBER
  • 7 POSTS
I forgot the car is a SLS 4.6L.
Was this
answer
helpful?
Yes
No
-1
Monday, January 11th, 2010 AT 1:29 PM
Tiny
IMPALASS
  • MECHANIC
  • 3,112 POSTS
Hello -

Thanks for the info.......

Good job on getting the codes.......

I understand you forgot to have the battery/alternator checked... However as I said that is the most important in this case.

Code 307 is dealing with engine misfire detection.......A misfire occurs when there is a complete lack of combustion in the cylinder. A misfire will cause a fluctuation in crankshaft revolution speed.

Code 404 is the EGR system and the conditions for setting can be Ignition voltage 12 volts or less. Or Ignition voltage greater than 12 volts.

Code 325 is the knock sensor module circuit when the PCM sees a knock event.

If your alternator failed for a moment that would interrupt the electrical flow, thus interrupting ignition... Thus causing a misfire code 307, causing a knock code 325 and the EGR problem 404.

My thought.....I would still have my battery and alternator checked. Clear the codes and drive on if all checks are clear right now. The first time codes are thrown, as long as the car is running okay...I usually make a note and press. In this case as I said...I would still check out the battery/alternator and keep an eye on them for now.
Was this
answer
helpful?
Yes
No
Monday, January 11th, 2010 AT 8:13 PM
Tiny
IMPALASS
  • MECHANIC
  • 3,112 POSTS
Hello -

Also, it looks like you may have some recalls on your vehicle. The dealer may fix these for free. Please contact the dealer service department, give them the VIN number of your car and have them check on these to see if they apply to you.

04V110000: FUEL RAIL
NHTSA RECALL BULLETIN
Reference Number(s): 04V110000
Related Ref Number(s): 04V110000
ARTICLE BEGINNING
VEHICLE DESCRIPTION
Model(s): 1995 Cadillac DeVille
1995 Cadillac Eldorado
1995 Cadillac Seville
1995 Oldsmobile Aurora
1996 Cadillac DeVille
1996 Cadillac Eldorado
1996 Cadillac Seville
1996 Oldsmobile Aurora
1997 Cadillac DeVille
1997 Cadillac Eldorado
1997 Cadillac Seville
1997 Oldsmobile Aurora
Campaign No: 04V110000
Mfg. Campaign No: 04014
Number of Affected Vehicles: 483477
Beginning Date of Manufacture: 1996 03 01
Ending Date of Manufacture: 1997 06 30
DEFECT SUMMARY
Some passenger vehicles equipped with 4.0l V8 engines have a condition in which the nylon tubing used in the fuel rail construction may degrade and crack. Additionally, the 1995 model year uses a unique underhood fuel return line that may crack. Cracking of the fuel rail or return line tubing can result in a fuel leak into the engine compartment.
CONSEQUENCE SUMMARY
Fuel leakage, in the presence of an ignition source, could result in a fire.
CORRECTIVE SUMMARY
Dealers will inspect and, if necessary, replace the engine fuel rail with a new stainless steel fuel rail. Dealers will also install a revised chassis fuel return line. The recall began on June 2, 2004, for 1996-1997 Oldsmobile Aurora vehicles.

97V064000: ELECTRONIC BRAKE/TRACTION CONTROL MODULE
NHTSA RECALL BULLETIN
Reference Number(s): 97V064000
Related Ref Number(s): 97V064000
ARTICLE BEGINNING
VEHICLE DESCRIPTION
Model(s): 1997 Buick Park Avenue
1997 Cadillac DeVille
1997 Cadillac Eldorado
1997 Cadillac Seville
Campaign No: 97V064000
Number of Affected Vehicles: 77449
Beginning Date of Manufacture: 1996 APR
Ending Date of Manufacture: 1996 DEC
DESCRIPTION OF DEFECT
The electronic brake control module or the electronic brake and traction control module can cause the antilock brake system (ABS) to cycle during a non-ABS brake application.
CONSEQUENCE OF DEFECT
This condition can result in an increase in vehicle stopping distance increasing the risk of a vehicle crash.
CORRECTIVE ACTION
Dealers will replace the electronic brake control module or the electronic brake and traction control module.
Was this
answer
helpful?
Yes
No
+1
Monday, January 11th, 2010 AT 8:14 PM
Tiny
HOSEA101
  • MEMBER
  • 7 POSTS
1 last thing, can you give me a step by step R&R of the alt. And belt for the water pump.

Thanks for all of the help.
Was this
answer
helpful?
Yes
No
Tuesday, January 12th, 2010 AT 1:54 PM
Tiny
IMPALASS
  • MECHANIC
  • 3,112 POSTS
Hello -

Sorry for the delay. . .. . .. . .. . .had some minor technical difficulty.

Sorry, this is the best we can do for this task.

Removal

1. Disconnect the negative battery cable.
CAUTION: Before servicing any electrical component, the ignition and start switch must be in the OFF or LOCK position and all electrical loads must be OFF, unless instructed otherwise in these procedures. If a tool or equipment could easily come in contact with a live exposed electrical terminal, also disconnect the negative battery cable. Failure to follow these precautions may cause personal injury and/or damage to the vehicle or its components.

2. Remove the accessory drive belt.

3. Remove the upper front bolt.

4. Raise and suitably support the vehicle.

5. Remove the front engine splash shield.

6. Remove the radiator support access panel.

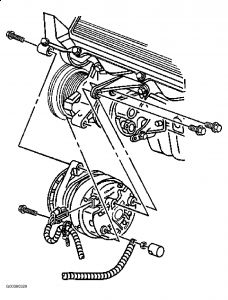
7. Loosen the rear generator bracket from the engine. See Fig. 2 .

https://www.2carpros.com/forum/automotive_pictures/248015_2_127.jpg


8. Remove the top bolt.

9. Remove the front lower mounting bolt.

10. Remove the lower rear mounting bolt.

11. Remove the upper rear mounting bolt.

12. Remove the duct from the back of the generator.

13. Disconnect the following electrical connections:

"Â Regulator
"Â Battery output
"Â Heated windshield (if equipped).

14. Remove the front generator - A/C bracket.

15. Rotate the generator and remove.

Installation

1. Install the generator. See Fig. 2 .

2. Install the front generator - A/C bracket.

3. Connect the following electrical connections:
"Â Regulator
"Â Battery output
"Â Heated windshield (if equipped).
Tighten the battery output cable to 20 N.m (15 lb ft).

4. Install the duct to the back of the generator. Align the duct to the generator black duct.

5. Install the upper rear mounting bolt. Tighten the upper rear mounting bolt to 47 N.m (35 lb ft).

6. Install the lower rear mounting bolt. Tighten the lower rear mounting bolt to 47 N.m (35 lb ft).

7. Install the front mounting bolt. Tighten the front mounting bolt to 47 N.m (35 lb ft).

8. Install the rear generator bracket bolt to the engine. Tighten the bracket mounting bolt to 47 N.m (35 lb ft).

9. Install the upper front bolt.

10. Install the radiator support access panel.

11. Install the front engine splash shield.

12. Lower the vehicle.

13. Tighten the upper front bolt. Tighten the upper front bolt to 47 N.m (35 lb ft).

14. Install the accessory drive belt.

15. Connect the negative battery cable. Tighten the negative battery cable bolt to 15 N.m (11 lb ft).
Was this
answer
helpful?
Yes
No
+1
Thursday, January 14th, 2010 AT 5:24 PM

Please login or register to post a reply.

Sponsored links