A battery can go dead for a few reasons, one of the most common causes is the battery simply has gone bad which is easy to load test without equipment, replacement may be is required. If the battery needs to be continuously charged check the alternator output voltage or the car has an electrical parasitic drain. If your car has been sitting for an extended amount of time, the battery can loose charge which is normal.
Safety Precautions
- Use protective gloves and eyewear
- Do not turn the charger on before connecting it to the battery
- Clean the battery cable ends and battery terminals
- Turn the battery charger off before disconnection
- Only charge a battery in well ventilated areas
- Never smoke or allow open flames near a charging battery.
- Avoid charging a frozen or severely discharged battery, as it may be damaged and could explode.
A typical battery charger converts AC voltage from a 110 volt wall plug, into DC voltage that mimics the alternator when your car's engine is running. When a charger is connected to a battery is will put out about 15 volts at the selected amps.
Here is a list of the different types of charges available:
- Simple Chargers: This charger supplies a constant DC or pulsed DC power source to the battery being charged (typical).
- Trickle Chargers: A trickle charger delivers a slow charge at a low rate, typically to maintain or keep a battery fully charged.
- Smart Chargers: This charger adjusts the charging rate based on the condition of the battery.
- Float Chargers: Similar to a trickle charger but with a difference, they can stay connected to a battery, indefinitely.
- Pulse Chargers: Uses pulse technology and are designed to reduce sulfate build-up on lead-acid battery plates extending the battery life.
- Inductive Chargers: These are less common and use electromagnetic induction to charge batteries.
- Solar Chargers: These eco-friendly chargers are useful for maintaining the charge of vehicle batteries in the outdoors.
- Jump Starters: Jump starters can quickly deliver a voltage boost when the battery is too low to do so on its own.
- Bench Chargers: Heavy-duty chargers used in automotive shops and feature multiple charging modes which can handle a variety of battery types.
Let's Get Started!
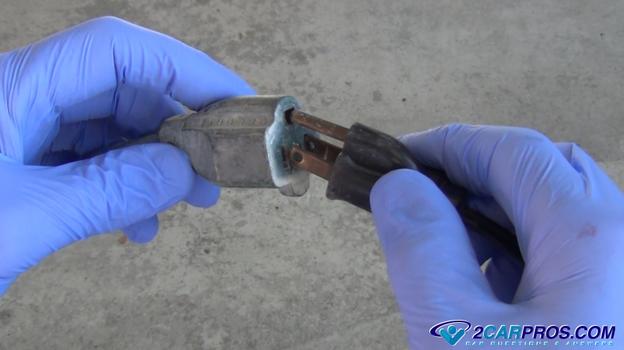
1. Inspect the Battery Charger: It's important to use a battery charger that is in good shape to avoid short circuits which may cause a spark over the battery. Look for broken leads or a damaged plug and replace or repair the charger if needed.
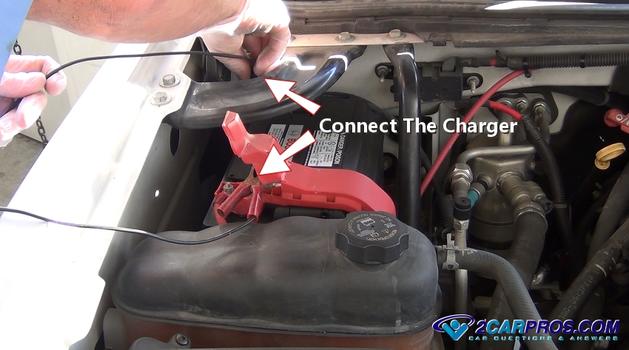
2. Connect the Battery Charger: Lift the hood of your car and locate the battery, in some cases it will be in the trunk. While wearing gloves uncover the positive terminal of the battery. These terminals will be identified by a (+) or (-) sign. Before connecting the charger make sure it is unplugged or turned off. Then connect the red spring loaded clamp to the positive side and the black clamp to the negative side (it does not matter which order). Once connected wiggle the clamps to make sure they are getting a good connection. Do not hook up the charger backwards, this can cause electrical damage to the car and the charger.
3. Turn the Charger On: Switch the charger on or simply plug it in. Some chargers do not have a switch which is normal. At this point you should hear a buzzing sound which indicates the charger is starting the work, then select the charge rate if applicable.
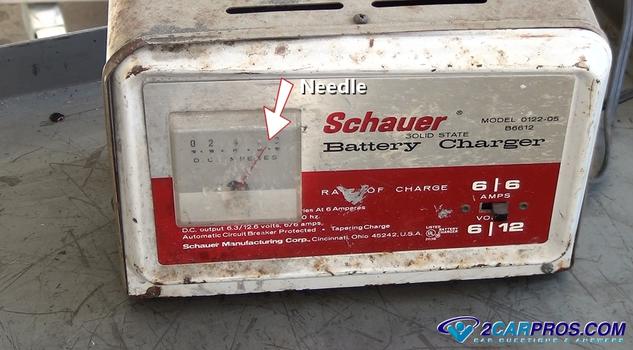
4. Watch the Charger Gauge: After turning the charger on the gauge at the front of the charger it will do one of three things;
- Not move which means you have a bad connection at one of the terminals or the charger is not working. In this case switch the charger off or unplug it and then reposition the clamps or get a new charger.
- The needle will jump to the top of the gauge and slowly move downward as the battery charges. This is a normal pattern of the dead battery.
- The needle will move a little bit which means the battery is probably no good due to an internal short, or the battery is fully charged.
5. Charging the Battery: Depending on the state of charge and the condition of the battery charge times will vary. As the battery charges the needle will drop lower until it does not move anymore which is telling you the battery is completely charged. If you try and start the car with the charger connected it can trip the circuit breaker inside the charger which prevents charger overload. When the circuit breaker cools it will reset and the charger will be ready to go again. When this happens the gauge will drop to zero. A fully charged battery will typically show 12.6 volts or more when fully charged.
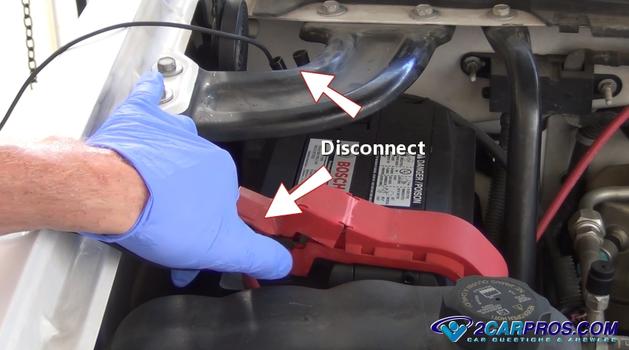
6. Disconnect the Charger: After the battery charging is complete turn the charger off or unplug it. This will stop the currant flow of electrically and will help you not to cause a spark near the battery which rarely can cause an explosion. A battery is most prone to an explosion after a recharge due to the hydrogen gasses produced while charging. To check the batteries condition after the charge it's a good idea to perform a load test, this will let you know if the battery is any good or not.
7. Inspect the Battery: After charging is complete inspect the battery for bulging, leakage or excessive hydrogen odors which are signs the battery is bad and needs to be replaced.
Watch the Video!
Please watch this video of the job being done to glean additional helpful information.
Credits
This guide knowledge base was created by the 2CarPros Team, and by Ken Lavacot: Automobile repair shop owner and certified master automobile technician of over 30 years. If you have question or need help please ask one of our experts we are happy to help. Please visit our 2CarPros YouTube Channel.


