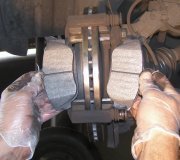
1992 Cadillac EL Dorado Rear disc pad replacement

Tiny
BOUFF
  • MEMBER
  • 1992 CADILLAC ELDORADO
Brakes problem
1992 Cadillac El Dorado V8 Two Wheel Drive 205000 miles

Hello, and thank you in advance.
I'm trying to put new pads on the rear brakes.
The lower caluper bolt was easy, the upper bolt I do not understand. Also, on this system do I need the special reset tool, or can I use the clamp mehtod.
Tuesday, January 27th, 2009 AT 7:15 PM

3 Replies

Tiny
BLUELIGHTNIN6
  • MECHANIC
  • 16,542 POSTS
Hello
Thanks for the donation.

Below are procedures for replacing your rear brake pads. Let me know if you need any further assistance.

NOTE: Disc brake pads must be replaced in axle sets only.

REMOVAL:
Use a syringe or similar tool to remove 2/3 of the brake fluid from the master cylinder reservoir.
Raise and safely support the vehicle.
Remove the wheel and tire assembly, then reinstall 2 lug nuts to retain the disc brake rotor.
Remove the disc brake caliper from the mounting bracket, but do not disconnect the brake hose from the caliper. Suspend the caliper with wire from the coil spring.

WARNING: Do not let the caliper hang from the brake hose. The hose may become damaged, causing possible brake failure.

Use a small prybar to disengage the buttons on the outboard disc brake pad from the holes in the caliper housing. Remove the outboard disc brake pad.
Remove the inboard disc brake pad.
Inspect the disc brake rotor and machine or replace, as necessary.

INSTALLATION:
Wipe the outside surface of the caliper piston boot clean using denatured alcohol.
Using a C-clamp, bottom the caliper piston into the caliper bore. Tighten the clamp slowly, and be careful not to damage the piston or piston boot. After bottoming the piston, use a small plastic or wood tool to lift the inner edge of the boot next to the piston and press out any trapped air; the boot must lay flat.
Install the inboard disc brake pad by snapping the retainer spring into the piston. Make sure the pad lays flat against the piston and does not touch the boot. If the pad contacts the boot, remove the pad and reseat or reposition the boot.
Install the outboard disc brake pad. Position the pad so that the covered in this guidear sensor is at the trailing edge of the pad during forward wheel rotation on all except 1990 Deville and Fleetwood. On 1990 Deville and Fleetwood, position the pad so that the covered in this guidear sensor is at the leading edge of the pad during forward wheel rotation. The back of the pad must lay flat against the caliper.
Install the disc brake caliper.
Install the wheel and tire assembly and locovered in this guider the vehicle.
Apply the brake pedal several times to position the caliper piston and seat the brake pads in the caliper.
Check the brake fluid level in the master cylinder and add fluid as necessary.

Thanks for choosing 2CarPros. Com!
Was this
answer
helpful?
Yes
No
Wednesday, January 28th, 2009 AT 1:11 AM
Tiny
BOUFF
  • MEMBER
  • 2 POSTS
Thank you, your info was very helpful.
But I'm not getting past first base. Is there more detailed information on removeing the disc brske caliper.
The lower bolt is obvious, the upper is recessed and looks like you would need a very thin wall socket to get at it?
Was this
answer
helpful?
Yes
No
Wednesday, January 28th, 2009 AT 9:54 AM
Tiny
BLUELIGHTNIN6
  • MECHANIC
  • 16,542 POSTS
Okay, sure. Removal/Installation procedures for rear brake calipers are as follows:

REMOVAL:
Raise and safely support the vehicle.
Remove the wheel and tire assembly.
If the caliper is to be removed from the vehicle, remove the bolt attaching the brake hose to the caliper. Discard the gaskets. Plug the openings in the caliper and brake hose to prevent fluid loss.
If the caliper is to be removed from the vehicle, lift up on the end of the parking brake cable spring to free the end of the cable from the parking brake lever.
Remove the bolt and washer attaching the cable support bracket to the caliper.
Remove the sleeve bolt, pivot the caliper up to clear the rotor and then slide it inboard off the pin sleeve.
If the caliper is being removed only for brake pad replacement or to provide access to the mounting bracket, rotor or other components, suspend the caliper with wire from the strut.

WARNING: Do not let the caliper hang from the brake hose. The hose may become damaged, causing possible brake failure.

INSTALLATION:
Inspect the pin boot, bolt boot and sleeve boot for cuts, tears or deterioration and replace as necessary.
Inspect the bolt sleeve and pin sleeve for corrosion or damage. Pull the boots to gain access to the sleeves for inspection or replacement. Replace corroded or damaged sleeves; do not try to polish away corrosion.
If not replaced, remove the pin boot from the caliper and install the small end over the pin sleeve (installed on caliper support) until the boot seats in the pin groove. This prevents cutting the pin boot when sliding the caliper onto the pin sleeve.
Hold the caliper in the position it was removed and start it over the end of the pin sleeve. As the caliper approaches the pin boot, work the large end of the pin boot in the caliper groove, then push the caliper fully onto the pin.
Pivot the caliper down, being careful not to damage the piston boot on the inboard disc brake pad. Compress the sleeve boot by hand as the caliper moves into position to prevent boot damage.
After the caliper is in position, recheck the position of the pad clips. If necessary, use a small prybar to reseat or center the pad clips on the bracket abutments.
Install the sleeve bolt and tighten to 20 ft. Lbs. (27 Nm).
Install the cable support bracket (with cable attached) with the bolt and washer and tighten to 32 ft. Lbs. (43 Nm).
Lift up on the end of the cable spring clip and work the end of the parking brake cable into the notch in the lever.
Position the brake hose on the disc brake caliper. Connect the hose to the caliper using the attaching bolt and 2 new gaskets. Tighten the bolt to 32 ft. Lbs. (44 Nm).
Bleed the brake system.
Install the wheel and tire assembly and locovered in this guider the vehicle. Check the parking brake adjustment.

Thanks for choosing 2CarPros. Com!
Was this
answer
helpful?
Yes
No
Wednesday, January 28th, 2009 AT 12:13 PM

Please login or register to post a reply.

Sponsored links