CABIN AIR FILTER
Removal & Installation (1999-2003)
On 3.2TL models, remove the screw, then remove the glove box damper.
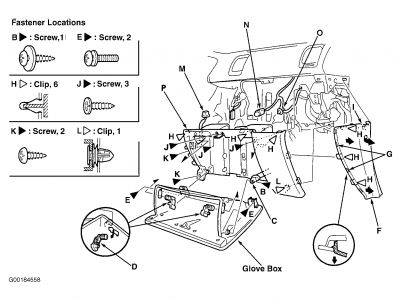
Remove the screws and remove the glove box.On 3.2CL models, remove the screw (B) and damper (C). See Fig. 3 . While holding the glove box, remove the glove box stop (D) on each side. Remove the screws (E), then remove the glove box.
Fig. 3: Removing The Glove Box (3.2CL)
Courtesy of AMERICAN HONDA MOTOR CO., INC.

On both models, cut plastic cross brace in glove box opening.
Remove cross brace and 2 mounting screws from glove box opening. Remove filter lid from evaporator.
Pull out lower dust and pollen filter assembly. Remove filter from housing.
To install, reverse removal procedure. Ensure arrow marks on edge of filter face in direction of air flow. Ensure no air leaks from evaporator.
Align cross brace into glove box opening by aligning tabs with slots. Secure cross brace with 2 mounting screws.Reinstall glove box.
SPONSORED LINKS
Monday, April 26th, 2021 AT 11:58 AM


