Timing Belt Replacement?

Tiny
PPENNYK
  • MEMBER
  • 2008 HYUNDAI SANTA FE
  • 50,000 MILES
For scheduled 50,000 mile maintenance, I am being advised by the dealer that the timing belt should be replaced (sight unseen), to the tune of $600. I live in Denver, CO, and drive less than around 8,000 miles/yr. Is this really necessary and is this a reasonable cost can I do it myself?
Sunday, June 23rd, 2013 AT 9:17 AM

22 Replies

Tiny
CARADIODOC
  • MECHANIC
  • 33,908 POSTS
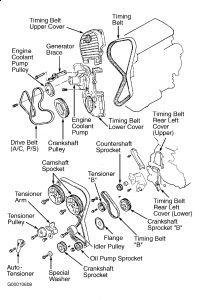
Sounds about right or even a little low for cost but since you didn't say which engine you have, I can't tell if you have an "interference" engine or not. Most import engines are of the interference design which means if the timing belt breaks you're in for a very expensive repair to replace bent valves. Here is how you can change the timing belt yourself.

https://www.2carpros.com/diagrams/hyundai/santa-fe/2005

Check out the diagrams (Below). Please let us know if you need anything else to get the problem fixed.
Was this
answer
helpful?
Yes
No
Sunday, June 23rd, 2013 AT 10:55 AM
Tiny
PPENNYK
  • MEMBER
  • 2 POSTS
Thank you for your response. My engine is a V6 3.3L DOHC 24-Valve, according to the original sticker.
Was this
answer
helpful?
Yes
No
Sunday, June 23rd, 2013 AT 11:04 AM
Tiny
KMONGOLD
  • MEMBER
  • 1 POST
  • 2005 HYUNDAI SANTA FE
  • 6 CYL
  • 4WD
  • AUTOMATIC
  • 47,996 MILES
I am being told that I need to replace my timing belt before I get to 50000 miles is that true? It runs just fine never have had any problems.
Was this
answer
helpful?
Yes
No
Monday, September 7th, 2020 AT 1:47 PM (Merged)
Tiny
KHLOW2008
  • MECHANIC
  • 41,814 POSTS
Hi kmongold,

Timing belt is a maintenance item that needs to be replaced when the recommended mileage is due. Failure to replace it would be catastropic if it breaks.

Check your owners manual for the recommended mileage, most cars have it at 60,000 miles
Was this
answer
helpful?
Yes
No
Monday, September 7th, 2020 AT 1:47 PM (Merged)
Tiny
ROBERTJ0929
  • MEMBER
  • 5 POSTS
  • 2004 HYUNDAI SANTA FE
Engine Mechanical problem
2004 Hyundai Santa Fe 4 cyl Two Wheel Drive Automatic

where do I find the timing marks for the cam shafts and cranck shaft
Was this
answer
helpful?
Yes
No
Monday, September 7th, 2020 AT 1:47 PM (Merged)
Tiny
EDWARD.S
  • MECHANIC
  • 166 POSTS
Hi, I Can Send You How To Do The Job, If You have Adobe Reader.

Hope This Helps You,
Good Luck

Edward S.
Was this
answer
helpful?
Yes
No
Monday, September 7th, 2020 AT 1:47 PM (Merged)
Tiny
ROBERTJ0929
  • MEMBER
  • 5 POSTS
Please send me the pics thank you
Was this
answer
helpful?
Yes
No
Monday, September 7th, 2020 AT 1:47 PM (Merged)
Tiny
MCAVINEE
  • MEMBER
  • 69 POSTS
  • 2004 HYUNDAI SANTA FE
  • 2.7L
  • V6
  • 2WD
  • AUTOMATIC
  • 1,000,000 MILES
I had to replace the motor mount and now I need to get everything lined back up.
Was this
answer
helpful?
Yes
No
Monday, September 7th, 2020 AT 1:48 PM (Merged)
Tiny
WRENCHTECH
  • MECHANIC
  • 20,761 POSTS
Here is the timing belt timing. Check out the diagrams (Below). Please let us know if you need anything else to get the problem fixed.
Was this
answer
helpful?
Yes
No
Monday, September 7th, 2020 AT 1:48 PM (Merged)
Tiny
BENTORWICK
  • MEMBER
  • 1 POST
  • 2004 HYUNDAI SANTA FE
  • 6 CYL
  • AWD
  • AUTOMATIC
  • 135,000 MILES
Can I tell if my 2004 Hyundai santa fe has had its timing belt changed. Its now done 135K Km. I have only owned it a week it has been service on a regular basis but the services provider won't supply me with what attcually was done when serviced.
Was this
answer
helpful?
Yes
No
Monday, September 7th, 2020 AT 1:48 PM (Merged)
Tiny
PROTECH1980
  • MEMBER
  • 901 POSTS
Thats gonna be hard to tell without service records, you could have a tech pull the top plastic cover and check condition of belt, manufacture suggests replacement every 60,000 miles so I would bet that you may be due for replacement.
Was this
answer
helpful?
Yes
No
Monday, September 7th, 2020 AT 1:48 PM (Merged)
Tiny
ELGASQUE
  • MEMBER
  • 1 POST
  • 2004 HYUNDAI SANTA FE
  • 67,000 MILES
No problem yet my question is why doesn, t Hyundai make a timing belt to last 100000 miles I have 67000 and plan to have it changed at 70000 miles most of these miles are city miles not freeway miles most of the time the car sits in the garage am leaving to go on a 1400 mile trip and hope all will be fine until I get back home
Was this
answer
helpful?
Yes
No
Monday, September 7th, 2020 AT 1:48 PM (Merged)
Tiny
CARADIODOC
  • MECHANIC
  • 33,908 POSTS
Because you would complain about the cost of such a belt. No one makes belts that last forever. They're rubber and they flex a huge amount up to a dozen times per revolution, and they dry-rot just from sitting. The better question is how can they make a belt to last so long?

You didn't list your engine size so I can't look up if you have an "interference" engine. Most import engines are of that design. If the timing belt breaks that results in bent valves which is a real expensive repair. All manufacturers recommend the belt be replaced at specific intervals to avoid that repair. Back in the late '80s Honda used to recommend the belt be replaced every 75,000 miles, ... And they typically broke at 65,000 miles. My old beat up '88 Grand Caravan with 402,000 miles is on its first replacement belt but that is not an interference engine so if it breaks it's not a big repair bill. Yours COULD last just as long as my original one did, but at $1000.00 to $3000.00 for a valve job, do you want to risk it or do you want to do some preventive maintenance?

Keep in mind the city miles you mentioned puts a real lot more wear on the timing belt than highway driving. The engine makes a lot more revolutions in a given mileage because it spends a lot of time idling at red lights, and when in first and second gears. Highway driving is the least stressful on the belt.
Was this
answer
helpful?
Yes
No
Monday, September 7th, 2020 AT 1:48 PM (Merged)
Tiny
EVERYME21
  • MEMBER
  • 3 POSTS
  • 2004 HYUNDAI SANTA FE
  • 2.4L
  • 4 CYL
  • FWD
  • MANUAL
  • 90,000 MILES
2004 Dohc 2.4 LHyundai Santa fe. The camshaft sprockets do not turn more than a quarter turn. The marks do not line up. What did I do and can it be remedied?
Was this
answer
helpful?
Yes
No
Monday, September 7th, 2020 AT 1:48 PM (Merged)
Tiny
CARADIODOC
  • MECHANIC
  • 33,908 POSTS
This is an "interference" engine meaning if the timing is off as little as three teeth, any open valves can be hit by the pistons. You didn't say what the history is that has led up to this point so I don't know if you had the cylinder head off and why, so I just have to guess. If you're replacing the timing belt just for normal maintenance, the camshaft sprockets turned due to the pressure of the valve springs pushing on the camshaft's lobes. All you have to do is put everything back in alignment, then slide the belt on. If the timing belt broke while you were driving, there's going to be bent valves and the cylinder head will have to be removed to replace them. Regardless of the cause, if you tried to forcibly turn one of the camshafts when it locked up, you may have also bent a valve.

Once the valves are replaced, if necessary, all you have to do to turn the camshafts is to move the pistons away from top dead center. Just turn the crankshaft 1/8th of a turn, put the camshaft sprockets in time, then bring the crankshaft back up to top dead center.
Was this
answer
helpful?
Yes
No
+1
Monday, September 7th, 2020 AT 1:48 PM (Merged)
Tiny
EVERYME21
  • MEMBER
  • 3 POSTS
It died shifting into 3rd(manual tran). When I got to the timing belt I saw that the teeth were sheered of in multiple spots. The code reader I used said crankshaft sensor error.
Was this
answer
helpful?
Yes
No
Monday, September 7th, 2020 AT 1:48 PM (Merged)
Tiny
CARADIODOC
  • MECHANIC
  • 33,908 POSTS
Once you get it timed and the belt installed, do a compression test. If you find it's real low, you'll need to have the bent valves replaced.
Was this
answer
helpful?
Yes
No
+1
Monday, September 7th, 2020 AT 1:48 PM (Merged)
Tiny
EVERYME21
  • MEMBER
  • 3 POSTS
Thanks much. I'll get on it tomorrow.
Was this
answer
helpful?
Yes
No
+2
Monday, September 7th, 2020 AT 1:48 PM (Merged)
Tiny
ENGLISHTALLPAUL
  • MEMBER
  • 1 POST
  • 2003 HYUNDAI SANTA FE
I wonder if you could send me some info on how to change the timing belt on a 2003 Hyundai Santa Fe 2.4 petrol/gasoline. I cannot access this info in the UK. I tried to get the information from the US Hyundai site But as I was not a US resident they declined to give me the information.


http://www.2carpros.com/forum/automotive_pictures/379813_work_001_1.jpg

Was this
answer
helpful?
Yes
No
Monday, September 7th, 2020 AT 1:48 PM (Merged)
Tiny
BMRFIXIT
  • MECHANIC
  • 19,053 POSTS
The manufacturer recommends the belt be replaced every 60,000 miles, except in California. In California, inspect timing belt at 60,000 miles, and replace as necessary.
REMOVAL & INSTALLATION

CAUTION: This application is an interference engine. Do not rotate camshaft or crankshaft when timing belt is removed, or engine damage may occur.

Removal
CAUTION:DO NOT rotate engine counterclockwise (as viewed from timing belt end of engine). If reusing timing belt, place reference mark on timing belt to indicate direction of rotation before removing.

Remove drive belts and drive pulleys from crankshaft and water pump.
Remove timing belt covers. To align timing marks, rotate engine clockwise so No. 1 cylinder is at TDC of compression stroke. Ensure camshaft sprocket timing marks align with upper surface of rocker cover. Dowel pin of camshaft sprocket should be pointing upward.
Remove timing belt auto tensioner.
If reusing timing belt, place mark on timing belt to indicate direction of belt rotation.
Remove timing belt.
Remove camshaft sprockets.
Remove plug at left side of block and insert a screwdriver to hold left counterbalance shaft in position. Screwdriver will have to be inserted at least 2.36" (60 mm). Remove oil pump sprocket nut and sprocket.
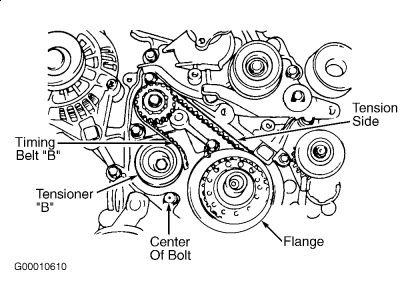
Loosen right counterbalance shaft sprocket mounting bolt. Remove tensioner "B" and timing belt "B". .

Inspection
Check belt teeth for cracks, damage and oil contamination.
Inspect sprockets for damage.
Check tensioner pulley and idler pulley for grease leakage and roughness in rotation.
Check sprockets and pulleys for wear, cracks or damage. Replace components if necessary.
Measure protrusion of auto tensioner rod.
From end of housing, auto tensioner rod should extend .55" (14 mm) on Sonata or .57" (15 mm) on Santa Fe. Replace auto tensioner rod, if not within specification. Place tensioner in a soft-jawed vise, and test resistance of rod. If rod can be easily pushed in with light vise pressure, replace auto tensioner.
Installation

Install crankshaft sprocket "B" onto crankshaft. Ensure flange is properly positioned. Lightly oil outer surface of spacer, and then install spacer onto right counterbalance shaft, with rounded edge of spacer inward.
Install counterbalance shaft sprocket. Tighten flange bolt tightly by hand. Align timing marks on each sprocket and on front case.
When installing timing belt "B", ensure there is no slack in tension side.
Install tensioner "B" in center of pulley of left side of mounting bolt, and in pulley flange toward front of engine.
Align timing mark of right counterbalance shaft sprocket with timing mark on front case.
To tighten timing belt "B", lift tensioner "B" so tension side is pulled tight. Tighten bolt to secure tensioner "B". DO NOT turn shaft, or belt will be over-tightened.
Ensure timing marks are aligned. Ensure center of span on tension side of timing belt "B" can be depressed by hand. Ensure belt deflection is .20-.28" (5-7 mm).
Install crankshaft sprocket flange and sprocket.
Ensure flange is mounted in proper direction, with chamfered side toward block.
Install special washer and sprocket bolt to crankshaft.
Tighten sprocket bolt to specification..
Insert long screwdriver through plug hole in left side of cylinder block to hold counterbalance shaft in position. Install oil pump sprocket, and tighten nut to specification
Install camshaft sprockets, and tighten bolts.
If auto tensioner rod is fully extended, place it in soft-jawed vise, and compress rod slowly until hole in rod lines up with hole in auto tensioner housing.
Insert stiff wire to hold rod in this position. Install auto tensioner, leaving wire in place.

CAUTION: If timing marks on camshaft sprockets do not line up properly, DO NOT rotate sprocket more than 2 teeth in either direction, or valve and piston will touch. If necessary to rotate camshaft sprocket more than 2 teeth, rotate crankshaft sprocket counterclockwise first based on the timing mark. After camshaft sprocket is properly timed, return crankshaft to TDC.

Install tensioner pulley onto tensioner arm (on 1999-01 models, pin holes should be in approximately 8 and 10 o'clock positions), and tighten bolt to specification.
timing marks of camshaft sprockets with notches on upper side of rocker cover and dowel pins straight up. Align crankshaft sprocket timing marks. Align oil pump sprocket timing marks.
On 1999-01 models, install timing belt around tensioner pulley and crankshaft sprocket. Secure belt onto tensioner pulley by hand. Pull other side of belt, and install it around oil pump sprocket. Install belt around idler pulley. Install belt around exhaust camshaft sprocket. Turn intake camshaft sprocket one tooth clockwise to align its timing mark with cylinder head top surface. Pull belt with both hands, and install around intake camshaft sprocket. Gently raise tensioner pulley so belt will not sag, and then temporarily tighten center bolt.
On 2002-05 models, align timing mark on each sprocket with the corresponding timing mark, and install the timing belt in the following order: crankshaft sprocket, oil pump sprocket, idler pulley, exhaust camshaft sprocket, intake camshaft sprocket, then tensioner pulley.
On all models, ensure timing mark of each sprocket is still aligned. When checking alignment of oil pump sprocket timing marks, remove plug from hole in left side of cylinder block and insert long screwdriver 2.36" (60 mm) or more to verify that counterbalance shaft is in position. After checking timing mark, reinstall plug using liquid gasket. Remove wire from auto tensioner.
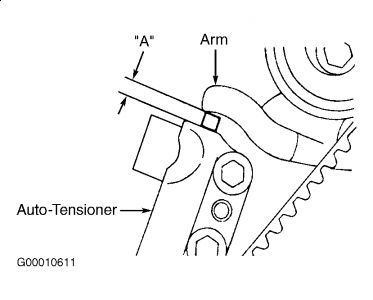
Rotate crankshaft 2 complete turns clockwise. Leave in this position for about 15 minutes. Measure auto tensioner protrusion "A" (distance between tensioner arm and auto tensioner body). Ensure auto tensioner protrusion is .24-.31" (6-8 mm).
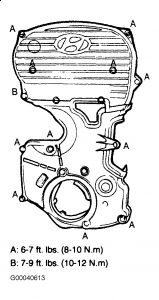
Install timing belt lower cover and upper cover. Note proper location of each bolt.

good luck
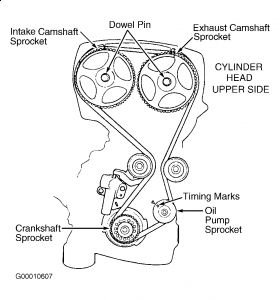

https://www.2carpros.com/forum/automotive_pictures/99387_Graphic2_202.jpg


https://www.2carpros.com/forum/automotive_pictures/99387_Graphic3_96.jpg


https://www.2carpros.com/forum/automotive_pictures/99387_Graphic4_48.jpg


https://www.2carpros.com/forum/automotive_pictures/99387_Graphic5_27.jpg


https://www.2carpros.com/forum/automotive_pictures/99387_Graphic6_17.jpg

Was this
answer
helpful?
Yes
No
+5
Monday, September 7th, 2020 AT 1:48 PM (Merged)

Please login or register to post a reply.

Sponsored links