Heater Core Removal

Tiny
DURANGOPROBLEM
  • MEMBER
  • 2000 DODGE DURANGO
  • 6 CYL
  • 4WD
  • AUTOMATIC
Is there anyway to take out a heater core of a 2000 dodge durango without taking the dash completely off?
Sunday, February 6th, 2011 AT 6:33 PM

68 Replies

Tiny
DOCFIXIT
  • MECHANIC
  • 18,828 POSTS
Hello,

Start by disconnecting the battery and draining the coolant and if the car has AC you will need to evacuate the system here are two guides to help walk you through the repair with instruction for how it is done on your truck below.

https://www.2carpros.com/articles/re-charge-an-air-conditioner-system

and

https://www.2carpros.com/articles/replace-heater-core

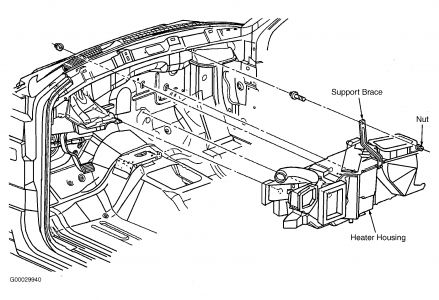
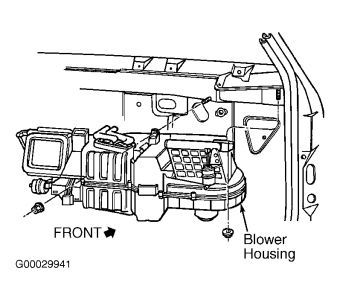
Check out the diagrams (Below). Please let us know if you need anything else to get the problem fixed.
Was this
answer
helpful?
Yes
No
+2
Sunday, February 6th, 2011 AT 9:01 PM
Tiny
PLEASEHELP
  • MEMBER
  • 1 POST
  • 2000 DODGE DURANGO
  • V8
  • 2WD
Need on replace the heater core in 2000 dodge durango
Was this
answer
helpful?
Yes
No
+5
Monday, January 7th, 2019 AT 6:23 PM (Merged)
Tiny
BMRFIXIT
  • MECHANIC
  • 19,053 POSTS
Is it leaking?
If not and not enough hot air
Should have it isolated and flush
if leaking and need to have it replaced let me know I will help you with directions
Was this
answer
helpful?
Yes
No
+3
Monday, January 7th, 2019 AT 6:23 PM (Merged)
Tiny
RASMATAZ
  • MECHANIC
  • 75,992 POSTS
REMOVAL

Remove the heater-A/C housing from the vehicle, and remove the housing cover. Refer to: Heating and Air Conditioning, Housing Assembly HVAC, Service and Repair, Front, Front HVAC Unit Removal and Installation, See: Housing Assembly HVAC Service and Repair Front Front HVAC Unit Removal and Installation
Heater Core Remove/Install

Lift the heater core out of the heater-A/C housing.
Was this
answer
helpful?
Yes
No
+1
Monday, January 7th, 2019 AT 6:23 PM (Merged)
Tiny
DOCFIXIT
  • MECHANIC
  • 18,828 POSTS
If going to replace youself suggest good manual like Mitchell that you can get from this site because instrument panel needs to be removed
Was this
answer
helpful?
Yes
No
+1
Monday, January 7th, 2019 AT 6:23 PM (Merged)
Tiny
JERRYDRAMTAHAL
  • MEMBER
  • 1 POST
  • 2000 DODGE DURANGO
  • V8
  • 4WD
  • AUTOMATIC
  • 160,000 MILES
In the summer I get no ac even after I gas it up and in the winter I get no heat. Its so bad that some type of foggy substance it coming out of the vents and steaming up the windshield. I believe its the heater care and I would like to know how to replace it
Was this
answer
helpful?
Yes
No
Monday, January 7th, 2019 AT 6:23 PM (Merged)
Tiny
BLUELIGHTNIN6
  • MECHANIC
  • 16,542 POSTS


https://www.2carpros.com/forum/automotive_pictures/261618_Noname_1387.jpg

Was this
answer
helpful?
Yes
No
+1
Monday, January 7th, 2019 AT 6:23 PM (Merged)
Tiny
OLII2D
  • MEMBER
  • 1 POST
  • 1998 DODGE DURANGO
  • V8
  • 4WD
  • AUTOMATIC
  • 130,000 MILES
How do I remove the heater core from a 1998 Dodge Durango?
Was this
answer
helpful?
Yes
No
-2
Monday, January 7th, 2019 AT 6:23 PM (Merged)
Tiny
BLUELIGHTNIN6
  • MECHANIC
  • 16,542 POSTS


https://www.2carpros.com/forum/automotive_pictures/261618_Noname_1272.jpg

Was this
answer
helpful?
Yes
No
-1
Monday, January 7th, 2019 AT 6:23 PM (Merged)
Tiny
RDSTEELE
  • MEMBER
  • 1 POST
  • 2001 DODGE DURANGO
Heater problem
2001 Dodge Durango V8 Four Wheel Drive Automatic

I would like to know how to replace the heater core in the durango.
Was this
answer
helpful?
Yes
No
+2
Monday, January 7th, 2019 AT 6:23 PM (Merged)
Tiny
BMRFIXIT
  • MECHANIC
  • 19,053 POSTS
HEATER SYSTEMS - RWD TRUCKS & VANS -2001 Dodge Durango

INSTRUMENT PANEL

Removal & Installation (Dakota & Durango)
1.Disconnect negative battery cable. Disable air bag system. See AIR BAG SYSTEM SAFETY article in GENERAL SERVICING. Place front wheels in straight-ahead position. Remove door sill trim from both doorways. Remove kick panel covers from both sides of vehicle. Remove mounting bolts for hood release handle. Remove knee bolster.
2.Remove steering column trim panel and support bracket. If equipped, remove tilt steering column lever. Remove upper and lower shrouds from steering column. Disconnect driver's side air bag module. Loosen multifunction switch wiring harness connector screw and disconnect from switch. Screw will remain in connector.
3.Disconnect PRNDL cable. Disconnect shift cable from steering column. Remove steering coupler lock pin. Remove toe plate retaining bolts. Remove steering column mounting bolts and remove steering column from vehicle.
4.Remove screw from bulkhead wiring harness connector and disconnect. Disconnect 2 body wiring harness connectors, located next to bulkhead connector. Disconnect 3 wiring harness connectors, located nearest to dash panel junction block. Disconnect brake light switch. If equipped, disconnect Rear Wheel Anti-Lock (RWAL) brake module, located near steering column support brackets.
5.Disconnect plastic retainer clip from parking brake linkage rod, located at back of parking brake release handle. Remove rod end from parking brake handle. Remove instrument panel center support bracket. Unplug vacuum harness connector located at left end of heater assembly housing. Disconnect Air Bag Control Module (ACM) connector.
6.Remove glove box. Reach through glove box opening and disconnect antenna coaxial cable. Disconnect blower motor connector located above glove box opening, near support brace for heater assembly housing. Disconnect radio ground strap. Loosen instrument panel roll-down bracket bolts about 2 turns (bolts are located at lower corners, on both sides of instrument panel) . Remove 5 bolts across top of dash panel, at base of windshield, removing center screw last.
7.Roll down instrument panel and install a temporary support hook that is about 18" (457 mm) in length. Install hook from center hole in instrument panel to center hole of dash panel. Pull lower instrument panel outward until both roll-down bracket bolts are in slotted roll-down pivot position . Instrument panel should now be supported and away from firewall.
8.Disconnect 2 body wiring harness connectors, located on a bracket near right end of instrument panel. Disconnect blower motor resistor. Disconnect temperature control cable from heater assembly housing and remove from housing. Disconnect defrost duct flexible hose from heater assembly housing.
9.Ensure all electrical and vacuum connectors are disconnected and instrument panel is free and clear for removal. With the aid of an assistant, remove temporary support hook. Lift instrument panel off of roll-down bracket bolts and remove from vehicle.
10.To install, reverse removal procedure. Ensure all wiring and hoses are clear and not pinched. Adjusting temperature control cable. Tighten bolts and nuts to specification.. Enable air bag system.

1.Disconnect negative battery cable. Ensure front wheels are in a straight-ahead position and steering wheel is in LOCKED position. Disable air bag system. Remove Air Bag Control Module (ACM) and bracket from floor panel transmission tunnel. Drain cooling system.
2.Remove left and right cowl side inner trim panels. Remove knee bolster/steering column cover. Remove hood release and parking brake release handle bolts from lower instrument panel support.
3.Disconnect driver's side air bag connector at lower left corner of instrument panel. If equipped, disconnect overdrive lock-out switch wiring harness connector from instrument panel wire harness near instrument panel lower reinforcement.
4.Pull PRNDL cable and twist to remove from position arm. Push tab on bottom of cable retainer upward, then squeeze sides to remove retainer from column. If equipped, remove tilt lever. Remove both upper and lower shrouds from column. Remove lower fixed column shroud. Loosen multifunction switch connector screw. Screw will remain in connector.
5.Ensure steering wheel is in LOCKED position. Remove remaining steering column electrical connectors. Remove air bag wiring harness from steering column wiring trough. Remove wiring trough from steering column. Remove steering column as an assembly from vehicle.
6.From driver's side of instrument panel, disengage parking brake release linkage rod from parking brake mechanism. Disconnect instrument panel wiring harness from parking brake mechanism. Disconnect 3 wiring harness bulkhead connectors located closest to dash panel.
7.Disconnect instrument panel left side wiring harness connectors. Remove screw from center of headlight and dash-to-instrument panel (bulkhead) connector, and disconnect connector. Disconnect instrument panel-to-door wiring harness. Disconnect instrument panel to stoplight switch connector. Disconnect vacuum harness for heater system.
8.If vehicle is equipped with Infinity sound system, disconnect Infinity wiring harness connector from instrument panel harness connector that is secured to bulkhead connector.
9.From passenger's side of instrument panel, disconnect radio antenna coaxial cable connector. Loosen right and left instrument panel roll-down bracket bolts about .50" (13 mm) . Removing center screw last, remove 5 bolts holding top of instrument panel to top of dash panel.
10.Roll instrument panel downward and install a temporary support hook to center hole of dash panel. Support hook should support instrument panel in rolled down position, about 18" (457 mm) away from dash panel. Disconnect remaining wiring harness connectors. With the aid of an assistant, remove temporary hook and lift instrument panel from vehicle.
11.To install, reverse removal procedure Ensure all wiring and hoses are clear and not pinched. Tighten bolts and nuts to specification . Enable air bag system.
https://www.2carpros.com/forum/automotive_pictures/99387_Graphic1_225.jpg


https://www.2carpros.com/forum/automotive_pictures/99387_Graphic2_107.jpg

Was this
answer
helpful?
Yes
No
Monday, January 7th, 2019 AT 6:23 PM (Merged)
Tiny
MIGUELALEY
  • MEMBER
  • 1 POST
  • 1999 DODGE DURANGO
  • V8
  • 4WD
  • AUTOMATIC
  • 150,000 MILES
It is hard to change the heater core? And how you can change?
Was this
answer
helpful?
Yes
No
Monday, January 7th, 2019 AT 6:23 PM (Merged)
Tiny
BLUELIGHTNIN6
  • MECHANIC
  • 16,542 POSTS
REMOVAL/INSTALLATION:
Disconnect the battery negative cable.
Remove the instrument panel from the vehicle.
If equipped with air conditioning, recover the refrigerant.
Disconnect the liquid line refrigerant line fitting from the evaporator inlet tube.
Ram: remove the accumulator.
Disconnect the accumulator inlet tube.
Drain the cooling system.
Disconnect the heater hoses from the heater core tubes.
Ram: remove the powertrain control module from the dash panel. Disconnecting wiring is not necessary.
Remove the four nuts from the heater-A/C mounting studs on the engine compartment side of the dash panel.
Remove the nut(s) that secure(s) the heater-A/C housing mounting brace to the stud(s) on the passenger compartment side of the dash board.
Pull the housing rearward far enough for the mounting studs and evaporator condensate drain tube to clear the dash panel holes.
Remove the housing from the vehicle.
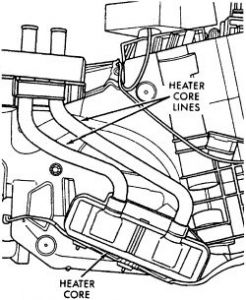
Lift the heater core out of the housing.
Installation is the reverse of removal.


https://www.2carpros.com/forum/automotive_pictures/261618_1_28.jpg


Thanks for using 2CarPros.com!
Was this
answer
helpful?
Yes
No
Monday, January 7th, 2019 AT 6:23 PM (Merged)
Tiny
GOSSOMERR
  • MEMBER
  • 1 POST
  • 1999 DODGE DURANGO
  • V8
  • 4WD
  • AUTOMATIC
  • 140,000 MILES
I am trying to replace the heater core. I have the dash and steering column out. I have found 2 10mm bolts on the engine side of the firewall. Where are the others and how many are there?
Was this
answer
helpful?
Yes
No
Monday, January 7th, 2019 AT 6:23 PM (Merged)
Tiny
BMRFIXIT
  • MECHANIC
  • 19,053 POSTS
HEATER ASSEMBLY
Removal (Dakota & Durango)

Disconnect negative battery cable. Drain cooling system.
Remove instrument panel.
In engine compartment, disconnect heater hoses and plug all openings. Remove 4 heater assembly nuts from engine compartment firewall. Inside vehicle, remove heater assembly support brace screw, and swing support brace out of way. Move passenger seat rearward.
Carefully pull heater assembly rearward until studs and heater core tubes clear firewall. Lower heater assembly and rotate assembly until studs are facing downward. Remove heater assembly from vehicle.
Place heater assembly on work bench with assembly housing cover facing down. Remove 2 bolts securing heater assembly housing cover to blower motor housing cover. Unplug vacuum harness connector from panel/defrost door actuator.
Remove floor duct from heater assembly housing. Remove 2 bolts securing heater assembly housing cover to lower housing near floor outlet. Turn assembly over. Disengage vacuum harness retainer and vacuum harness. Remove 13 screws securing housing cover.
Remove blend-air door lever. Gently pry panel-defrost door lever off. Pull up on heater assembly housing cover far enough to separate cover sealant and remove cover.
Was this
answer
helpful?
Yes
No
-1
Monday, January 7th, 2019 AT 6:23 PM (Merged)
Tiny
5PINEJACS
  • MEMBER
  • 1 POST
  • 1998 DODGE DURANGO
  • V8
  • 4WD
  • AUTOMATIC
  • 121,000 MILES
I have checked numerous sites about heater core replacement in a 98' Durango and all but your site say dash must be removed to get to it. Is this true? This is in my daughters car and was thinking I would have to take to a shop and pay around $1000 to have done. The other sites also say you need to evacuate air conditioner and disconnect airbag. Please provide more information.

Thanks
Was this
answer
helpful?
Yes
No
+1
Monday, January 7th, 2019 AT 6:23 PM (Merged)
Tiny
MERLIN2021
  • MECHANIC
  • 17,250 POSTS
All of the above is true! Instrument panel, A/C discharge, and even steering column is advised, but not mentioned. Air bag disable too!
1. Disconnect negative battery cable. Drain cooling system. Remove instrument panel. 2. In engine compartment, disconnect heater hoses and plug all openings. Remove 4 heater assembly nuts from engine compartment firewall. Inside vehicle, remove heater assembly support brace screw, and swing support brace out of way. Move passenger seat rearward. 3. Carefully pull heater assembly rearward until studs and heater core tubes clear firewall. Lower heater assembly and rotate assembly until studs are facing downward. Remove heater assembly from vehicle. 4. Place heater assembly on work bench with assembly housing cover facing down. Remove 2 screws securing heater assembly housing cover to blower motor housing cover. Unplug vacuum harness connector from panel/defrost door actuator. 5. Remove floor duct from heater assembly housing. Remove 2 screws securing heater assembly housing cover to lower housing near floor outlet. Turn assembly over. Disengage vacuum harness retainer and vacuum harness. Remove 13 screws securing housing cover. 6. Remove blend-air door lever. Gently pry panel-defrost door lever off. Pull up on heater assembly housing cover far enough to separate cover sealant and remove cover. Installation - Ensure blower motor housing cover sealant is in place and in good condition. To complete installation, reverse removal procedure.
Was this
answer
helpful?
Yes
No
Monday, January 7th, 2019 AT 6:23 PM (Merged)
Tiny
CIXTHEZE
  • MEMBER
  • 1 POST
  • 1999 DODGE DURANGO
Heater problem
1999 Dodge Durango V8 Four Wheel Drive Automatic

I have a 99 dodge durango and I need step by step help on the removal of a heater core. I've been let down by other so called helpers today and seriously would be greatly appreciated if you can help me.
Was this
answer
helpful?
Yes
No
-1
Monday, January 7th, 2019 AT 6:23 PM (Merged)
Tiny
JACOBANDNICKOLAS
  • MECHANIC
  • 109,747 POSTS
Here is what I found:

REMOVAL & INSTALLATION

Disconnect the battery negative cable.
Remove the instrument panel from the vehicle.
If equipped with air conditioning, recover the refrigerant.
Disconnect the liquid line refrigerant line fitting from the evaporator inlet tube.
Ram: remove the accumulator.
Dakota, Durango: disconnect the accumulator inlet tube.
Drain the cooling system.
Disconnect the heater hoses from the heater core tubes.
Ram: remove the powertrain control module from the dash panel. Disconnecting wiring is not necessary.
Remove the four nuts from the heater-A/C mounting studs on the engine compartment side of the dash panel.
Remove the nut(s) that secure(s) the heater-A/C housing mounting brace to the stud(s) on the passenger compartment side of the dash board.
Pull the housing rearward far enough for the mounting studs and evaporator condensate drain tube to clear the dash panel holes.
Remove the housing from the vehicle.
Lift the heater core out of the housing.
Installation is the reverse of removal.

Let me know if it helps.
Was this
answer
helpful?
Yes
No
Monday, January 7th, 2019 AT 6:23 PM (Merged)
Tiny
TANDBERGII
  • MEMBER
  • 3 POSTS
Greetings, im ed, heres what ive done so far, 1 bolt and H.C. Hoses from drivers side. 3 bolts and ac housing fron pass side. It seems the block under the ac housing has star bolts which are virtually locktighted on. Wd40 and a 14 volt dewalt drill have not losened them. But will that block pull through the firewall? Theres a wiring attaching block set on a metal block at the centerconsole inside the cab, but the hvac block itself seems stuck in the middle somewhere, a blot I cant spot? Any ideas?
Was this
answer
helpful?
Yes
No
-1
Monday, January 7th, 2019 AT 6:23 PM (Merged)

Please login or register to post a reply.

Sponsored links