Hi and thanks for using 2CarPros.com. First, when it does not start, you need to check if the engine is getting spark and fuel. Here are general directions for both:
https://www.2carpros.com/articles/how-to-check-fuel-system-pressure-and-regulator
https://www.2carpros.com/articles/how-to-test-an-ignition-system
One of these elements will be missing. Once you determine which one it is, then we can focus on a specific component. Something tells me that when you replaced the belt, you may have damaged one of the wires going to the crankshaft position sensor. NOTE: If you have a real time scanner, check to see if there is a signal from the aforementioned sensor. If there is no signal, check wiring. If wiring is good, replace sensor.
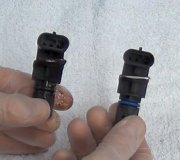
I have attached directions for removing and replacing the sensor. Additionally, I have attached pictures to help guide you.
1995 Honda Truck Passport 4WD V6-3.2L SOHC (6VD1)
Vehicle � Powertrain Management � Computers and Control Systems � Crankshaft Position Sensor � Service and Repair
SERVICE AND REPAIR
REMOVAL
Preparation: Disconnect Battery Ground Cable. Remove Exhaust & Transfer Protector. Disconnect Front Propeller Shaft Joint.
Disconnect Wiring Connector.
Remove Mounting Nut from the exhaust and transfer protector.
Remove Crankshaft Position (CKP) Sensor
INSTALLATION
To install, follow the removal steps in the reverse order.
Install Crankshaft Position Sensor into the Cylinder Block.
NOTE: Before installation, apply small amount of Engine oil to the O-Ring.
Torque: 9 N.m (78 lb.in)
Tighten the Mounting Bolt of the exhaust and transfer protector to the specified torque.
Torque: 63 N.m (46 lb.ft)
Reconnect the Wiring Connector.
Connect Front Propeller Shaft Joint and tighten to the specified torque.
Torque: 37 N.m (27 lb.ft)
Connect Battery Ground Cable.
Tighten the Exhaust & Transfer Protector Fixing Bolt to the specified torque
If you find that spark is missing, the first concern is the crank sensor in this situation.
Here are specific directions for checking fuel pump pressure for your vehicle.
1995 Honda Truck Passport 4WD V6-3.2L SOHC (6VD1)
Vehicle � Engine, Cooling and Exhaust � Engine � Fuel Pressure � Testing and Inspection � Test 1 of 3
TEST 1 OF 3
Circuit Description
The Fuel Pump delivers Fuel to the Fuel Rail and Injectors, where the system pressure is controlled from 280 to 320 kPa (41 to 46 psi) by the Fuel Pressure Control Valve. Excess fuel is returned to the Fuel Tank. When the Engine is stopped, the Pump can be energized by jumping the Fuel Pump Relay Connector with a fused jumper.
Test Description
Number(s) below refer to circled number(s) on the diagnostic chart.
Use Pressure Gauge J-34730-1. Wrap a shop towel around the Fuel Pressure Tap to absorb any small amount of fuel leakage that may occur when installing the Gauge. (The pressure will not leak down after the Fuel Pump is stopped on a correctly functioning system.)
While the Engine is idling, Manifold Absolute Pressure is low (high vacuum). When this is applied to the Fuel Regulator Diaphragm the vacuum will result in a lower fuel pressure at about 190 - 200 kPa (25 - 30 psi).
The application of high vacuum to the Fuel Pressure Control Valve should result in a Fuel pressure drop.
Fuel pressure leak-down may be caused by one of the following:
Fuel Pump Check Valve not holding.
Pump Coupling Hose leaking.
Fuel Pressure Control Valve leaking.
Injector sticking open/leaking.
NOTE: Fuel System is under pressure. To avoid Fuel spillage, refer to field service procedures for testing or repairs requiring disassembly of Fuel Lines or Fittings. Refer to part 3 of 3 of this chart.
Diagnostic Aids
Improper Fuel System pressure may contribute to one or all of the following symptoms:
Cranks but will not run.
Diagnostic Trouble Code 44 or 45.
Cutting out (May feel like Ignition problem).
Hesitation, loss of power or poor Fuel economy.
Picture 4 is a flow chart to help diagnose fuel related issues.
Let me know if you have other questions or need additional help. Remember, we must first determine which system is causing the no start. Once we do that, the repair will be much easier.
Take care,
Joe
Images (Click to make bigger)
Friday, June 1st, 2018 AT 8:50 PM


