Hello -
I believe this is the info you are requesting.
Headlamps, removing and installing
NOTE: "¢ It is not necessary to disconnect battery.
"¢ Illustrations depict removal and installation of left headlamp.
Removing:
"¢ Switch off ignition, switch off all electrical components and remove ignition key.
"¢ Press against headlamp.
Fig. 267: Turning Locking Bolt In Direction Of Arrow Open (Sticker)
Courtesy of VOLKSWAGEN UNITED STATES, INC.
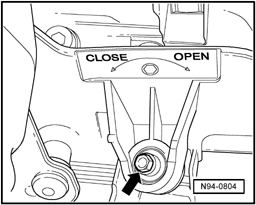
"¢ Turn locking bolt - arrow - in - direction of arrow Open (sticker) - until resistance is felt.
NOTE: "¢ Do not use force to turn bolt further, otherwise the locking mechanism will be destroyed.
Headlamp is pushed toward front.
"¢ Pull headlamp out of opening on body until resistance is felt.
Fig. 268: Identifying Locking Clip
Courtesy of VOLKSWAGEN UNITED STATES, INC.
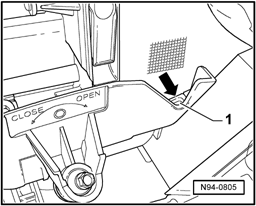
"¢ Hold locking clip - 1 - pressed - arrow - and remove headlamp from opening on body.
Installing:
Fig. 269: Identifying Guides
Courtesy of VOLKSWAGEN UNITED STATES, INC.
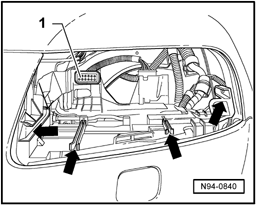
NOTE: "¢ Guides - arrows - must be free of dirt.
"¢ Check connector - 1 - in headlamp mount for proper fitting before inserting headlamp into guides.
"¢ Set headlamp into guides - arrows -.
"¢ Slide headlamp into opening on body.
NOTE: "¢ A significant "clicking" must be audible. Securing clip engages.
Fig. 270: Turning Locking Bolt In Direction Of Arrow Open (Sticker)
Courtesy of VOLKSWAGEN UNITED STATES, INC.

"¢ Turn locking bolt - arrow - in - direction of arrow Close (sticker) - until resistance is felt.
"¢ Press lightly against headlamp and turn further in - direction of Close arrow (sticker) -.
Securing bracket must engage audibly.
NOTE: "¢ Do not use force to turn bolt further, otherwise the locking mechanism will be destroyed.
"¢ Check installation position of headlamp for uniform gap dimensions.
If the gaps are uneven in relation to body, headlamp position must be corrected → Headlamp installation position, correcting.
"¢ Check headlamp for function.
Feb 28, 2009 at 6:51 PM