Hello -
Good on you for attempting this. Just a couple of things if I may.
First, allow yourself plenty of time. Go slow and keep track of the order of things.
The information I am attaching shows a complete over hall of the door. You shouldn't have to do all of that. Just remove what you need to so do not do all of the steps.......just to the part to where you can do the lock. I just attached it all for your reference.
Be careful.....many of these parts are sharp.
Note the tools and my advice is if you notice in step 4b, purchase new clips.....many times they brake and you can not properly put the door panel back on. I normally just replace them all.
If you notice - to work on that bolt for the glass you would stop at step 14.....so as you see they don't get to the lock.
Not sure if you have manual windows or electric.....manual - the handle is held on with a clip....look at the last pic.....
Please review all of this and if you have any questions please let me know and I will do what I can.
Good luck!
Thanks for the donation
Please let us know if what the final fix was for your car so we can better assist others. Thanks!
Find a car repair manual for your car repair questions.
OVERHAUL
HINT:
The installation procedures are the removal procedures in reverse order. However, only installation procedures requiring additional information are included.
Use the same procedures for the RH side and LH side.
The procedures listed below are for the LH side.
A bolt without a torque specification is shown in the standard bolt chart.
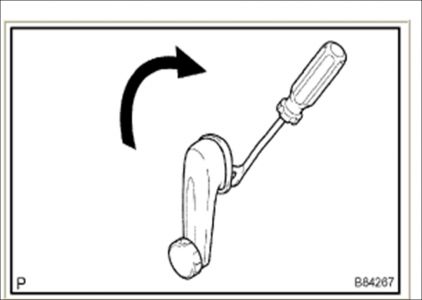
REMOVE FRONT DOOR WINDOW REGULATOR HANDLE ASSEMBLY (W/O POWER WINDOW)
Insert a clip remover between the plate and trim.
Maintain the position in (a) and turn the handle as shown in the illustration to remove the handle.
REMOVE FRONT DOOR PULL HANDLE LH
Remove the screw.
Using a screwdriver, remove the door pull handle. HINT: Tape the screwdriver tip before use.
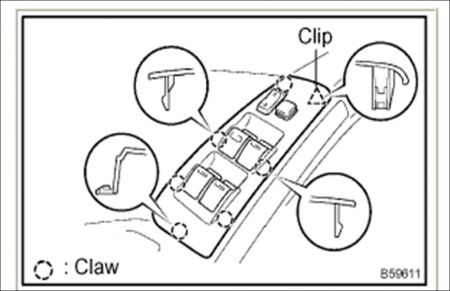
REMOVE POWER WINDOW REGULATOR MASTER SWITCH ASSEMBLY (W/ POWER WINDOW)
Using a screwdriver, disengage the clip, 6 claws, remove the power window regulator master switch from the trim board. HINT: Tape the screwdriver tip before use.
Disconnect the master switch connector.
Remove the 3 screws and base panel from the master switch.
REMOVE FRONT ARMREST BASE PANEL UPPER LH (W/O POWER WINDOW)
w/o Power door lock: Remove the front armrest base panel upper.
Using a screwdriver, remove the front armrest base panel upper from the trim board. HINT: Tape the screwdriver tip before use.
w/ Power door lock: Remove the front armrest base panel upper.
Using a screwdriver, remove the front armrest base panel upper from the trim board. HINT: Tape the screwdriver tip before use.
Disconnect the door lock switch connector.
Remove the door lock switch from the base panel.
REMOVE FRONT DOOR LOWER FRAME BRACKET GARNISH LH
Using a screwdriver, disengage the clip and claw, and remove the garnish. HINT: Tape the screwdriver tip before use.
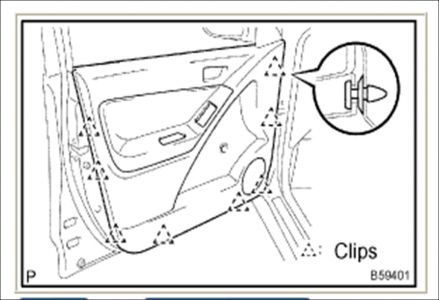
REMOVE FRONT DOOR TRIM BOARD SUB-ASSEMBLY LH
Remove the screw.
Using a screwdriver, disengage the 7 clips and then pull the trim board upward to remove it. HINT: Tape the screwdriver tip before use.
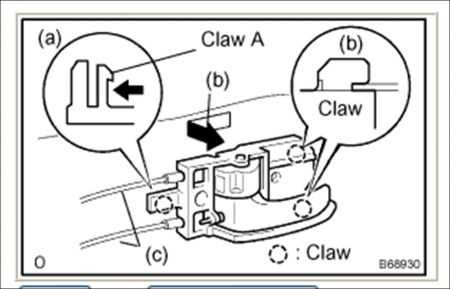
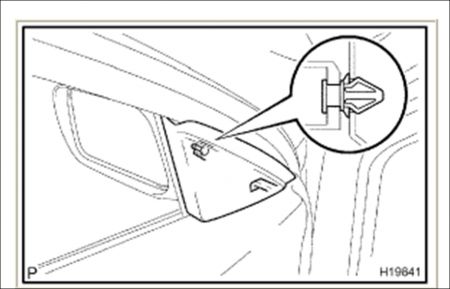
REMOVE FRONT DOOR INSIDE HANDLE SUB-ASSEMBLY LH
Using a screwdriver, disengage claw A. HINT: Tape the screwdriver tip before use.
Move the inside handle in the direction indicated by the arrow mark in the illustration. This will release the claw and allow removal of the inside handle.
Disconnect the 2 cables from the inside handle.

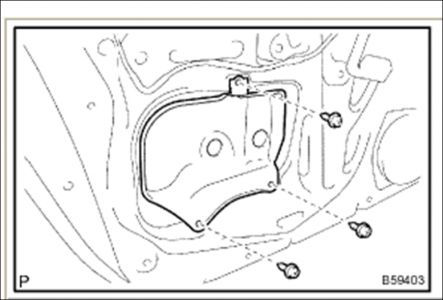
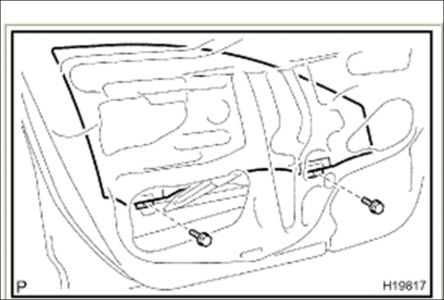
REMOVE FRONT DOOR SERVICE HOLE COVER LH
Remove the 2 screws and bracket.
Remove the service hole cover. NOTE: Remove the remaining tape on the body.
Remove the 2 screws and reinforcement.
REMOVE OUTER REAR VIEW MIRROR ASSEMBLY LH
REMOVE FRONT DOOR BELT MOULDING ASSEMBLY LH
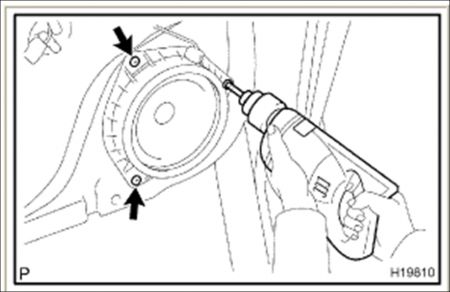
REMOVE FRONT NO.1 SPEAKER ASSEMBLY
Disconnect the speaker connector.
Using a drill of less than Dia. 4 mm (0.16 in.) , drill out the 3 rivet heads and remove the speaker. NOTE:
Be sure to gently place the drill perpendicular to the rivet to prevent the rivet hole and the drill itself from being damaged.
Be careful with the cut rivet, because it is hot.
Even if the flange is taken off, continue drilling and push out the remaining fragments with the drill.
Using a vacuum cleaner, remove the drilled rivet and dust from the inside of the door.
REMOVE FRONT DOOR INSIDE PANEL PLATE LH
Remove the 3 screws and inside panel plate.
REMOVE FRONT DOOR GLASS SUB-ASSEMBLY LH HINT: Insert a cushion inside the door panel to prevent the glass from being scratched.
Driver's side: Temporarily install the window regulator master switch.
Passenger's side: Temporarily instal the power window regulator switch.
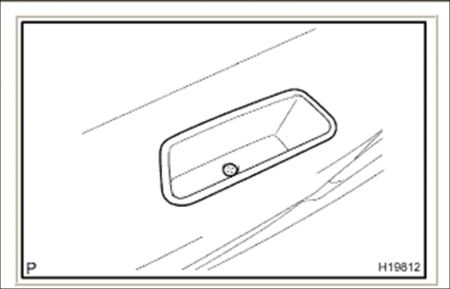
Move the door glass until the bolts appear in the service holes.
Remove the 2 bolts. NOTE: Be careful when removing the bolts as the glass may fall and become damaged.
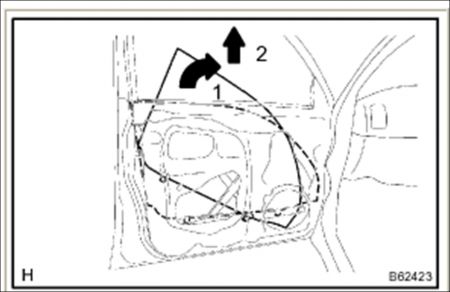
Remove the door glass in the direction indicated by the arrow marks in the illustration. NOTE: Be careful not to damage the glass.
Driver's side: Remove the window regulator master switch.
Passenger's side: Remove the power window regulator switch. HINT: Pull the glass upward to remove it.
REMOVE FRONT DOOR GLASS RUN LH
Remove the glass run.
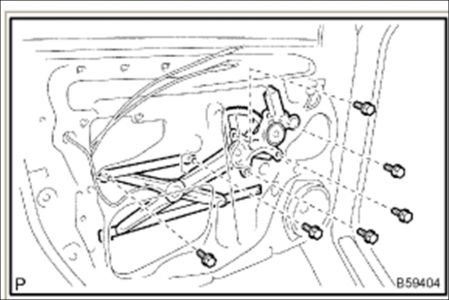
REMOVE FRONT DOOR WINDOW REGULATOR SUB-ASSEMBLY LH (W/O POWER WINDOW)
Loosen the 6 bolts. NOTE: Be careful when removing the bolts as the window regulator may fall and become damaged.
Remove the 6 bolts and window regulator. HINT : Remove the window regulator through the service hole.
REMOVE FRONT DOOR WINDOW REGULATOR SUB-ASSEMBLY LH (W/ POWER WINDOW)
Disconnect the window regulator connector.
Loosen the 6 bolts. NOTE: Be careful when removing the bolts as the window regulator may fall and become damaged.
Remove the 6 bolts and front door window regulator. HINT: Remove the window regulator through the service hole.
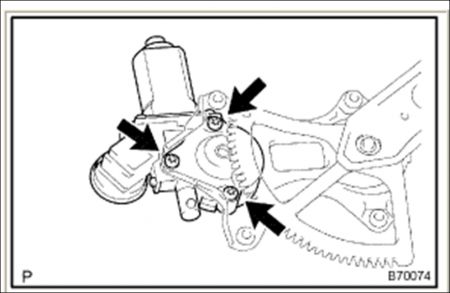
REMOVE POWER WINDOW REGULATOR MOTOR ASSEMBLY LH (W/ POWER WINDOW)
Place matchmarks on the window regulator motor bracket and regulator gear.
Remove the 3 screws and motor.
REMOVE FRONT DOOR FRAME SUB-ASSEMBLY REAR LOWER LH
Remove the bolt and frame. HINT: Remove the frame through the service hole. NOTE: Be careful when removing the bolt as the frame may fall and become damaged.
REMOVE FRONT DOOR OUTSIDE HANDLE COVER LH
Remove the hole plug.
Using a torx wrench (T30), loosen the screw and remove the cover with the door lock key cylinder installed.
REMOVE FRONT DOOR LOCK ASSEMBLY LH (W/O POWER DOOR LOCK)
Using a torx wrench (T30), remove the 3 screws and door lock. HINT: Remove the door lock through the service hole. NOTE: Be careful when removing the bolts as door lock may fall and become damaged.
Remove the door lock wire harness packing.
REMOVE FRONT DOOR W/MOTOR LOCK ASSEMBLY LH (W/ POWER DOOR LOCK)
Disconnect the power door lock connector.
Using a torx wrench (T30), remove the 3 screws and the door lock. HINT: Remove the door lock through the service hole. NOTE: Be careful when removing the bolts as door lock may fall and become damaged.

REMOVE FRONT DOOR HANDLE ASSEMBLY OUTSIDE LH
Pushing the outside handle in the arrow mark direction in the illustration, remove the outside handle.
REMOVE FRONT DOOR OUTSIDE HANDLE FRAME SUB-ASSEMBLY LH
Using a torx wrench (T30), loosen the screw of the frame.
Using pliers, disengage the clips and remove the handle frame, as shown in the illustration. NOTE: Be sure to remove the outside handle together with the clips, because the clips will be damaged if the clips remain attached to the door panel.
REMOVE FRONT DOOR WEATHERSTRIP LH
Remove the door panel side bolt and disconnect the check.
Using a clip remover, remove the weatherstrip. HINT: If clips are damaged during removal, replace them.
INSTALL FRONT DOOR WEATHERSTRIP LH
Install the weatherstrip.
Apply adhesive to the threads of the bolt. Adhesive: Part No. 08833-00070, THREE BOND 1324 or equivalent
Install the check to the body panel with the bolt. Torque: 30 N.m (306 kgf.cm, 22 in.lbf)
INSTALL FRONT DOOR OUTSIDE HANDLE FRAME SUB-ASSEMBLY LH
Install the lock open rod.
Apply MP grease to the sliding areas of the frame.
Using a torx wrench (T30), install the outside handle. Torque: 4.0 N.m (41 kgf.cm, 35 in.lbf)
INSTALL FRONT DOOR LOCK ASSEMBLY LH (W/O POWER DOOR LOCK)
Install a new door lock wire harness packing.
Apply MP grease to the sliding and rotating areas of the door lock.
Apply adhesive to the 3 screws. Part No. 08833-00070, THREE BOND 1324 or equivalent
Using a torx wrench (T30), install the door lock with the 3 screws. Torque: 5.0 N.m (51 kgf.cm, 44 in.lbf)
INSTALL FRONT DOOR W/MOTOR LOCK ASSEMBLY LH (W/ POWER DOOR LOCK)
Apply MP grease to the sliding and rotating areas of the door lock.
Install a new door lock wire harness packing. NOTE:
When reinstalling a door lock, always use new packing.
Do not allow grease or dirt to contaminate the gap between the door panel and packing.
Old packing or damaged packing cannot effectively protect against water. Water will damage the door lock.
Insert the control rod into the door lock, and then set it to the door panel. NOTE: Make sure that the rod is securely engaged with the lock.

Apply adhesive to the threads of the 3 screws. Adhesive: Part No. 08833-00070, THREE BOND 1324 or equivalent
Using a torx wrench (T30), install the door lock with the 3 screws. Torque: 5.0 N.m (51 kgf.cm, 44 in.lbf)
Connect the power door lock connector.
INSTALL FRONT DOOR OUTSIDE HANDLE COVER LH
Using a torx wrench (T30), install the cover (with the door lock key cylinder installed) with the screw. Torque: 4.0 N.m (41 kgf.cm, 35 in.lbf)
Install the hole plug.
STALL FRONT DOOR FRAME SUB-ASSEMBLY REAR LOWER LH
Install the frame with the bolt. Torque: 6.2 N.m (63 kgf.cm, 55 in.lbf)
INSTALL POWER WINDOW REGULATOR MOTOR ASSEMBLY LH (W/ POWER WINDOW)
Align the matchmarks on the regulator motor bracket and regulator gear.
Install the motor with the 3 screws. Torque: 5.4 N.m (55 kgf.cm, 48 in.lbf) HINT: Never rotate the motor down word until the window glass installation is completed.
INSTALL FRONT DOOR WINDOW REGULATOR SUB-ASSEMBLY LH (W/ POWER WINDOW)
Apply MP grease to the sliding and rotating areas of the window regulator. NOTE: Do not apply grease to the spring of the window regulator.
Install the regulator with the 6 bolts. Torque: 8.0 N.m (82 kgf.cm, 71 in.lbf)
Connect the window regulator connector.
INSTALL FRONT DOOR WINDOW REGULATOR SUB-ASSEMBLY LH (W/O POWER WINDOW)
Apply MP grease to the sliding and rotating parts of the window regulator. NOTE: Do not apply grease to the spring of the window regulator.
Install the window regulator with the 5 bolts. Torque: 8.0 N.m (82 kgf.cm, 71 in.lbf)
INSTALL FRONT DOOR GLASS SUB-ASSEMBLY LH (W/ POWER WINDOW)
Install the glass run. NOTE: Do not damage the door glass.
Insert the door glass into the door panel along the glass run as indicated in the illustration.
Install the door glass to the window regulator with the 2 bolts. Torque: 8.0 N.m (82 kgf.cm, 71 in.lbf)
INSPECT POWER WINDOW FUNCTION (W/POWER WINDOW)
INSTALL FRONT NO.1 SPEAKER ASSEMBLY
Using a hand riveter or an air riveter, install the speaker to the door with the 3 rivets.
NOTE: Do not prize the riveter. The riveter will be damaged and the mandrel will bend.
Do not tilt the riveter when fastening the rivet to the speaker as this will cause the rivet to be loose.
Do not have any space between the rivet head and the speaker. The rivet head must be completely flat against the speaker.

Do not have any space between the speaker and door. Firmly hold together the 2 items while installing the rivet.
Connect the speaker connector.
INSTALL OUTER REAR VIEW MIRROR ASSEMBLY LH
INSTALL FRONT DOOR SERVICE HOLE COVER LH
Install the reinforcement with the 6 screws.
Install a new service hole cover to the door panel. HINT:
When installing the service hole cover, pull out the links and connectors through the service hole cover.
There should be no wrinkles or folds after attaching the service hole cover.
After attaching the service hole cover, sealing condition should be confirmed.
Install the bracket with the 2 screws.
INSTALL FRONT DOOR WINDOW REGULATOR HANDLE ASSEMBLY (W/O POWER WINDOW)
Install the regulator handle with the snap ring. HINT: With the door window fully closed, install the plate and regulator handle with the snap ring as shown in the illustration.
Nov 25, 2008 at 9:48 PM