No power to fuel pump

Tiny
DEE-ANGELO42
  • MEMBER
  • 1989 TOYOTA COROLLA
  • 1.6L
  • 4 CYL
  • 2WD
  • MANUAL
  • 340,000 MILES
Hi good day,

I am from South Africa, Cape town and have an issue with my 1989 Toyota Corolla series 1 tvis 4age engine. There is no power to the in tank fuel pump. All fuses and relays we have checked looks fine. Please help.
Wednesday, April 10th, 2019 AT 3:08 AM

15 Replies

Tiny
JACOBANDNICKOLAS
  • MECHANIC
  • 109,885 POSTS
Welcome to 2CarPros.

The first thing, confirm that fuse 1 (10 amp) under the dash is good. See picture 2 for a legend of what it covers.

Here are links that show how to check a fuse and how they work:

https://www.2carpros.com/articles/how-a-car-fuse-works

https://www.2carpros.com/articles/how-to-check-a-car-fuse

Here are additional links you may find helpful related to using testing equipment for electrical issues and wiring:

https://www.2carpros.com/articles/how-to-use-a-test-light-circuit-tester

https://www.2carpros.com/articles/how-to-use-a-voltmeter

https://www.2carpros.com/articles/how-to-check-wiring

Next, check the fuel pump relay (and circuit opening relay) and connector. The Circuit Opening Relay, located near the ECU, is responsible for providing power to the Fuel Pump. Power is applied to the STA terminal of the relay from the starter when the ignition switch signals cranking mode. This allows the fuel pump to operate until the engine starts and runs under its own power. A signal from the Air Flow Meter (FC), keeps the relay closed until the ignition switch is turned OFF and de-energizes the EFI Main Relay. The fuel pump operation is then interrupted.

I attached picture 1 for you to review. It is a schematic of the relay. Check the connectors mentioned. Also, here is a link that shows how to check a relay:

https://www.2carpros.com/articles/how-to-check-an-electrical-relay-and-wiring-control-circuit

Do these things first and let me know what you find.

Take care,
Joe
Was this
answer
helpful?
Yes
No
Thursday, April 11th, 2019 AT 4:56 PM
Tiny
DEE-ANGELO42
  • MEMBER
  • 8 POSTS
Good day.

Thanks I will do the checks and report back with findings.
Was this
answer
helpful?
Yes
No
Friday, April 12th, 2019 AT 3:59 AM
Tiny
JACOBANDNICKOLAS
  • MECHANIC
  • 109,885 POSTS
Welcome back:

Sounds like a plan. I will watch for your reply.

Take care,
Joe
Was this
answer
helpful?
Yes
No
Friday, April 12th, 2019 AT 7:49 PM
Tiny
DEE-ANGELO42
  • MEMBER
  • 8 POSTS
Hi again guys. Made some progress with the troubleshooting and found the ground on the pump was bad and we lowered the tank to inspect and found a loose connection. Fixed that up and still got no power to the pump. Removed the pump and tested it with direct current and it came on. Reinstalled it bridged fp and +b and boom pump came on and we managed to start car. The circuit opening relay is suspectedly faulty. Also noticed the engine check light came on as I tried starting again with the bridged link in. Car revvs up and drove with the link but struggled and needed to be warmed up with revving. Car stood for over 6 months and was driven today after so long. How should I go about checking the management light coming on. I also noticed the air sensor on the original airbox isn't there as an aftermarket air intake was installed. Could this signal the management? Really appreciate all the great feedback you guys have given and look forward to your advice.

Dee
Was this
answer
helpful?
Yes
No
Monday, April 22nd, 2019 AT 12:33 PM
Tiny
JACOBANDNICKOLAS
  • MECHANIC
  • 109,885 POSTS
Welcome back:

Were you able to verify why the light came on? Any trouble codes? Also, yes an aftermarket air box can cause issues. Make sure there are no leaks and also that everything is properly together and tight.

Let me know,

Joe
Was this
answer
helpful?
Yes
No
Monday, April 22nd, 2019 AT 6:48 PM
Tiny
DEE-ANGELO42
  • MEMBER
  • 8 POSTS
Hi Joe
No I haven't found why the light came on. How do I go about that?

Not sure on how to read codes on the Toyota's. Any advice on this?

Thanks,

Dee
Was this
answer
helpful?
Yes
No
Monday, April 22nd, 2019 AT 10:54 PM
Tiny
JACOBANDNICKOLAS
  • MECHANIC
  • 109,885 POSTS
Welcome back:

Not a problem. Follow this:

Turn the key to run/engine off

Jump DLC terminals T and E1 with a short lead

Count MIL flashes and compare with trouble code table below

First flashes of 1/2 second duration indicate †tens’, after a 1 1/2 second pause, next flashes of 1/2 second duration indicate †units’

A 2 1/2 second pause occurs between codes

After a 4 1/2 second pause, trouble codes will be repeated

________________________________

Let me know what you find.

Joe
Was this
answer
helpful?
Yes
No
Tuesday, April 23rd, 2019 AT 6:52 PM
Tiny
DEE-ANGELO42
  • MEMBER
  • 8 POSTS
Good morning from SA.

Thanks for the instructions Joe.
But the trouble codes seems to be absent in the previous comment you posted.
Was this
answer
helpful?
Yes
No
Tuesday, April 23rd, 2019 AT 10:43 PM
Tiny
JACOBANDNICKOLAS
  • MECHANIC
  • 109,885 POSTS
Welcome back:

Did it do anything indicating it was in test mode? Also, do you know the build date of the vehicle? The procedure is a little different for a 90. Maybe it is a late build and works like the 1990's do.

Let me know. The build date should be labeled on the door frame.

Joe
Was this
answer
helpful?
Yes
No
Wednesday, April 24th, 2019 AT 6:25 PM
Tiny
DEE-ANGELO42
  • MEMBER
  • 8 POSTS
Hi again

So I checked the flashing engine light with the linked T and E1and got a code 28?
Was this
answer
helpful?
Yes
No
Saturday, April 27th, 2019 AT 9:56 AM
Tiny
JACOBANDNICKOLAS
  • MECHANIC
  • 109,885 POSTS
Welcome back:

That code is for an oxygen sensor. Still no power to the fuel pump?

Let me know.
Joe
Was this
answer
helpful?
Yes
No
Saturday, April 27th, 2019 AT 7:58 PM
Tiny
DEE-ANGELO42
  • MEMBER
  • 8 POSTS
Hi, yes, I found out its a oxygen sensor no.2 code. Not entirely sure if my car has one will have to check. I have power to the fuel pump yes. Car doesn't start on the first swing though. I suspect a air/fuel mixture. Can this mixture cause it to not start right away and does the oxygen sensor have anything to do with this? Sorry I have yet to supply you with the build number.

Thanks
Was this
answer
helpful?
Yes
No
Sunday, April 28th, 2019 AT 1:12 AM
Tiny
JACOBANDNICKOLAS
  • MECHANIC
  • 109,885 POSTS
Welcome back:

Most times when the car starting is slightly delayed, it is caused by fuel pressure. Actually, fuel pressure drop off. The system should maintain a specific pressure. If there is a problem causing the pressure to totally drop off, it takes a second for the pump to produce pressure. Thus, you get a delayed start.

There are different things which can cause this. However, the first thing that should be checked is fuel pressure. Here are the directions for testing. The pictures attached correlate with these directions.

SYSTEM TEST:

1. Using a Tee fitting and fuel hose, connect a low pressure fuel pressure gauge in-line between the fuel pump outlet and the carburetor inlet.
2. Start the engine and observe the gauge readings.

Fuel Pressure: 2.5 - 3.5 PSI

3. If fuel pressure is zero, ensure that the fuel tank has fuel. Also check fuel filter for blockage or restriction.
4. Raise engine rpm to 3,000 rpm and check gauge reading. If a drop in fuel pressure occurs, remove the fuel pump for component testing.
Removing Fuel Pump

picture 1

5. If no problems are found, remove the fuel pressure gauge from the engine.
6. Reconnect all fuel hoses.
7. Start engine and check for fuel leaks.

COMPONENT TESTS:

1. With the fuel pump removed from the engine, operate the pump lever by hand and check for excessive arm play tension.
2. Block off the outlet and return pipes with your fingers and check that there is an increase in lever arm play. Ensure that the lever arm moves freely indicating that air is trapped in the pump.
Checking Fuel Pump Inlet Valve

picture 2

3. Block off the inlet pipe with your finger and check that the pump arm is now locked (cannot be depressed easily). DO NOT force the arm to depress.
Checking Fuel Pump Outlet Valve

picture 3

4. Check the pump diaphragm by blocking off all three of the pipes with your fingers and attempting to depress the pump arm. It should lock as in step 3.
Testing Fuel Pump Diaphragm

picture 4

5. If any deficiencies are found, replace the fuel pump.
6. Block off the vent holes under the pump casting with your fingers. Check that the pump arm locks.
Checking Fuel Pump Oil Seal

picture 5

7. If the arm does not lock, the oil seal is bad and the fuel pump should be replaced.
8. Reinstall the fuel pump on the engine cylinder head.

Joe
Was this
answer
helpful?
Yes
No
Sunday, April 28th, 2019 AT 5:09 PM
Tiny
DEE-ANGELO42
  • MEMBER
  • 8 POSTS
Hi Joe

My car is a fuel injected model tvis engine not carburetor? I can still test fuel pressure using the method I suppose? My issue is with the oxygen sensor and if my car actually has one, where it would be situated. Note that it is an Ae92 tvis 1989(Sadm) 1.6 Twincam.
Was this
answer
helpful?
Yes
No
Tuesday, April 30th, 2019 AT 9:18 AM
Tiny
JACOBANDNICKOLAS
  • MECHANIC
  • 109,885 POSTS
Welcome back:

If you take a look at the attached picture (1), it indicates the engines in which I have information. Next, all of the engines listed have an O2 sensor. It is behind the catalytic converter. Take a look at picture 2. It shows location. Note that it says 4wd only. That is only for the shield and not the location of the sensor.

Here are directions for fuel injection. The specs are included and the remaining pics correlate with the directions.

____________________________________

FUEL PRESSURE TEST
FUEL PUMP QUICK CHECK:

1. Check that battery voltage is at least 12 volts.
2. Turn on the ignition switch.
3. Using a service wire, short terminals +B and FP on the engine check connector. The fuel pump should operate.
Shorting Fuel Pump Test Terminals
pic 3

4. Feel the fuel hose coming from the fuel filter to the fuel rail. The fuel flow should be felt, if the fuel pump is operating.
Checking For Fuel Pump Operation
pic 4

5. If not, perform pressure test below.
6. If fuel flow is felt, fuel pump operation is indicated, although fuel pressure may not be correct. For an accurate diagnosis, perform pressure test.

FUEL PRESSURE TEST:

1. Check that battery voltage is at least 12 volts.
2. Disconnect battery negative terminal.
3. Remove fuel delivery pipe between Cold Start Injector and fuel rail. Use caution if the fuel system is still under pressure.
Disconnecting Cold Start Injector Fuel Pipe
pic 5

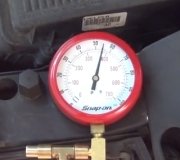
4. Connect a suitable fuel pressure gauge to the fuel rail using the union bolt and gaskets to provide a tight seal.
Connecting Fuel Pressure Gauge
pic 6

5. Wipe off any gasoline that may have escaped when the fuel pipe was disconnected and reconnect negative battery terminal. Turn on the ignition switch.
6. Using a service wire, short terminals +B and FP on the engine check connector. The fuel pump should operate and cause the pressure gauge to deflect.
Shorting Fuel Pump Test Terminals

pic 7

Fuel Pressure: 38 - 44 PSI (265 - 304 kPa)

7. If pressure is low, check fuel pump output and/or fuel filter for restrictions. If pressure is high, refer to FUEL PRESSURE REGULATOR/FUEL RAIL and test components.
8. If there is zero fuel pressure, check fusible links, fuses (EFI 15A, IGN 7.5A), EFI Main Relay and circuit wiring. Refer to CHASSIS ELECTRICAL DIAGRAMS for circuit schematics.
9. If no problem is found with the above components, go to the gas tank and listen for sound from the electric fuel pump.
10. If sound is heard, confirm that there is fuel in the tank.
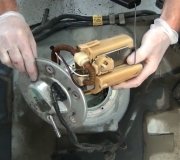
11. If no sound is heard, remove the fuel pump from the tank, (refer to COMPONENT REPLACEMENT AND REPAIR PROCEDURES), and bench test the fuel pump with battery current.
12. If fuel pump does not operate, replace the fuel pump.
13. After repairs are made, remove all test equipment from engine, start engine and check for fuel leaks.

__________________________________

Let me know if that helps.

Joe
Was this
answer
helpful?
Yes
No
Tuesday, April 30th, 2019 AT 6:42 PM

Please login or register to post a reply.

Sponsored links