Hi,
There is a chance of a short to the IAC and IAT. I'm going to provide the diagnostics for both codes. Let me know if it is something you are comfortable doing.
I want you to note that when looking at the connector views below, both sensors are located right next to each other. I can't be sure, but I suspect that is where you will find the issue.
The attached pics correlate with the directions.
____________________________________
P0118
2004 Acura TL V6-3.2L
P0118
Vehicle ALL Diagnostic Trouble Codes ( DTC ) Testing and Inspection P Code Charts P0118
P0118
DTC P0118: ECT Sensor Circuit High Voltage
1. Turn the ignition switch ON (II).
2. Check the ECT SENSOR in the DATA LIST with the HDS.
Is about -40 °F (-40 °C) or less, or 4.90 V or higher indicated?
YES - Go to step 3.
NO - Intermittent failure, system is OK at this time. Check for poor connections or loose terminals at the ECT sensor and the ECM/PCM.
3. Turn the ignition switch OFF.
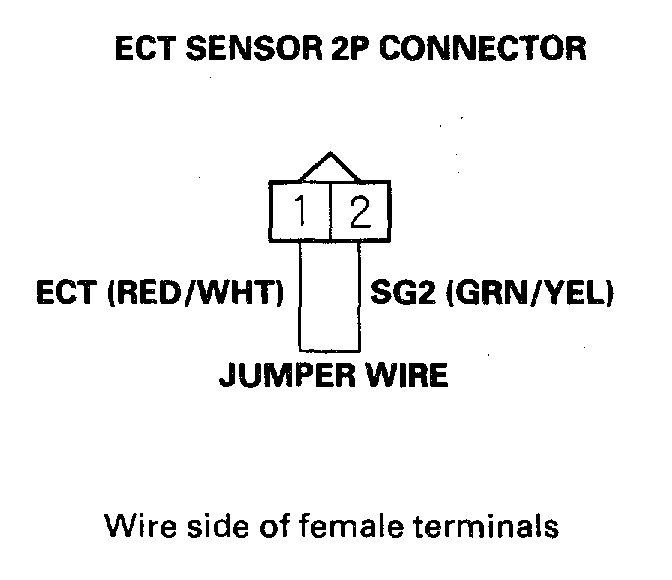
4. Disconnect the ECT sensor 2P connector.
Pic 1
5. Connect ECT sensor 2P connector terminals No.1 and No.2 with a jumper wire.
6. Turn the ignition switch ON (II).
7. Check the ECT SENSOR in the DATA LIST with the HDS.
Is about -40 °F (-40 °C) or less, or 4.90 V or higher indicated?
YES - Go to step 8.
NO - Go to step 13.
8. Turn the ignition switch OFF.
9. Remove the jumper wire.
10. Turn the ignition switch ON (II).
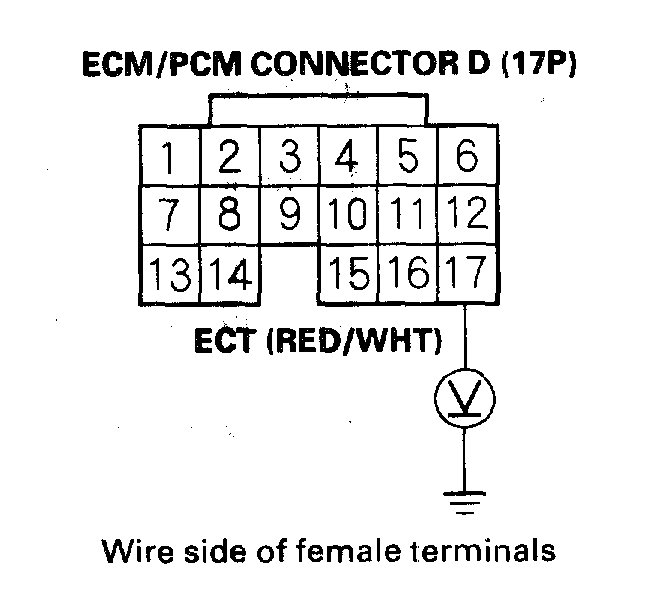
Pic 2
11. Measure voltage between ECT sensor 2P connector terminal No.1 and body ground.
Is there about 5 V?
YES - Repair open in the wire between the ECM/PCM (D10) and the ECT sensor, then go to step 15.
NO - Go to step 12.
Pic 3
12. Measure voltage between ECM/PCM connector terminal D17 and body ground.
Is there about 5 V?
YES - Repair open in the wire between the ECM/PCM (D17) and the ECT sensor, then go to step 15.
NO - Go to step 19.
13. Turn the ignition switch OFF.
14. Replace the ECT sensor.
15. Turn the ignition switch ON (II).
16. Reset the ECM/PCM with the HDS.
17. Do the ECM/PCM idle learn procedure.
18. Check for Temporary DTCs or DTCs with the HDS
Are any Temporary DTCs or DTCs indicated?
YES - If DTC P0118 is indicated, check for poor connections or loose terminals at the ECT sensor and the ECM/PCM, then go to step 1. If any other Temporary DTCs or DTCs are indicated, go to the indicated DTC's troubleshooting.
NO - Troubleshooting is complete.
19. Update the ECM/PCM if it does not have the latest software, or substitute a known-good ECM/PCM.
20. Check for Temporary DTCs or DTCs with the HDS.
Are any Temporary DTCs or DTCs indicated?
YES - If DTC P0118 is indicated, check for poor connections or loose terminals at the ECT sensor and the ECM/PCM, then go to step 1. If any other Temporary DTCs or DTCs are indicated, go to the indicated DTC's troubleshooting.
NO - If the ECM/PCM was updated, troubleshooting is complete. If the ECM/PCM was substituted, replace the original ECM/PCM.
_______________________________________________________
P0113
2004 Acura TL V6-3.2L
P0113
Vehicle ALL Diagnostic Trouble Codes ( DTC ) Testing and Inspection P Code Charts P0113
P0113
DTC P0113: IAT Sensor Circuit High Voltage
1. Turn the ignition switch ON (II).
2. Check the IAT SENSOR in the DATA LIST with the HDS.
Is about -40 °F (-40 °C) or less, or 4.90 V or higher indicated?
YES - Go to step 3.
NO - Intermittent failure, system is OK at this time. Check for poor connections or loose terminals at the IAT sensor and the ECM/PCM.
3. Turn the ignition switch OFF.
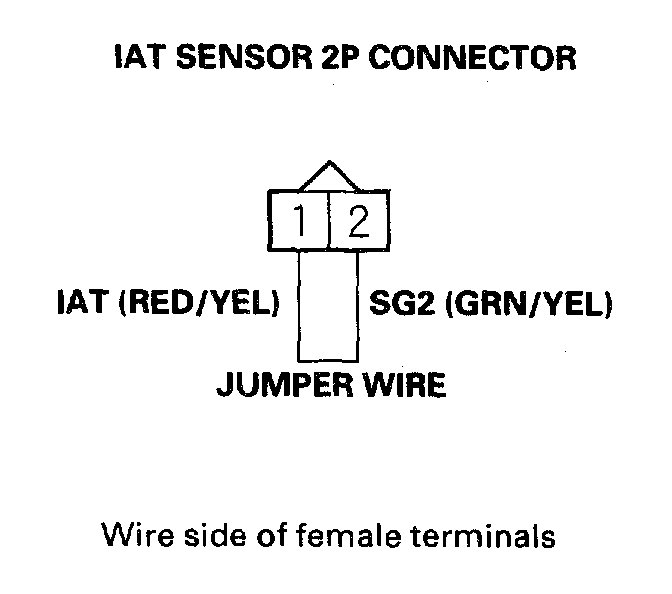
4. Disconnect the IAT sensor 2P connector.
Pic 4
5. Connect AT sensor 2P connector terminals No.1 and No.2 with a jumper wire.
6. Turn the ignition switch ON (II).
7. Check the IAT SENSOR in the DATA LIST with the HDS.
Is about -40 °F (-40 °C) or less, or 4.90 V or higher indicated?
YES - Go to step 8.
NO - Go to step 13.
8. Turn the ignition switch OFF.
9. Remove the jumper wire.
10. Turn the ignition switch ON (II).
Pic 5
11. Measure voltage between IAT sensor 2P connector terminal No.1 and body ground.
Is there about 5 V?
YES - Repair open in the wire between the ECM/PCM (D10) and the IAT sensor, then go to step 15.
NO - Go to step 12.
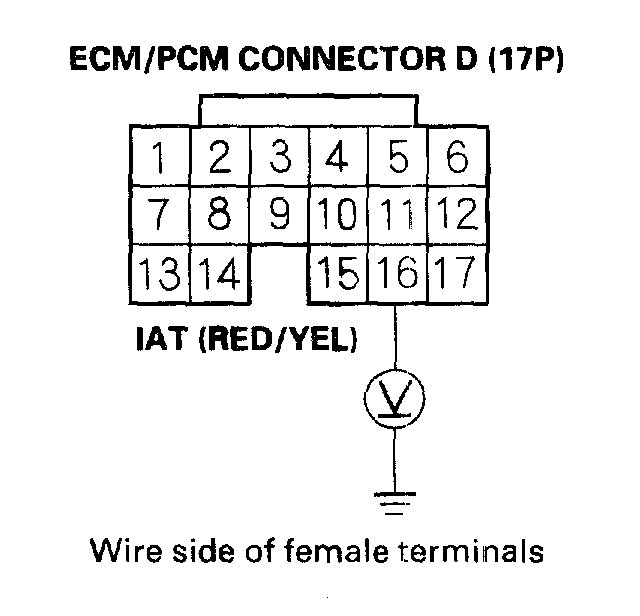
Pic 6
12. Measure voltage between ECM/PCM connector terminal D16 and body ground.
Is there about 5 V?
YES - Repair open in the wire between the ECM/PCM (D16) and the IAT sensor, then go to step 15.
NO - Go to step 19.
13. Turn the ignition switch OFF.
14. Replace the IAT sensor.
15. Turn the ignition switch ON (II).
16. Reset the ECM/PCM with the HDS.
17. Do the ECM/PCM idle learn procedure.
18. Check for Temporary DTCs or DTCs with the HDS.
Are any Temporary DTCs or DTCs indicated?
YES - If DTC P0113 is indicated, check for poor connections or loose terminals at the IAT sensor and the ECM/PCM, then go to step 1. If any other Temporary DTCs or DTCs are indicated, go to the indicated DTC's troubleshooting.
NO - Troubleshooting is complete.
19. Update the ECM/PCM if it does not have the latest software, or substitute a known-good ECM/PCM.
20. Check for Temporary DTCs or DTCs with the HDS.
Are any Temporary DTCs or DTCs indicated?
YES - If DTC P0113 is indicated, check for poor connections or loose terminals at the IAT sensor and the ECM/PCM, then go to step 1. If any other Temporary DTCs or DTCs are indicated, go to the indicated DTC's troubleshooting.
NO - If the ECM/PCM was updated, troubleshooting is complete. If the ECM/PCM was substituted, replace the original ECM/PCM.
_______________________________________
Let me know if this helps or if you have other questions.
Take care,
Joe
Images (Click to make bigger)
Thursday, January 28th, 2021 AT 5:14 PM
