You do not have to bleed the system if nothing was opened that would allow air to get in. A normal part of replacing shoes is to inspect the wheel cylinders behind their dust boots for signs of leakage. If that is found, the wheel cylinder must be replaced, then just that wheel has to be bled.
In the 1980's, it was common practice to rebuild calipers and wheel cylinders on every brake job. That is less common today, but when it is necessary, professionally-rebuilt calipers and new wheel cylinders are so inexpensive, the kits to rebuild them cost almost as much, plus you have to add in the labor and special tools. Rebuilding these parts is best left as a last resort when that is your only option. Unfortunately there is fewer and fewer people who know how to do that.
There are precautions to observe when working with brake fluid. The first is to be extremely careful that not a singe drop of petroleum product gets mixed in with it. That will contaminate the entire system and cause rubber parts to swell. The only proper repair for that is to remove every part that contains a rubber part that contacts the fluid, flush and dry the steel lines, then install new rubber parts. That includes rubber flex hoses, calipers, wheel cylinders, master cylinder and its rubber bladder seal under the cap, combination valve, and when used, the rear height-sensing proportioning valve. That repair can cost more than what the vehicle is worth, and it is a lot worse if it has an anti-lock brake control valve assembly. Petroleum products include engine oil, transmission fluid, power steering fluid, gear lube, axle grease, and penetrating oil. Brake system specialists even wash their hands with soap and water to avoid getting fingerprint grease on rubber parts and on friction surfaces and linings.
The second concern is to never push the brake pedal over half way to the floor. I never trust a helper with pedal-bleeding, especially if that is an inexperienced, new mechanic. I only do gravity-bleeding. This is to crack the cap on the reservoir so vacuum will not build up that inhibits fluid flow, open all the necessary bleeder screws, then just wait for one to start flowing. If none do that after five minutes, push the brake pedal by hand an inch or two to get the flow started. That is only necessary if the reservoir was allowed to run empty and the entire system is out of fluid. When fluid flows from one bleeder screw, close it and wait for the next one to start flowing. When all the bleeder screws are closed, "irritate" the brake pedal by hand a little. That will wash any stuck bubbles into the calipers and wheel cylinders. Open each bleeder screw once more to burp those last few bubbles out.
The reason for not pushing the pedal over half way is crud and corrosion build up in the bores of the master cylinder where the pistons don't normally travel. Pushing the pedal over half way runs the rubber lip seals over that crud and can rip them. That results in a slowly-sinking brake pedal, and that may take two or three days to show up. When we get a car in with a popped flex hose, a lot of shops automatically include a rebuilt master cylinder in the estimate, assuming the surprised driver pushed the pedal to the floor. This damage is commonly caused by do-it-yourselfers and inexperienced mechanics when they pedal-bleed the system.
As for the tools, since you listed "beginning mechanic", it is time to start investing in quality tools. Just like with doctors and carpenters, when you make your living with hand tools, the more you buy that you will use, the more productive you will be. If you are paid on flat-rate, this is the fastest way to earn more dollars per day. If you are in one of the few shops that only pay by the hour, higher productivity will be rewarded with promotions and pay raises. Start by looking at the online catalogs for Mac, Matco, Cornwell, and Snapon Tools. All of these will have lifetime warranties. Professional mechanics will not put up with cheap quality tools, and since these guys show up at each shop one a week, they will not be selling junk. You can also stop in on these trucks, but if you are not working at a shop yet, the mechanics at any shop can tell you when they stop at their shop. It will usually only be for an hour, and at some places the mechanics are on their lunch breaks, and at some their time in the trucks cuts into their earning time, so the salesman will have to take care of them first. You might have to wait until the end of the hour, then the salesman will be happy to answer any questions and show you what is popular.
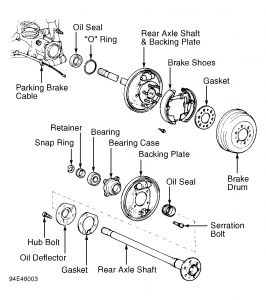
Also, consider stopping in at a Toyota dealership and asking one of the brakes specialists what he uses most often. The most common tool looks like a screwdriver handle with a round cylinder on the end to push and turn the caps on the "nails" holding the shoes to the backing plate. You can do the same job a little less elegantly with a regular slip-joint pliers. There are a variety of spring tools that will include a grooved shaft to wind spring hooks off their anchors and to lever them back on.
Look at S14AP and S13P in the MAC online catalog. S13P has the grove on the right end for prying return springs onto the anchor pin and the left end goes over the anchor pin, then is rotated to wind the spring off. It has been a long time since I bought tools, and I was surprised at the prices. Given that there is not much that can go wrong with these, Harbor Freight Tools will have less-expensive versions. When I started in the early 1980's, these two tools came in a kit of brake tools from Harbor Freight Tools for $12.95. I still use them today. A coworker bought the same kit in the same plastic tray in the same box, with the Snapon name on it, for $109.95!
Monday, April 12th, 2021 AT 9:45 AM
(Merged)


