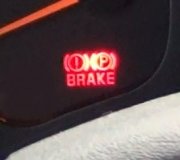
Replaced Master brake cylinder, I still get brake idiot light

Tiny
VINTSHAVE
  • MEMBER
  • 1993 CHEVROLET CAPRICE
Hi,

I was having issues where the brakes did not seem to be working that effectively on the care. I few months ago, I replaced all the pads and drums and front rotors, so no issues there. The combination of the idiot light coming on and the reduced braking effectiveness led me to believe that the master cylinder (which was 20 years old) needed replacing. I did that and braking improved. The pedal still seemed a bit soft, but the car stopped fine and the idiot light was off. A day went buy and the light is back on - not all the time, but towards the floor. The reservoir is properly filled and braking seems fairly good.

What is there left that could be causing this?

John
Wednesday, May 1st, 2013 AT 1:45 AM

10 Replies

Tiny
CARADIODOC
  • MECHANIC
  • 33,871 POSTS
First of all, check the level in the reservoir. Low fluid level will turn the same light on. Also be sure the parking pedal is fully retracted.

The next thing to suspect is unequal pressures in the two hydraulic systems, typically caused by leak. GM has used some unusual master cylinder designs that include a valve that blocks fluid flow to a leak. Due to changes in the suspension geometry you may not notice a brake pull, or you might just see a tiny wiggle in the steering wheel when you apply the brakes. The easiest thing to do is drive over sand or granite at a slow speed and try to lock all four wheels. See if just the front skid, just the rear, or only one front wheel.

Front-wheel-drive cars use split-diagonal hydraulic systems where one front wheel and the opposite rear wheel are on the same circuit. On GM cars those have that valve that blocks fluid flow. A leak will trip the valve but so will anything else that causes unequal pressures. Most commonly that is pedal-bleeding with a helper. No pressure will build up in the circuit with the bleeder screw open but it will in the other side. That will trip that valve and block fluid flow to two wheels, and you likely will not notice anything wrong in the pedal feel. By the sounds of your description they may be using the same master cylinder design on your car. That's why I'd like you to try to lock up the wheels and make them skid.

Those valves can also trip just by replacing the front brake pads. You have to push the pistons back into the calipers to make room for the new thicker pads, then you have to pump the brake pedal to work the pistons back out after everything is reassembled. First of all it is important to never push the brake pedal more than halfway to the floor. Doing so is likely to damage it if it is more than about a year old. That will also prevent tripping that valve. When the pistons start to move out, one will contact the pads first and start to build pressure before the other side will, and that's when that valve will trip.

Now that I covered all that, I've never seen that valve or a split-diagonal hydraulic system on a rear-wheel-drive car. The last thing to consider is did you bench-bleed the new master cylinder before you installed it? If you did not there is most likely air still in the system. Since the master cylinder sits at quite an angle, the air will stick around the ports in the steel lines. It won't go all the way down to the wheels during normal braking, and it usually will not wash back into the reservoir when you release the brakes because of that high angle. What you can do is loosen one of the steel lines a little, then have a helper slowly push the brake pedal. It should take about 20 seconds to push it half way to the floor. If there's air in the lines you'll see the bubbles come out past the threads of the line nuts. Be sure to tighten the nut before you tell the helper he can release the pedal. If some air bubbles came out, do that a second time, then do the other line the same way.
Was this
answer
helpful?
Yes
No
Wednesday, May 1st, 2013 AT 2:29 AM
Tiny
DUGSMOBILE
  • MECHANIC
  • 38 POSTS
Sounds like some air in the system, needs to be bleed in right sequence again. The air is causing the fluid pressure differential switch to trip. Suggest Rebleed and flush brake system. I checked the sequence chart and verified that the pattern is RR, LR, RF, LF. I always cheated and just stick the BF bottle in the top the master while holding a little strip of plastic over the mouth of the bottle, then after it is standing up slide the plastic out of the way, it will work like a water cooler. Not brave don't try it. Hope this helps.
Was this
answer
helpful?
Yes
No
Wednesday, May 1st, 2013 AT 2:42 AM
Tiny
VINTSHAVE
  • MEMBER
  • 62 POSTS
<>

Both of these are fine

<>

Once the valve has been tripped, is there a way to reset it?

<>

I did bench bleed the new master. I also left the line nuts loose when I installed it and had a helper depress the pedal to work any air out.

The pedal is definitely NOT hard. The car stops though.

Haynes manuals suck :P
Was this
answer
helpful?
Yes
No
Wednesday, May 1st, 2013 AT 3:01 AM
Tiny
CARADIODOC
  • MECHANIC
  • 33,871 POSTS
Sorry I didn't mention resetting the valve. First of all I'm not sure there even is one in your master cylinder. That is really a front-wheel-drive thing. If you do have that, you can prove it is tripped by trying to bleed the brakes. On front-wheel-drive cars you will only get fluid to come out of one front wheel and the opposite rear one. No fluid will come out of the other two no matter how hard you push on the pedal. The only way I've ever found to unseat that valve is to go to one of the wheels that isn't flowing, open the bleeder screw, and give it a quick, short burst of compressed air, then let it gravity-bleed. Once you close the bleeder and both sides build pressure equally that valve won't trip again. You don't want to push in so much air that it makes it all the way to the master cylinder. That will just make bleeding it more time-consuming. Just give the air nozzle a quick sharp tap.

As far as which wheels to bleed in which order, that IS spelled out in the service manual but it doesn't make any difference. If the pedal is pushed too far and pressure only builds in one circuit, that valve will still trip. Some manufacturers and some instructors want the right rear bled first because it is the longest line and that will expel the most air the fastest. Some specify the left front first because it is the shortest and will take the least amount of fluid and time to get one entire line air free. In the 35 years I've been doing brake work I have always bled the same wheel first and never had a problem. That wheel is which ever one I'm standing closest to.
Was this
answer
helpful?
Yes
No
Wednesday, May 1st, 2013 AT 3:40 AM
Tiny
VINTSHAVE
  • MEMBER
  • 62 POSTS
OK, I bled the master cylinder and I individually bled each line until it ran clear with fluid. Still, the brakes are spongy and the light comes on. What is there left to check/do?
Was this
answer
helpful?
Yes
No
Sunday, May 5th, 2013 AT 4:18 PM
Tiny
CARADIODOC
  • MECHANIC
  • 33,871 POSTS
Any chance the rear drum brakes are out of adjustment?

You can unplug the switches to see which one is turning on the light. Start with the combination valve below the master cylinder.
Was this
answer
helpful?
Yes
No
Sunday, May 5th, 2013 AT 10:43 PM
Tiny
VINTSHAVE
  • MEMBER
  • 62 POSTS
Thanks for your suggestion. A few follow-up questions:

How would I verify that the rear drum brakes are adjusted as they should be?

Where would the other switches be? Are they on each wheel?

Is there any way to get a better idea of where the air might be (if there is air in the system that is causing the problem)? Could it be in the combo valve? If so, does it have a separate bleeding procedure or would the air just come out of one of the wheel bleeders?

Thanks again!

J
Was this
answer
helpful?
Yes
No
Sunday, May 5th, 2013 AT 11:05 PM
Tiny
CARADIODOC
  • MECHANIC
  • 33,871 POSTS
The pressure-differential switch is on the combination valve under the master cylinder. Follow the two steel lines down to it. The switch will have a single wire plugged into it.

The low fluid level switch, when used, is in the brake fluid reservoir on the side. It will have two wires. The parking brake switch is under the dash on the pedal assembly.

Rear shoes out of adjustment come on gradually over time. GM didn't have much trouble with that because they used a solid link for their adjuster that can't break. I adjust mine up by feeling how much I can move the drum side to side when it's halfway on. There are measuring tools but I never seem to have good luck with those.

I also forgot to ask if your car has anti-lock brakes. If it does, there may be some valves that need to be opened with a scanner. It would use the Bendix-9 system which is a lower version of the Bendix-10 that Chrysler used. A scanner isn't needed for the Chryslers so it shouldn't be for yours either.
Was this
answer
helpful?
Yes
No
Monday, May 6th, 2013 AT 1:26 AM
Tiny
VINTSHAVE
  • MEMBER
  • 62 POSTS
MAJOR UPDATE:

Combo Valve

When a helper depressed the pedal, a pin popped out from the side closest to firewall. When he let the pedal up, it returned. Nothing projected from the other side. Is this normal?

Rear Brakes

I didn't really think to check the rear shoes because I had just replaced them 12 months ago.

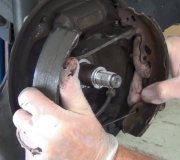
But on your suggestion, I removed the back right drum. Those suckers were worn right down to the bone and the drum is severely grooved. The wheel cylinders are pretty rusty too, so they need to be replaced. It's a little weird because I replaced the shoes, drums and wheel cylinders on the back brakes about 12 months ago. This leads me to believe:

1) I either messed them up royally when I installed them
2) there is something else that brought them to an early grave

Not sure which, but it is clear that BOTH rears are going to need new drums, wheel cylinders and shoes.

I would certainly welcome any thoughts on what may have led to the rapid demise of the rear brakes.

While it's not going to be dirt cheap or easy to redo the rear brakes, it certainly beats the hell out of a bad ABS system
Was this
answer
helpful?
Yes
No
Monday, May 6th, 2013 AT 7:14 PM
Tiny
CARADIODOC
  • MECHANIC
  • 33,871 POSTS
We always talk about it in class but it's rare to cause a problem. That is grooves worn in the six "lands" on the backing plates. Those are the raised spots the shoe frames ride on. The concern is the shoes will catch in those groves and stick applied. That doesn't happen on Chrysler products because they have folded over tabs that provide about a 3/8" sliding surface. GM shoes don't have those tabs.

Also push on one of the pistons in the wheel cylinder and watch if the other one moves out freely. If one is stuck, that can hold a shoe applied, although once the lining wears down it usually stops wearing further.

The biggest offender to look at is the parking brake strut bar between the two shoes. You must be able to push it forward with your thumb a good 1/16" to 1/8" against the pressure of the anti-rattle spring. If it is tight you will usually also find that both shoes are not tight against the large anchor pin on top. That is caused by a parking brake cable that is stuck in the partially-applied position. That is a REAL big problem with Fords as little as a year old. For your car you can usually use a pry bar to force the parking brake lever back that's hanging down from the rear shoe. That will get you by until you can replace the cable, or if you don't use the parking brake.

Be sure the shoes are in the correct locations, shorter linings toward the front of the car, longer ones to the rear.
Was this
answer
helpful?
Yes
No
Monday, May 6th, 2013 AT 7:30 PM

Please login or register to post a reply.

Sponsored links