Here are the directions for replacing the canister purge valve. The attached pics correlate with the directions. The code you have doesn't pertain to this as a problem.
In this case, the evap system needs smoke tested. Basically, smoke is injected into the EVAP system at a very low psi. Where the leak is located, smoke will come out. That way you locate the leak.
Regardless, here are the directions your requested:
2010 Ford Focus L4-2.0L
Evaporative Emission Canister Purge Valve
Vehicle Powertrain Management Emission Control Systems Evaporative Emissions System Canister Purge Control Valve Service and Repair Removal and Replacement Evaporative Emission Canister Purge Valve
EVAPORATIVE EMISSION CANISTER PURGE VALVE
303-13 Evaporative Emissions 2010 Focus
REMOVAL AND INSTALLATION
Evaporative Emission Canister Purge Valve
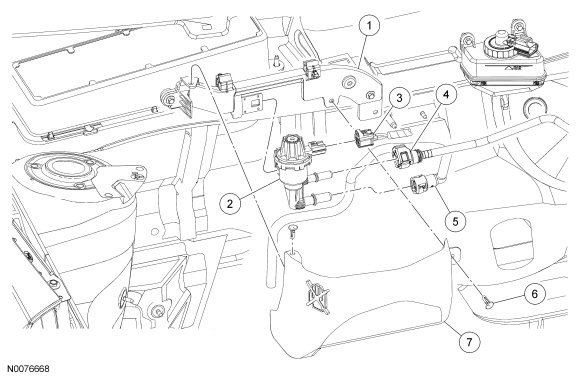
Pic 1
Item Part Number Description
1 9G683 Evaporative Emission (EVAP) canister purge valve bracket
2 9G641 EVAP canister purge valve
3 14A464 EVAP canister purge valve electrical connector
4 � Vapor jumper tube-to- EVAP canister purge valve quick connect coupling (part of 9D289)
5 � Vapor jumper tube-to- EVAP canister purge valve quick connect coupling (part of 9L291)
6 W709438 Heat shield retainer (2 required)
7 � Heat shield
Removal and Installation
image WARNING: Do not smoke, carry lighted tobacco or have an open flame of any type when working on or near any fuel-related component. Highly flammable mixtures are always present and may be ignited. Failure to follow these instructions may result in serious personal injury.
Image WARNING: Do not carry personal electronic devices such as cell phones, pagers or audio equipment of any type when working on or near any fuel-related component. Highly flammable mixtures are always present and may be ignited. Failure to follow these instructions may result in serious personal injury.
Image WARNING: Always disconnect the battery ground cable at the battery when working on an evaporative emission (EVAP) system or fuel-related component. Highly flammable mixtures are always present and may be ignited. Failure to follow these instructions may result in serious personal injury.
Disconnect the battery ground cable. For additional information, refer to Section 414-01.
Remove the 2 retainers and the heat shield.
Disconnect the Evaporative Emission (EVAP) canister purge valve electrical connector.
Disconnect the 2 vapor jump tube-to- EVAP canister purge valve quick connect couplings. For additional information, refer to Section 310-00.
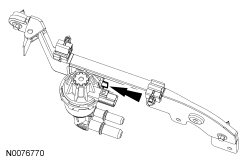
Press the locking tab and remove the EVAP canister purge valve from the bracket.
Pic 2
To install, reverse the removal procedure.
______________________________________________________________________________
Let me know if this helps or if you have other questions.
Take care,
Joe
Images (Click to make bigger)
Friday, December 6th, 2019 AT 9:10 PM


