Replacement procedures for your vehicle's oil pump are below..
REMOVAL:
Disconnect the negative battery cable.
Raise and safely support the vehicle.
Drain the engine oil into a suitable container.
Remove the oil pan (explained later, below)
Unfasten the crankshaft oil deflector bolts, then remove the crankshaft oil deflector.
Remove the oil pump retaining bolts, then remove the oil pump and pump driveshaft.
INSTALLATION:
Prime the oil pump.
Install the oil pump and pump driveshaft. Tighten the oil pump mounting bolts to 30 ft. lbs. (41 Nm).
Install the crankshaft oil deflector and mounting nuts. Tighten the mounting nuts to 18 ft. lbs. (25 Nm).
Install the oil pan (explained later, below).
Carefully lower the vehicle.
Fill the crankcase to the correct level with oil.
Start the engine, check the oil pressure and check for leaks.
OIL PAN REMOVAL:
Disconnect the negative battery cable.
Remove the serpentine belt.
If equipped, loosen, but do not remove, the upper A/C compressor bolts.
Loosen the right front wheel lugnuts.
Raise and safely support the front of the vehicle.
Drain the engine oil.
Remove the right front tire and wheel assembly.
Remove the right inner fender splash shield.
Disconnect the engine mount strut from the suspension support.
Pull out the cotter pin and remove the castle nut from the lower ball joint. Separate the joint from the steering knuckle.
Remove the right side sway bar link.
Detach the ABS sensor from the right subframe.
Unfasten the right side subframe mounting bolts then remove the subframe and control arm as an assembly.
Remove the lower A/C compressor mounting bolts and position the compressor aside. DO NOT disconnect the refrigerant lines or allow the compressor to hang unsupported.
Disconnect the engine mount strut bracket from the engine.
Remove the engine to transaxle brace.
Remove the oil filter.
Remove the starter.
Remove the flywheel inspection cover.
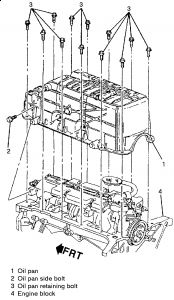
Unfasten the oil pan flange retaining bolts and the oil pan side retaining bolts, then remove the oil pan.

OIL PAN INSTALLATION:
Clean the gasket mating surfaces.
Apply silicon sealer to the portion of the pan that contacts the rear of the block. On the block are cutouts, use a putty knife to insert silicon sealer into these crevices. Position a new gasket on the oil pan.
Position the oil pan and install the mounting bolts finger-tight.
With all the bolts in place, tighten the oil pan flange bolts to 18 ft. lbs. (25 Nm) and the oil pan side bolts to 37 ft. lbs. (50 Nm).
Install the flywheel inspection cover and the starter.
Coat the seal on the oil filter with clean engine oil, then install the filter on the engine.
Install the engine-to-transaxle brace and tighten the mounting bolts.
Install the engine mount strut bracket. Tighten the mounting bolt at the engine bracket to 85 ft. lbs. (115 Nm).
Place the A/C compressor in the mounting bracket, then tighten the lower mounting bolts.
Install the right side subframe and control arm assembly. Tighten the subframe mounting bolts to 89 ft. lbs. (120 Nm).
Install the right side sway bar link and secure.
Connect the ball joint to the steering knuckle and tighten the castle nut to 48 ft. lbs. (60 Nm). Install a new cotter pin.
Connect the ABS sensor to the right subframe assembly.
Connect the engine mount strut bracket and tighten the mounting bolt at the frame to 85-89 ft. lbs. (115-120 Nm).
Install the right inner fender well splash shield.
Install the right front tire and wheel assembly and tighten to specification.
Carefully lower the vehicle.
Install the serpentine belt.
Fill the crankcase to the correct level.
Connect the negative battery cable, start the vehicle and verify that there are no leaks.
Thanks for using 2CarPros.com!
Wednesday, March 11th, 2009 AT 1:29 AM


