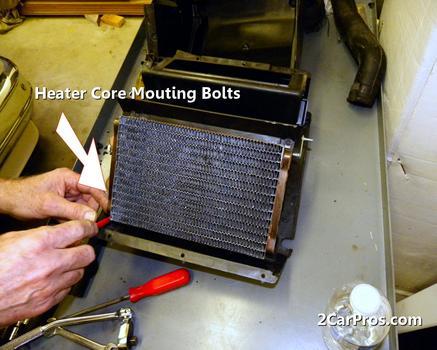
Its under the dash- passenger side. The entire dash has to come out to change it
REMOVAL AND INSTALLATION
1. Perform steps 1 through 7 of Blower Motor removal and installation. See: Blower Motor > Procedures
2. Remove relay panel above glove compartment opening.
3. Through glove compartment opening, disconnect the A/C vacuum line connector and radio noise capacitor connectors.
4. Remove left windshield pillar trim cover.
5. Remove left lower side cowl trim cover.
6. Remove hood release handle mechanism attaching screws.
7. Remove steering column trim covers.
8. Disconnect parking brake release mechanism connecting rod. Gain access through fuse panel opening.
9. Remove lower left instrument panel silencer.
10. Remove lower left instrument panel reinforcement.
11. Remove instrument panel center (radio) bezel.
12. Remove forward floor console.
13. Remove the radio.
14. Remove the heater A/C control.
15. Remove cigar lighter.
16. Remove message center/trip computer, if equipped.
17. Disconnect side window demister tubes from top of heat A/C unit.
18. Remove steering column upper attaching bolts and allow the steering wheel to rest on the driver seat cushion.
19. Remove upper instrument panel (defroster outlet) cover.
20. Remove upper instrument panel attaching screws from below the windshield opening.
21. Loosen (do not remove) the left lower cowl instrument panel attaching screw.
22. Remove the right lower cowl instrument panel attaching screw.
CAUTION: Protect the passenger seat cover from soiling or damage using a suitable cover.
23. Carefully pull the instrument panel away from the dash panel on the right side of the vehicle and allow the instrument panel to rest on the passenger seat cushion.
CAUTION: Before proceeding with operation review the safety precautions.
24. From the engine compartment, drain the cooling system and disconnect the heater hoses from the heater core nipples, plug the nipples to avoid spilling coolant inside the vehicle.
25. Completely discharge the refrigerant system.
26. Disconnect the refrigerant lines from the H-valve at the dash panel on the right side of the vehicle. Seal the refrigerant lines using plastic sheeting and tape.
27. Remove the H-valve from the evaporator plate. Wrap the H-valve in plastic sheeting and tape to avoid contamination.
28. Remove the condensate drain tube.
29. Remove heater A/C unit to dash panel attaching nuts.
30. From inside the vehicle, pull rearward on the heater A/C unit to clear the dash panel silencer and remove the unit from the vehicle.
To install, reverse the preceeding operation. Refill cooling system and test for leaks. Evacuate and charge the refrigerant system and test overall performance.
Sunday, June 1st, 2008 AT 10:28 PM


