Labor manual shows about 2 hours to replace it, but I can't find any instructions on it. It has a note that says includes removing the pan. There is a service bulletin about bypassing the solenoid.
Converter Lock Up Solenoid - Bucking/Surging
Notes
Models
1989-1990 AA, AC, AG, AH, AJ, AK, AL, AP, AS, Bodies
Subject
Surge/Buck at 35-55 MPH With Vehicles Equipped With 2.2, 2.5 And 3.0L Engines.
Index
DRIVEABILITY
Date
February 12, 1990
No.
18-02-90
P-205 (C18-27-9)
BODY CODE LEGEND
AA - ACCLAIM/SPIRIT/LEBARON LANDAU
AC - DYNASTY/NEW YORKER LANDAU/SALON
AG - DAYTONA
AH - LANCER/LEBARON GTS (4-DOOR HATCHBACK)
AJ - LEBARON COUPE/LEBARON CONVERTIBLE
AK - ARIES/RELIANT
AL - OMNI/HORIZON
AP - SHADOW/SUNDANCE
AS - CARAVAN/GRAND CARAVAN/CARAVAN C/V
VOYAGER/GRAND VOYAGER/TOWN & COUNTRY
This bulletin applies to 1989 and 1990 vehicles equipped with A413 and A670 3 speed automatic transmissions with lock up torque converters. It does not apply to vehicle equipped with the A604 4 speed automatic transmission.
SYMPTOM/CONDITION
A surge may be noticed at steady cruising speeds above 35 mph. In addition, bucking may occur under light deceleration conditions, especially when cresting a hill.
DIAGNOSIS
The above conditions can be diagnosed by disconnecting the transmission lock-up torque converter solenoid, and driving the vehicle under the above conditions. If the problem goes away, follow the repair procedure below. If either problem is still present, refer to the Diagnostic Test Procedure for correction.
PARTS REQUIRED
Driveability Kit PN 4419447
Consists of:
1 Wiring Jumper Assembly PN 4400768
1 Lock-Up Solenoid Cap PN 4419446
2 Tie Wrap PN 6015756
1 Authorized Modification Label PN 4275086
REPAIR PROCEDURE
The following procedure involves disconnecting the lock-up torque convertor solenoid. The customer should be advised that after this repair is performed, a loss in fuel economy of 1 to 2 miles per gallon may be noticed, depending on driving conditions.
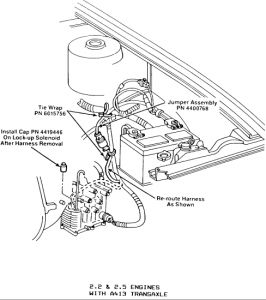
FIGURE A
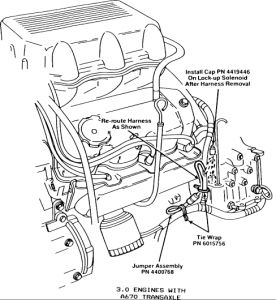
FIGURE B
1. Disconnect the wiring connector from the lock-up torque convertor solenoid. This is located directly behind the transmission dipstick (Figures A and B).
2. Install wiring jumper assembly, PN 4400768, to the lock-up solenoid wiring connector removed in Step 1.
3. 2.2 & 2.5L Engines - Reroute new wiring assembly (jumper plugged into original lock-up wiring) under battery so that it loops back along original lock-up wiring. Tie wrap looped harness to original lock-up wiring in two places, using supplied tie wrap, PN 6015756 (Figure A).
3.0L Engines - Reroute new wiring assembly (jumper plugged into original lock-up wiring) so that it loops back along original lock-up wiring. Tie wrap looped harness to original lock-up wiring in two places using tie wrap, PN 6015756 (Figure B).
4. Install supplied cap, PN 4419446, onto lock-up solenoid.
FIGURE C
5. Type information on Authorized Modification Label, PN 4275086, as shown in Figure C and attach near VECI label.
POLICY: Reimbursable within the provisions of the warranty.
TIME ALLOWANCE:
Labor Operation No. 21-96-01-90 0.2 Hrs.
FAILURE CODE: AM - Authorized modification


Friday, May 29th, 2009 AT 2:58 PM


