Water pump replacement instructions please?

Tiny
BOB 2222
  • MEMBER
  • 2002 SUBARU OUTBACK
  • 4 CYL
  • 2WD
  • AUTOMATIC
  • 120,000 MILES
When driving temperature gauge goes to red but doesn't vent steam. When idling in park temperature gauge reads perfect. Changed thermostat and radiator cap same issue. Drove car until gauge went to red then parked, but did not turn off car and gauge went back to normal temperature while running. What the heck!
Sunday, August 18th, 2019 AT 6:26 PM

5 Replies

Tiny
SCGRANTURISMO
  • MECHANIC
  • 4,897 POSTS
Hello,

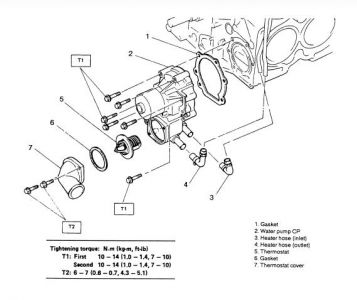
This could be a problem with your water pump starting to fail. When your car is at idle (low rpm's) it is able to keep up but as you drive (high rpm's) and a load is put on it, it is not able to keep up. In the diagrams down below I have included the Original Equipment Manufacturer (OEM) part number for the water pump for your vehicle, and guides for inspection and the removal and installation of your vehicle's water pump. Please go through these guides and get back to us with what you are able to find out.

Thanks,
Alex
2CarPros
Was this
answer
helpful?
Yes
No
Sunday, August 18th, 2019 AT 7:26 PM
Tiny
DOHELO
  • MEMBER
  • 1 POST
  • 2001 SUBARU OUTBACK
  • 4 CYL
  • 4WD
  • AUTOMATIC
  • 134,000 MILES
What is the best and simple way to removed a water pump. Thaks
Was this
answer
helpful?
Yes
No
Thursday, March 11th, 2021 AT 5:58 PM (Merged)
Tiny
RICHZOMBIE
  • MECHANIC
  • 173 POSTS


https://www.2carpros.com/forum/automotive_pictures/307763_Noname_25.jpg


1. Before servicing the vehicle, refer to the precautions in the beginning of this section.

2. Remove or disconnect the following:

Negative battery cable

Engine undercover, if equipped

3. Drain the coolant into a suitable container.

4. Remove or disconnect the following:

Radiator fan connector(s)

Radiator outlet and heater hoses

Heater bypass hose or overflow hose, if equipped

Reservoir tank, on Legacy models

Radiator fan motor assembly(ies)

Accessory drive belts

Timing belt

Belt tension adjuster

Belt idler No. 2

Camshaft Position (CMP) sensor

Left side camshaft pulley(s)

Left side rear timing belt cover

Tensioner bracket

Radiator and heater hoses from water pump

Water pump retainer bolts

Water pump

5. Inspect the radiator hoses for deterioration and replace as necessary.

To install:

1. Clean the gasket mating surfaces thoroughly. Always use new gaskets during installation.

2. Install or connect the following:

Water pump, tighten the bolts in sequence to 10 ft. lbs. (13 Nm). After tightening the bolts once, retighten to the same specification again.

Radiator heater hoses to water pump

Tensioner bracket

Left side rear timing belt cover

Left side camshaft pulley(s)

CMP sensor

Belt idler No. 2

Belt tension adjuster

Timing belt

Accessory drive belts

Radiator fan assembly(ies)

Reservoir tank, if removed

Heater bypass hose or overflow hose, if equipped

Air intake duct

Radiator outlet and heater hoses

Radiator fan connector(s)

Engine undercover, if removed

3. Fill the system with coolant and connect the negative battery cable.

4. Start the engine and allow it to reach operating temperature.

5. Check for leaks.
Was this
answer
helpful?
Yes
No
+1
Thursday, March 11th, 2021 AT 5:58 PM (Merged)
Tiny
MEDIQPONKY
  • MEMBER
  • 1 POST
  • 1996 SUBARU OUTBACK
My water pump is leaking, what steps do I take to change it?
Was this
answer
helpful?
Yes
No
Thursday, March 11th, 2021 AT 5:59 PM (Merged)
Tiny
BMRFIXIT
  • MECHANIC
  • 19,053 POSTS
Water pump is driven by timing belt.

1.8L & 2.2L 4-CYL -1996 Subaru Legacy Outback

TIMING BELT

Removal
1. Remove generator drive belt. Remove A/C belt and tensioner, if equipped. Remove crankshaft pulley. If engine is removed from vehicle, crankshaft can be held using Crankshaft Pulley Wrench (499977000).

2. Remove left, right and front timing belt covers.
If timing belt is to be reused, mark belt to indicate original direction of rotation before removal, if original marks are worn away or faded. Also mark belt to indicate belt-to-sprocket alignment, if original marks are worn away or faded.

3. To mark belt, turn crankshaft with Crankshaft Socket (499987500) to align marks on crankshaft sprocket and left and right camshaft sprockets with notches on timing belt cover and engine block.
.
4. Use White paint to mark direction of rotation and to mark timing belt in relation to sprocket timing marks. When marks are properly aligned, 44 teeth should be on right side of crankshaft sprocket and 40.5 teeth should be on left side of crankshaft sprocket.
.
5. Loosen tensioner adjuster mounting bolts. Remove belt idler, and belt idler No. 2. Remove timing belt. Remove upper belt idler. Remove belt tensioner and spacer. Remove belt tensioner adjuster.

Inspection
1. Inspect timing belt for wear on rounded edges of drive teeth. Inspect belt for signs of oil contamination. Replace belt if it is damaged or contaminated. Inspect belt tensioner adjuster oil seals for leaks. Inspect rod ends for abnormal wear and scratches. Timing belt bend radius must be greater than 2.36" (60.0 mm).
. 2. Slight trace of oil at rod oil seal does not indicate a problem. While holding tensioner with both hands, push rod section against floor or wall using a force of 33-110 lbs. (15-50 kg) to ensure rod
section does not move. 3. If rod section moves, replace tensioner adjuster with a NEW one. Measure extension of rod beyond body. Rod extension should be.606-.646" (15.40-16.40 mm). Replace belt tensioner adjuster if extension of rod is not as specified. Inspect belt tensioner and belt adjuster rod mating surface. Check spacer and tensioner bushing for wear.
Was this
answer
helpful?
Yes
No
Thursday, March 11th, 2021 AT 5:59 PM (Merged)

Please login or register to post a reply.

Sponsored links