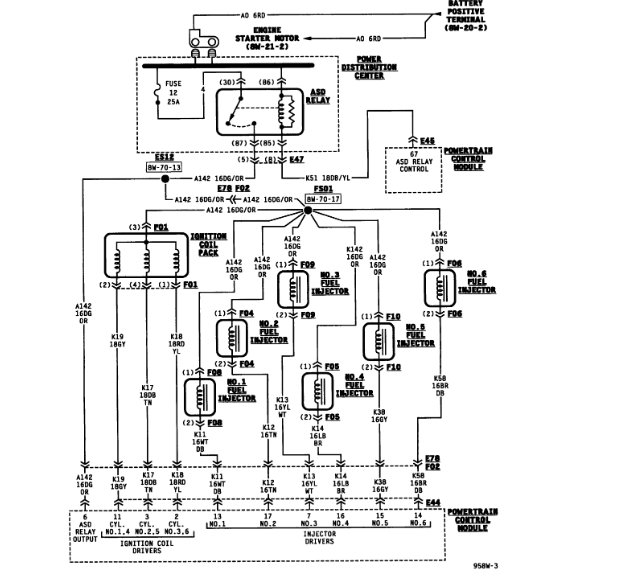
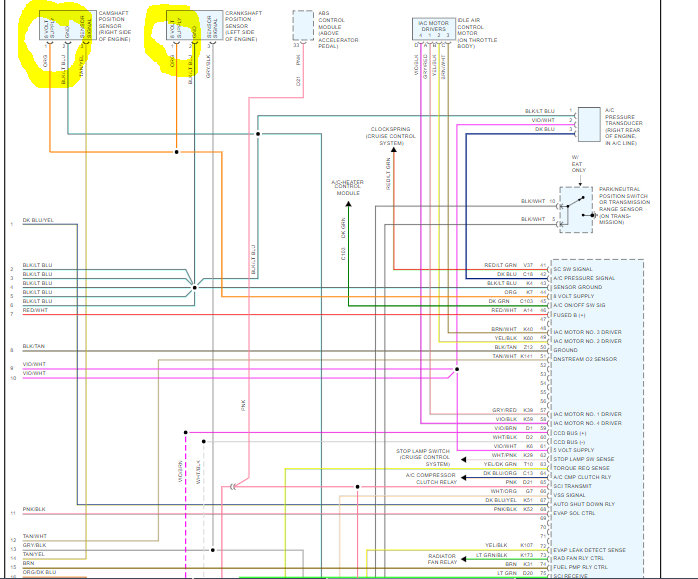
First you have to understand how these systems work. You had better not have voltage to the ignition coil unless the engine is rotating, (cranking or running). The coil pack, injectors, fuel pump or pump relay, alternator field, and oxygen sensor heaters all get 12 volts from the automatic shutdown, (ASD) relay, and that relay is turned on by the Engine Computer when it gets signal pulses from the crankshaft position sensor and the camshaft position sensor. In addition, the computer turns that relay on for one second when you turn on the ignition switch. You should hear the hum of the fuel pump for that one second.
There's two things you can start with. The first is to connect a test light to the dark green/orange wire at the ignition coil pack, any injector, or either smaller terminal on the back of the alternator. You can use a digital voltmeter for this instead, but most of them take too long to respond. You could miss something. With the test light, it should light up for one second when you turn on the ignition switch. In the unlikely event that is not happening, we'll have to go in a different direction.
What is important is if the light turns back on during cranking. Most commonly it will not, then those two sensor circuits become the suspects.
The second thing to do is to always start by reading and recording the diagnostic fault codes. Chrysler made doing that yourself much easier than any other manufacturer. Cycle the ignition switch from "off" to "run" three times within five seconds, leave it in "run", then watch the code numbers appear in the odometer display.
It is important to understand that fault codes never say to replace parts or that one is bad. When a sensor or other part is referenced in a fault code, that part is actually the cause of that code about half of the time. First we have to rule out wiring and connector terminal problems. In the case of the cam and crank sensors, however, they have a rather high failure rate on all brands of vehicles, so there is a good chance a fault code is caused by that sensor.
Once you know the fault code numbers, you can go here:
https://www.2carpros.com/trouble_codes/obd2
to see the definitions, or I can interpret them for you.
Another problem with setting fault codes for these two sensors is it takes some time for the missing signal to be detected. That means a code may not set just by cranking the engine. They will have a better chance of setting when a stalled engine is coasting to a stop. Often people erase fault codes thinking that is going to fix something, then, if they hadn't already been recorded, that valuable information has been lost.
When there are no fault codes related to the crank/no-start condition, you'll need a scanner to view live data and see what the Engine Computer is seeing related to these sensors. Both will be listed with something indicating whether or not their signals are showing up at the computer.
Be aware that if you remove either of these sensors, they have a critical air gap that must be maintained for proper operation and so they don't get broken by the parts rotating under them. The air gap for the original sensors was set with a thick paper spacer stuck on the end. The sensor is pushed in as far as it will go, then tightened down. That spacer's job is done now and it will slide off the first time the engine is cranked. If you remove one of these, you must use a new spacer to set the air gap again.
Many aftermarket sensors use a thin molded plastic strip to set the air gap. Those wear down over time, so if you want to reinstall one of those, you're supposed to cut the remaining part of the plastic rib off, then use a paper spacer.
Friday, January 4th, 2019 AT 5:01 PM
(Merged)


