Good afternoon,
You could either have a clogged heater core or a blend door that is not working.
https://www.2carpros.com/articles/car-heater-not-working
I would remove the hoses from the heater under the hood and flush the core with a garden hose. Run in back and forth until you get a good even flow.
When you change from heat to cool and back again, can you hear the blend door in the dash move back and forth?
https://www.2carpros.com/articles/replace-blend-door-motor
Roy
REMOVAL PROCEDURE
1. Drain the cooling system. Refer to Draining and Filling Cooling System (LS4 Static Fill) Draining and Filling Cooling System (L26, L32 Static Fill) Draining and Filling Cooling System (GE 47716 Fill) in Cooling System.
2. Remove the fuel injector sight shield.
imageOpen In New TabZoom/Print
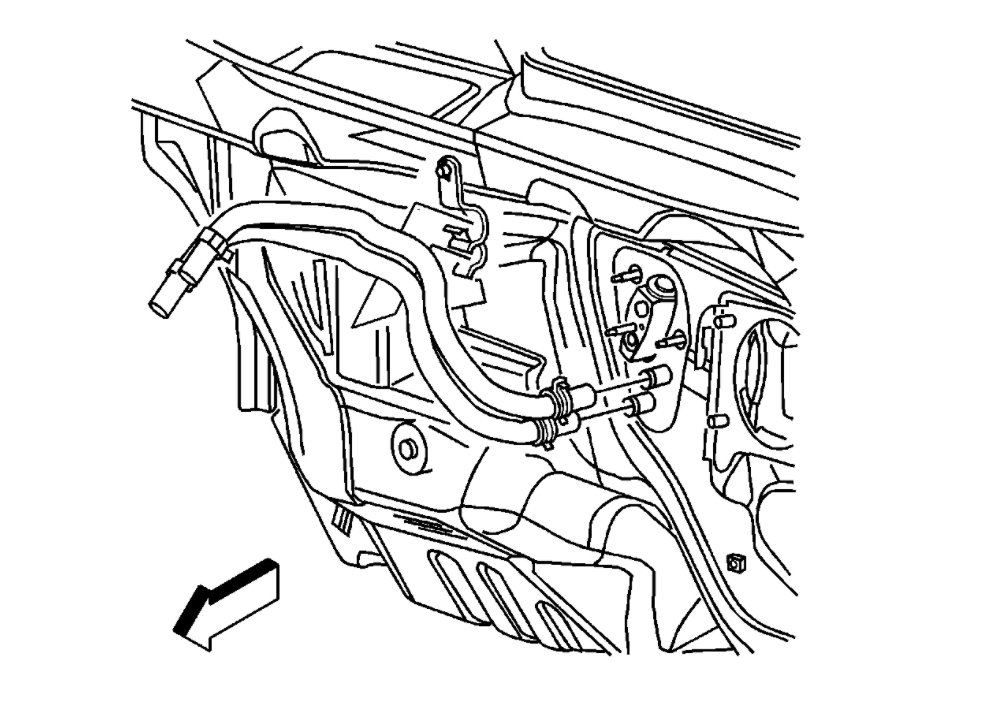
3. Use J 38185 in order to position aside the heater hose inlet clamp at the pipe adapter.
4. Disconnect the heater inlet hose from the pipe adapter.
5. Remove the heater hose from the support bracket.
6. Use J 38185 in order to position aside the heater core inlet hose clamp.
7. Disconnect the heater inlet hose from the heater core.
AIR TEMPERATURE ACTUATOR REPLACEMENT
REMOVAL PROCEDURE
1. Remove the right side instrument panel (I/P) insulator.
2. Remove the I/P compartment.
imageOpen In New TabZoom/Print
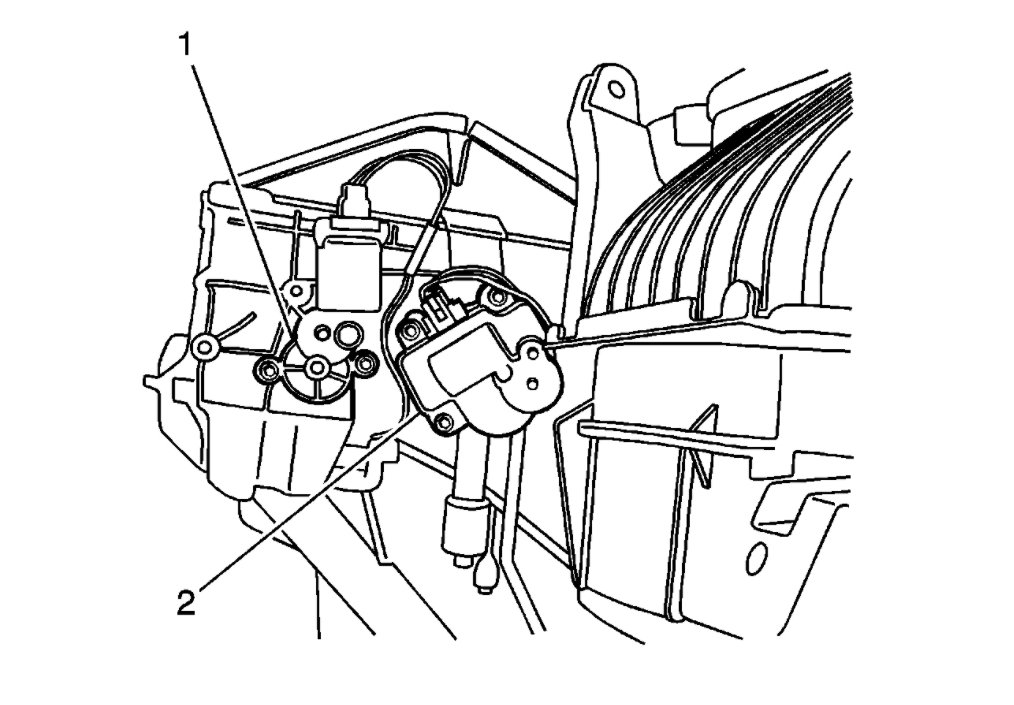
3. Remove the screws retaining the air temperature actuator (2).
4. Disconnect the electrical connector from the air temperature actuator.
5. Remove the air temperature actuator from the HVAC Module Assembly.
INSTALLATION PROCEDURE
imageOpen In New TabZoom/Print
1. Position the air temperature actuator (2). Align the slots in the electric actuator driver to the flats on the shaft.
2. Align the locating hole to the alignment pin on the HVAC module case.
3. Slide the actuator driver on the shaft. The actuator driver should sit completely on the shaft and the mounting holes should be flush with the HVAC module case.
4. Install the screws to the air temperature actuator.
NOTE: Refer to Fastener Notice in Service Precautions.
Tighten the screw to 1.5 N.m (13 lb in).
5. Connect the electrical connector to the air temperature actuator.
6. Install the I/P compartment.
7. Install the right side I/P insulator.
8. Calibrate the actuator. Refer to Re-Calibrating Actuators.
RE-CALIBRATING ACTUATORS
CALIBRATION PROCEDURE
Use the following steps to perform the calibration update:
1. Turn OFF the ignition.
2. Remove the battery positive voltage circuit fuse of the HVAC Control Module.
3. Wait 60 seconds.
IMPORTANT: The module memory will not clear if the battery positive voltage circuit fuse is installed in less than 60 seconds.
4. Install the fuse.
Images (Click to make bigger)
Sunday, January 31st, 2021 AT 1:51 PM


