NOTE:
? There may be two color variations of the link marks (link colors) on the timing chain.
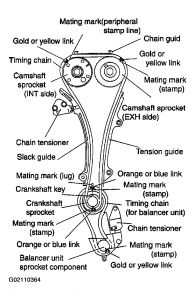
? There are 26 links between the gold/yellow mating marks on the timing chain; and 64 links between the camshaft sprocket gold/yellow link and the crankshaft sprocket orange/blue link, on the timing chain side without the tensioner.
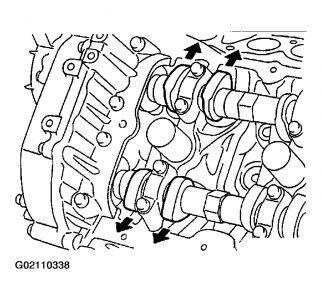
1.Make sure the crankshaft key points straight up.
2.Install the balancer unit and tighten the mounting bolts in the numerical order shown with the following procedure:
CAUTION:
? When reusing a mounting bolt, check its outer diameter before installation. Refer to Balancer Unit Mounting Bolt Outer Diameter .
a.Apply new engine oil to threads and seating surfaces of mounting bolts.
b.Tighten them to 45.2 - 51.0 N.m (4.6 - 5.2 kg-m, 34 - 37 ft-lb)..
c.Turn them another 90 ° - 95 ° degrees (Target: 90 ° degrees).
d.Fully loosen in the reverse order of tightening to 0 N.m (0 kg-m, 0 ft-lb).
e.Tighten them to 45.2 - 51.0 N.m (4.6 - 5.2 kg-m, 34 - 37 ft-lb).
f.Turn them another 90 ° - 95 ° degrees (Target: 90 ° degrees).
CAUTION:
? Check tightening angle with an angle wrench or a protractor. Do not make judgment by visual check alone.
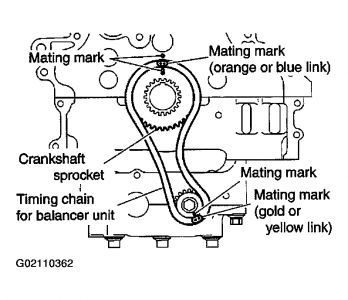
3.Install the crankshaft sprocket and timing chain for the balancer unit.
? Make sure that the crankshaft sprocket is positioned with mating marks on the block and sprocket meeting at the top.
? Install it by lining up mating marks on each sprocket and timing chain.
4.Install timing chain tensioner for balancer unit.
NOTE: Chain guide and tensioner move freely with the caulking pin as the axle. Therefore, bolt hole position of the three points could be changed during removal. If points change, temporarily fix the two mounting bolts on the chain guide and move the tensioner to match
ht
the bolt holes.
? Be careful not to let mating marks of each sprocket and timing chain slip.
? After installation, make sure the mating marks have not slipped, then remove stopper pin and release tensioner.
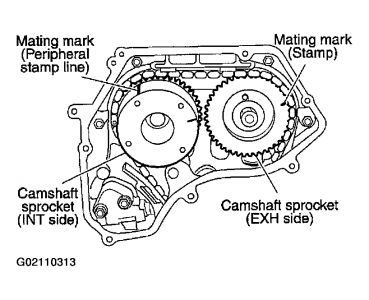
5.Install timing chain and related parts.
? Install by lining up mating marks on each sprocket and timing chain as shown.
NOTE: Before installing chain tensioner, it is possible to change the position of mating mark on timing chain for that of each sprocket for alignment.
CAUTION:For the above reason, after the mating marks are aligned, keep them aligned by holding them with a hand.
? Before and after installing chain tensioner, check again to make sure that mating marks have not slipped.
? After installing chain tensioner, remove stopper pin, and make sure the tensioner moves freely.
? To avoid skipped teeth, do not move crankshaft and camshaft until front cover is installed. 6.Install front oil seal to front cover.
? Using a drift of 56 mm (2.20 in) diameter, press oil seal in until it is flush with front end surface of front cover.
CAUTION:
? Be careful not to cause damage to circumference of oil seal.
Thursday, February 25th, 2021 AT 11:47 AM
