Negative Voltage between Ignition Coil and Battery?

1985 DODGE TRUCK
4.2L • V8 • 2WD • AUTOMATIC
Avatar
ALTHEA MAYBERRY
  • MEMBER
  • 65 POSTS
Dear CarPros,

I have the truck listed above Ram D150 with a 1979 318 cid engine. I have been working on this truck for nearly 3 years now. The person(s) who owned it before me made a mess of things. I have had to do a lot of extensive work on it. Let me explain everything I have done.
I have replaced:
*Distributor and pickup coil (Old distributor had a bent shaft)
*Ignition coil
*Starter relay
*Ignition switch
*ECU and wiring loom
*One bad fusible link in the duck foot wiring loom
*Ballast resistor

I have also replaced some wiring because I moved the ignition coil from the back firewall to the driver-side fender well. However, after investigating everything I have done, with a friend of mine who is a retired ASE-certified mechanic, neither of us can figure out what is wrong.
Where I think I went wrong is with the ECU wiring loom. The only place I could find a new wiring loom was at SummitRacing.com. Their ECU wiring looms are supposed to be universal and can be installed on a single ballast or a double ballast resistor system. However, the wires are different colors than what is installed in the original wiring. So, I had a bad time of it, figuring out how to wire it. I will include the diagram supplied by SummitRacing.com.
Now I will tell you what is going on as to what’s preventing it from running. I am getting spark in the start mode since the engine is trying to start. However, it won’t stay running, not even for a second in run mode. We have done some testing with my Volts/Ohms meter, and we are getting -12.5V from the positive side of the ignition coil and the positive side of the battery, with the key on and the key off. I do believe that it’s supposed to read positive 12.5, with the key on, from positive ignition coil to negative battery or any ground. I must have hooked up something backward.

I certainly hope you can help me figure out what I did wrong.

Sincerely,

Althea Mayberry
Sep 16, 2023 at 11:46 AM
Advertisement
Avatar
CARADIODOC
  • CERTIFIED EXPERT
  • 34,308 POSTS
First, do not use the battery's positive post for your voltmeter. We do that for some tests when checking if a ground circuit is good, but for the majority of tests using the positive post is only going to add a pile of confusion. For 99 percent of tests, voltages in a circuit are referenced to ground, meaning the battery's negative post or any paint and rust-free point on the frame, body sheet metal, or engine. If you're using a digital voltmeter and you just have the test leads switched, just ignore the minus sign in the displayed reading. For this type of problem, you can get faster results with a simple test light; the old kind with a standard light bulb, not one of the new electronic ones. For the most part here, we're just interested in whether we have something or nothing. The exact voltages are usually not important.

Next, there were two versions of ignition systems that used the small five-pin ignition module. My 1980 Volares use the newer version that only has four pins in the odd-shaped five-pin connector. Older versions used all five pins. The difference is the older style with five pins used the dual ballast resistor. One section of that fed that fifth pin. That dual unit caused a real lot of trouble, so the newer version did away with the troublesome half and just used a single resistor and the four-pin module. If I remember correctly, you can use the four-pin module in a vehicle that has the five-pin connector and dual resistor. Half of that resistor just won't be connected to anything and won't do anything.

The symptom you're describing is exactly what that dual ballast resistor caused. By being burned open, 12 volts did not show up on the one pin in the module, so there was no spark, (to keep the engine running). The clue had to do with the fact that all the way back to the beginning of time, a battery's voltage gets drawn down to as low as 9.6 volts during cranking. When we had breaker points, when they turned on, the only thing in the circuit to limit current was the very small resistance of the ignition coil's primary winding. With such little resistance, the high current would overheat and burn the contact points in a few hundred miles. To prevent that, the ballast resistor was added. The added resistance caused current to be a lot lower, and that made the contact points last thousands of miles.

As the breaker points operate, when they're open, there's no current flow, and 0 volts dropped across the ignition coil. When the points close, there is current flow and there's full system voltage across the coil, (typically around 14 volts, but we use 12 volts for this story). If we could smooth that out and take an average, we'd see roughly 10 volts across the coil.

Now take that lowered voltage due to the resistor, and couple that with the very low battery voltage during cranking, and that average voltage is so low, the very weak spark that results is often not strong enough to jump the spark plug's gap. That results in a crank / no-start, or very hard starting, especially in cold weather. To prevent that, the ballast resistor is bypassed during cranking. That is hard on the breaker points, but only as long as cranking takes place. Once the engine is running, that resistor is switched back into the circuit to protect those points.

The ballast resistor was held over with the world's first electronic ignition system, which was on Dodges in 1972 and Chryslers and Plymouths in '73. GM had their first version, the very nice HEI, (high energy ignition) system in 1976 or late '75.

The need to bypass the resistor was still there with the electronic ignition systems. The big three did that three different ways. GM did it with a "solenoid, ("S") terminal on their starter solenoids. It switched full battery voltage onto the ignition coil during cranking. Ford did it with a similar tap on their starter solenoids that sit on the inner fender next to the battery. They used at least three different versions of that solenoid to be sure there was sufficient confusion and frustration. Chrysler did the switching with a special tap on the ignition switch.

The point of this story is when the engine runs during cranking, but not once you release the ignition switch, it's due to that ballast resistor being burned out, or in this case, possibly not wired correctly. During cranking, the ignition switch is putting battery voltage on the terminal at the ignition module, but when the key is released to the "run" position, that circuit is turned off, but no voltage is coming from the ballast resistor to keep the module powered up.

The clue to this is the engine will run as long as the ignition switch is held in the "crank" position". With your left hand, you can reach over to shift into "drive", then the neutral safety switch will turn off the starter relay and the starter, but the engine will continue running until the key is released. That trick can allow you to drive out of the intersection where this failure occurred most often. Seems to be related to extended idling, as when sitting at a stop light.

I should add that there's one more version of this system that used two pick-up coils in the distributor and a relay to switch between them. I only saw that once, but I don't remember which years or models it was used on. One pickup was for normal running. The second one was switched in only during cranking to provide retarded spark for easier cranking. If you should have two pairs of wires coming out of the distributor, we're going to use just one of them. Either one can be used, but it may be necessary to readjust the ignition timing once the other problems are solved.

It will take me some time to find my diagram for this system. When I do, I'll post it to give us a place to start.
Sep 16, 2023 at 8:06 PM
Avatar
CARADIODOC
  • CERTIFIED EXPERT
  • 34,308 POSTS
These first two diagrams are right out of the service manual. They can be hard to follow until you become familiar with Chrysler diagrams. The third one is a diagram I drew to simplify the circuit. One point to be aware of is all through the '70s and most of the '80s, everything that had 12 volts switched onto it through the ignition switch used a dark blue wire under the hood. That includes one wire to the alternator, one to the voltage regulator, one to the choke heater, one to the ignition module, and one to the ballast resistor that split into two terminals for the dual resistor in this diagram from 1974. On many of the truck models, they used a red wire instead, so if you see either a red or a dark blue wire. you should find 12 volts on it when the ignition switch is in "run".

I won't whine and snivel if you use a digital voltmeter, but I would strongly suggest using a test light for these tests because they involve unplugging things in some cases. I can explain that better later. Your comment about the fuse link wire is what prompted me to recommend the test light. Also, I forgot to mention there's a sixth connection on the ignition module. That is the case, or housing, must be bolted to the body for the ground connection. Be sure that's tight and not rusty.

I added notes in the fourth diagram. Since the engine runs at times, we know the pick-up coil in the distributor has to be okay. If you needed to check it, best is to go right to the five-pin plug and check from there with an ohm meter. I can help with that, if necessary. I've found them to read around 650 to 700 ohms, but some service literature says it should be a lot lower. For the most part, you want to have something, not an open circuit. You can unplug the pick-up coil and measure there, but by doing it at the 5-pin connector, you're including the wires and the 2-pin connector terminals in the test. Next, with that 5-pin connector unplugged, you should find 12 volts on the other three terminals, (two if that's all you have). If one of those is missing, the ballast resistor is the likely suspect.

Now to add a clinker to the works, I see a reference to the starter relay and the wire from the ballast resistor. I haven't searched for that yet, but it is possible one of those ignition module wires gets its 12 volts from the starter relay during engine cranking. Regardless if it comes from the starter relay or a tap on the ignition switch, that circuit is working. It isn't shown on my version of the diagram.

Let me know what you find up to this point, and give me an idea of how comfortable you are with electrical diagnosis and reading meters.
Sep 16, 2023 at 8:19 PM
Advertisement
Avatar
ALTHEA MAYBERRY
  • MEMBER
  • 65 POSTS
I'm sorry, I guess I should have mentioned that I have a single ballast installed which was on the truck when I got it. Previous to my current truck, I had another 85 Dodge D150 and it was still factory. It too had a single ballast resistor.
Sep 17, 2023 at 5:36 AM
Avatar
CARADIODOC
  • CERTIFIED EXPERT
  • 34,308 POSTS
The story is the same. Just disregard the second resistor in my drawings.
Sep 17, 2023 at 6:16 PM
Avatar
ALTHEA MAYBERRY
  • MEMBER
  • 65 POSTS
We used the test light as you said and tested the power going to the starter regulator at the connection for the ballast. There is power going to the ballast connection in the crank mode but none in the run mode. Nor is there power going to the ECU or the ignition coil.
I thought I might add that I have had to do some rewiring and my friend, and I believe that I may have forgotten to hook something up or I hooked something up backward. But what? I don't know.
The extensive work I have done required unhooking a bunch of things under the hood because I did the head gaskets and manifold gaskets as well as installing a new timing chain assembly. I don't know if adding this information helps, but it does give you a broader view of what I have done.
Sep 18, 2023 at 11:00 AM
Avatar
CARADIODOC
  • CERTIFIED EXPERT
  • 34,308 POSTS
Wonderful. So we have 12 volts coming in on the pink wire for the resistor bypass circuit during cranking, but it's missing in the "run" mode for normal operation, (little red arrow). I pieced the two Chrysler diagrams together to make them easier to follow. The dead circuit is "J10 14RD. That's a 14-gauge red wire. Follow that back to the splice J10, (bigger red arrow). There's another diagram in between but it didn't reproduce well and at least for now, it isn't needed. The second diagram is for the ignition switch where circuit J10 originates. Actually, none of these reproduce very well. Get as far as you can, then I'll try to find something better. You can try copying them into a typing program like MS Word where you can make them bigger, if that will help.

In the first diagram, I followed it backward to J10. In the second one, it's easier to explain if we start at the blue arrow and follow it forward to J10. That's coming from a fuse link wire which is a good suspect. If you know where it is, tug gently on it. If it acts like a wire, it's good. If it's burned open, it will act like a rubber band. The circuit goes through a curved connector at the base of the steering column, (smaller red double arrow). Those terminals are another good place to find a badly burned or overheated connection. Check for 12 volts on both sides by back-probing those terminals alongside each wire.

Next, it goes to terminal "B1" on the ignition switch. That is another good place to find an overheated connection. Same with where it comes out on terminal "I". At this point, the ignition switch must be in the "run" position for 12 volts to be on the circuit. Next it goes to the connector again, (bigger red double arrow), and another good place to find burned terminals. After that connector, they show it feeding two fuses, 11 and 12. Look for those in the fuse box. They will have two tiny holes on top for test points. This is a dandy place to break the circuit in half. Let me know what you find on those fuses. If there's 12 volts, the defect is further down the circuit. If there's 0 volts, we have to look back toward the battery or fuse link wire.
Sep 18, 2023 at 8:17 PM
Avatar
ALTHEA MAYBERRY
  • MEMBER
  • 65 POSTS
Hello Caradiodoc. I thought I'd give you an update. We've had a bit of rain since we last conversed, and then over the weekend, my friend who's been assisting me had his 61st birthday on Saturday, and then on Sunday he went to a NASCAR race. However, I think we may have pinpointed the problem to either the wire that comes out of the bulkhead, inside the cab, to the ignition switch for the ignition feed, or it may be where the wires connect to the bulkhead. We had a difficult time taking out the part of the bulkhead that goes through the firewall. By the time we got it out, it was pretty hot outside, so we quit for the day. This morning I am going to check the connections in the bulkhead and try cleaning them. I'll let you know what I find out.
Sep 27, 2023 at 6:53 AM
Avatar
ALTHEA MAYBERRY
  • MEMBER
  • 65 POSTS
Hello again Caradiodoc. Here's a new update. I did an Oms test on the red wire on the cab side of the bulkhead and it's throwing an enormous number of 93.1 Oms. The blue wire is at 1.4 Oms. It's not supposed to be throwing that big of a number, right? If not, what's the best way to go about fixing it?
Sep 27, 2023 at 8:16 AM
Avatar
CARADIODOC
  • CERTIFIED EXPERT
  • 34,308 POSTS
You are so correct. That's way too high. That red wire feeds a lot of stuff under the hood. To do a quick double-check, turn the ignition switch to "run", then look on the back of the alternator for the two smaller wires bolted to the two brushes. One of those will also be red. See what you have for voltage there. It should be full battery voltage. If you find it's real low, a test would be to use a long jumper wire between that red wire and the positive battery post. Multiple things will come to life.

The terminals in bulkhead connectors and that curved connector at the base of the steering column were known for burning up due to the high current flow through them. There's a couple of ways to address this. First, if you see the connector body is melted, or the terminals are black, there's no saving them. They develop a little resistance between the mating pair of terminals. That resistance causes heat when current flows through it. That heat causes more resistance, and keeps snow-balling until the terminals turn black.

One repair is to cut the burned terminals out along with the melted plastic around them. Install new terminals, then plug them in separately after the rest of the plug is reconnected. Any time you do that, the wires will be hardened from the heat for about four inches. Solder won't adhere to that, so you have to cut off that four inches, splice in new pieces of the same gauge, then use a pair of universal crimp-style terminals, but solder them too for the best connection. This was real common too on mid '90s ignition switches., and I've run into it on head light and dimmer switches. Heater fan switches can also develop these overheated terminals.

The second method of repair is to just cut out the terminals and the four inches of wire on each side, then slice in a connecting wire with no terminals. The bulkhead connector is only there to put the vehicle together on the assembly line. It isn't needed after that as it does not provide a convenient place to take readings or do other tests.. Same with the steering column connector. You only need that one if you replace the entire column. It's a better repair to splice in a jumper wire around the connector, with no terminals.

Keep me updated on your progress.
Sep 28, 2023 at 10:43 PM
Avatar
ALTHEA MAYBERRY
  • MEMBER
  • 65 POSTS
Thanks, Caradiodoc. I did check the connectors on the bulkhead on both sides and the ignition switch half-moon connector on both ends and, luckily, they're not burnt. Resistance testing on the terminals themselves checks out normal. I'll try your test method for the alternator wire that you mentioned.
Sep 29, 2023 at 6:15 AM
Avatar
STRAILER
  • CERTIFIED EXPERT
  • 53,855 POSTS
Please let us know what you find.
Oct 2, 2023 at 10:46 AM
Avatar
ALTHEA MAYBERRY
  • MEMBER
  • 65 POSTS
Hello again. I did the suggested test on my alternator, and this is what happened: nothing. Nothing lit up. However, I left the battery connected for approximately 5 minutes, while I went next door to talk to my mechanic friend who's been helping me. After I returned to my truck, I discovered that the red wire on my alternator was hot to the touch. Also, my wire-piercing probe melted. What's the matter with this?
Oct 2, 2023 at 12:01 PM
Avatar
CARADIODOC
  • CERTIFIED EXPERT
  • 34,308 POSTS
That circuit draws a lot of current. Besides that field terminal on the alternator, the red wire feeds the voltage regulator, the ballast resistor for the ignition module, the electric choke heater, and possibly a few other things. When the engine is not running, meaning electrical system voltage is low, the voltage regulator is going to try to run the alternator wide open to get system voltage up to where it should be. Under that condition, field current through the alternator's brushes and the voltage regulator will be close to three amps. That's the equivalent of three brake light bulbs. I never measured current through the choke heater, but I would guess that could be another two or three amps. The ignition module turns on to allow current flow through the ignition coil, then pulses it off roughly 50 percent of the time when the engine is running. That's another couple of amps, but it turns off half the time, so the average is less. With the engine not running, that module is going to be turned on constantly, waiting for the timing signal to turn it off briefly. All those things added together, it's not unrealistic to find ten amps flowing through that circuit. That's the same draw as two low-beam head light bulbs.

Wire-piercing anything was never allowed in my classroom. If I found a pierced wire on one of my "bugged" cars, the offender was invited to replace the entire wire. WAY too many problems show up in the future from moisture getting in and corroding the wire. For our GM-owning friends, GM was using a lot of aluminum wire throughout the '80s. They had huge problems even without cutting into wires, especially at the fuse boxes. Those sat in front of the brake pedal where water and salt from shoes could get to the brass rivets inside the fuse boxes and cause corrosion. If someone did poke a hole in the wire's insulation, that section could turn to powder in as little as a couple of weeks. Instead, follow the wire to a connector terminal and back-probe it there to take a reading.

There's a couple of better ways to approach this. If you suspect something on that line could be shorted to ground, disconnect the negative battery cable, then use your ohm meter to measure between anyplace on that red wire, to a clean, rust-free point on the engine or body. If you find close to 0 ohms, unplug the voltage regulator, the ignition module, and the choke heater to see if the resistance goes up. With no power to the system, nothing will be turned on, so you should find a pretty high reading. I expect to find nothing shorted because you would have gotten a huge spark when you connected your test probe.

A better way to diagnose this, when you think something is drawing excessive current, is to use a light bulb in that jumper wire. I put together a dumbed-down set of drawings that I hope any competent do-it-yourselfer can follow to show how this is done. You won't have any trouble understanding the concept, but I have to explain a couple of changes. First, these are for powering up a circuit that is blowing its fuse. It's done by replacing the fuse with a bulb. I have another set of drawings for doing the same thing by bypassing the relay. Either one lets you work in the circuit with power applied. The bulb limits current to a safe value when the short is present.

The first change is you don't have to go to a fuse or relay. Just connect the bulb in series between the battery's positive post and the red wire. Second, the 3157 brake light bulb in my drawings won't pass enough current. You're likely to see little difference in brightness between having a short on that line vs. normal operation. Instead, substitute a head light bulb for the brake light bulb. Brake light bulbs draw one amp. A 9004 or an older sealed beam bulb will pass close to five amps on the low beam, and six amps on the high beam.

What you will find with the head light bulb is if the circuit has no short, it will be on but much less than full brightness. If there is a short, or if you want to experiment and ground out the red terminal at the alternator, you'll see the bulb go to full brightness. No more than five amps will pass through the bulb, so the wiring is protected.

With a jumper wire that can handle the current, and no short on the red wire, the engine should run. When the bulb is added to that jumper wire, it may drop too much of the 12 volts, leaving too little to power the ignition module and coil. If that bulb's brightness indicates there's no short, remove it and run the jumper wire directly to the red wire. If the engine runs, it just proves everything under the hood is okay. We still have to find where the 12 volts isn't making it from the ignition switch to under the hood.

I have one more comment of value, but you're free to disregard this if it will confuse the issue unnecessarily. That has to do with replacement alternators. All generators require three things to work. They must have a wire, (coil of wire), a magnet, (we use an electromagnet because it's easy to adjust its strength), and most importantly, movement between them. That's why we spin the electromagnet with a belt and pulley. Electromagnets are always a wound-up wire with two ends. Those are what the two brushes are connected to so the "field" coil can rotate, and that's what the two smaller wires are bolted to on the back of your alternator. Either wire can go to either brush terminal.

That wasn't the case in the earlier versions. The "AC generator" was one of Chrysler's many innovations that other manufacturers copied. They even copyrighted the term, "alternator". In those early versions, from 1960 - 1969, field current passed through the voltage regulator first, then to the field coil in the alternator, then to ground. That meant one of the field brushes was mechanically bolted right to the unit's housing to ground it. There was only one small wire to connect.

Starting with the 1970 models and the introduction of the electronic voltage regulator, (another Chrysler innovation), field current flows to one alternator brush first, through the field coil, out the second brush and terminal, over to the voltage regulator, through it, then to ground. To say that a simpler way, neither field terminal on the alternator is grounded. Where you see those brushes bolted on, there's fiber insulating washers under the bolt heads.

The potential problem is due to the fact the newer design can be used on the older car models. One field brush has to be grounded, and that was accomplished by the rebuilder supplying an extra metal washer to replace one of the fiber washers. The other insulated terminal was still used with the one smaller wire. No other wire had to be attached to the brush with the steel washer as it was now grounded.

The problem is once that modification was made, simply switching the one washer, that alternator was going to show up on the shelf at a salvage yard sooner or later. With only a quick glance, that metal washer could be overlooked. If that alternator was installed on a newer vehicle, one of two things would happen. If the red 12-volt feed wire, (blue on most car models), was attached to the grounded brush, you'd have that dead short. If it was attached to the insulated brush, the grounded brush would be bypassing the voltage regulator, so the alternator would charge wide open. That leads to blown bulbs and a badly over-charged battery. I'm only mentioning this because with all the things you mentioned from the previous owner, there's the chance this problem could be involved here.
Oct 2, 2023 at 4:30 PM
Avatar
ALTHEA MAYBERRY
  • MEMBER
  • 65 POSTS
Hello again. After unwrapping all the wiring in the engine compartment, I discovered that the insulation on the wires was cracked and breaking apart. The wires are very stiff as well. I've put too much time and money into this project to quit now, so I will be replacing all the wiring. I've already begun with the 14-gauge red wiring. This will take a while. I found these new kinds of splice protectors. They are clear heat shrink tubing with solder in the middle. They are called Solder Seal Wire Connectors. I hope they work as well as described in the videos I've seen. I've already used some of them and they seem like they will work just fine.
Oct 6, 2023 at 7:52 AM
Avatar
CARADIODOC
  • CERTIFIED EXPERT
  • 34,308 POSTS
My friend found those too at a car show swap meet. They do indeed seem to work, but I do have some concerns. The way the strands of wire get poked into each other in those connectors is exactly the way I do it for my repairs, especially where I splice in new sections between the door hinges. My concern is wires with insulation that has been cracked for a few years will have let moisture in, and that leads to a brown coating of corrosion on copper wires. I make sure to scrub that clean until I see only bright, shiny copper, then I splice the two ends, solder them, then seal them with moisture-proof heat-shrink tubing. I'm sure a lot of people are going to stuff the wires together without shining them up first. Solder will not make a solid electrical connection through that coating of corrosion. I can see a lot of problems in the future due to intermittent connections.

The other thing I question is how that solder can melt at such a low temperature. Regular solder that I've used for decades in tv and car repair melts at around 500 degrees. You need a soldering iron to get the temperature of the parts that high. It is not proper to melt the solder with the soldering iron. Doing so burns away the flux leaving molten solder that will not flow correctly to adhere to the parts. Instead, proper procedure is to use the soldering iron to heat the parts, the wire strands in this case, then those parts must get hot enough to melt the solder that's touched to them. Molten solder will flow through the wire strands toward the heat source, so you touch the solder to the side opposite of the iron and let it flow to the iron.

Once that solder joint has cooled, the heat-shrink tubing is slid over it, then heated with a hot air gun, similar to a hair drier. The temperature those get to is more than enough to shrink the tubing and melt the hot-melt glue inside them, but not nearly hot enough to melt the solder and let the splice fall apart.

Now we have these connectors with solder that DOES melt with a hot-air gun. What's different about it and will it hold up as well, or develop problems in the future?

My last concern has to do with standard good soldering skills. Proper techniques start with forming a solid mechanical connection, THEN a good electrical connection. By that, I mean you don't just lay two wires next to each other, or touch a wire to a terminal, throw a little solder on them and expect it to hold. Normal vibration will cause those parts to crack apart over time. Instead, we crimp terminals to wires first, or twist the ends of wires around each other first, to form the mechanical connection, then solder them to form the electrical connection. I've seen similar splice connectors that have a metal barrel that must be crimped with a special pliers to form the mechanical connection, then the tube is heated to shrink it and form a seal, but there's no way to get solder in there for the good electrical connection. These new connectors should make the good electrical connection and seal out moisture, but there's no solid mechanical connection first.

While these do seem to work, time will tell how well they hold up. I have a 2014 Ram that was a crash rebuilder. I've been driving it since it had 4200 miles with a broken connector by the left front wheel. Someone at the yard I bought it from planted a bunch of non-moisture-proof butt connectors in place of that connector so they could drive the truck around the yard. I haven't replaced the connector yet, but when I do, I'm not ready to trust these splices. I'll be using my normal method, but one frustration has always been holding the two wires together while they're being heated and soldered. Recently I found a special pair of pliers made for just that purpose. It locks in place with the wire strands interconnected and holds them while you do the soldering. This connector could just be eliminated as it is only needed to put sections together on the assembly line, but I like the idea of having it there to provide legitimate test points. I've replaced a half dozen of these on other rebuilders at my friend's body shop. It seems to be the first thing to get damaged in a crash. In later years it was moved to a more protected location, and still later it was removed entirely from the wiring harness.

I haven't run into the type of wire problems you found. I'm wondering what caused the damage. It sounds like it's heat-related, like a section was too close to hot exhaust parts or some heat shield got removed during other services and didn't get reinstalled.

Keep me updated on your progress.
Oct 6, 2023 at 5:49 PM
Avatar
ALTHEA MAYBERRY
  • MEMBER
  • 65 POSTS
Hello again. Before I answer your last response to my last post, I first need to ask a question. I am providing a photo so you will understand what I am asking. I am working on the red 14 gauge wires that is under the dash which goes through the bulkhead. The red wires look like they are spliced with a pigtail. Two wires morphing into one. They are being held together by a thing that looks like a small barrel. Is that also a fusible link? Or is it just a very strong connector?

Now to answer your post. Truthfully, I also wondered the same thing about the Solder Seal Wire Connectors because I do know it takes a lot of heat to apply solder properly. Especially after I connected the first two wires together. I noticed that the solder didn't seem to be melted. My friend and I thought that it could cause a problem. Yes, I understand that the wires need to be heated first and then the solder applied to the hot wires. I didn't know that there is a special tool to help hold the wires as you're soldering them. What's the tool called so I can get one?

As far as twisting wires together. I do it the same way as shown in the photo with the red wires twisted together. This is how my automotive instructor taught me how to do it in the 89/90 school year. I had a 1972 AMC Matador and I switched out the 6-cylinder inline engine for a V8. The alternators were on opposite sides, so I had to add some wiring. This is also when I learned how to solder and seal it with shrink tubing. Although I did take automotive repair classes, there is still a lot I don't know. I'm more of a hands-on learner than a book learner.

The wires in the engine compartment mostly ran across the firewall, just under the hood. a couple of months ago, I thought I was done with that part of the wiring, so I wrapped it back up with insulated cloth tape. However, after being in contact with you, I decided to unwrap it again because of what you said about broken wire insulation. Although I already knew of the broken insulation, I didn't know about the pliability and the corrosion, so I checked for pliability and corrosion. The red 14-gauge wires are stiff all the way to the 5-way splice on both sides of the splice as well as corroded and brittle, which as to why I am replacing the red wires. However, I don't know what I am going to do about the 5-way splice. The whole thing needs to be replaced. There are other wires in the harness that are the same way.

I don't know how long this is going to take, but I plan to rewire everything as well as thin out and eliminate what is not necessary. Such as the wiring for the A/C unit. The A/C compressor and mounting bracket are missing, so I don't need the wiring for that. This part of my project is going to take some time.
Oct 7, 2023 at 12:19 PM
Avatar
CARADIODOC
  • CERTIFIED EXPERT
  • 34,308 POSTS
On your first photo, I've seen those too, but never really paid much attention to them. If that is one wire feeding two fuse link wires, the two will be of a smaller diameter for up to about six inches, then there will be another splice and the wire will go back to a larger diameter. That makes the smaller fuse link section the weak link in the chain. The insulation on fuse link wires is dull, and chances are it will be a different color. Their current ratings are denoted by the color of the insulation, and I don't think I've ever seen red. Orange, gray, white, and black are common. The wire is regular wire. It's only the insulation that is special. It is designed to not burn or melt. If the two wires are red and shiny, it's more likely they're just two different circuits. It's less expensive to use a splice rather than run both wires all the way back to their point of origin.

You purchase replacement fuse link wire from any auto parts store. You'll get a piece about 12" long which is more than enough to make two or three repairs. The length of the installed section is not important. All that is important is there is something in there that's smaller than the rest of the wire it protects. In fact, you can splice and solder the ends of the old fuse link together too to make the repair once the short is solved. As long as some of the original wire is still there, the circuit is still protected.

As a point of interest, you can harvest a whole handful of fuse link wires at any salvage yard from an older Dodge Shadow or Plymouth Acclaim, and their twins. Those front-wheel-drive vehicles have about a dozen of them in a bundle running around the left front strut tower under the hood. Typically you'll see mostly white and a couple of gray wires.

As long as I'm sharing all this wondrous information about fuse link wires, these are used in high-current circuits, and they act like slow-blow fuses because they take some time to burn open. Current flow through a motor goes way up when it is stalled or locked up, or runs slow due to tight bearings. That will cause the link to burn open eventually. A motor that's just starting up when power is first applied also draws high current for a couple of seconds until it gets up to speed. That's where a regular fuse could blow but there's no actual defect in the circuit. Fuse link wires tolerate that momentary high current.

There is one huge drawback with fuse link wires that isn't an issue once you understand what is happening. In one case in particular, a very experienced former coworker who didn't like me, came over with his tail between his legs and asked for my help years ago with a radiator fan problem on a K-car. The old fan motor had tight bearings, so he ordered a new one. Couple of days later he installed it but it wouldn't run. He used the scanner to cycle the fan's relay on and off and found 12 volts pulsing on and off on the motor's positive wire. Ground wire was okay. In his mind he had ground, 12 volts, and a motor that runs when he jumps 12 volts to it, yet it doesn't run in the car. All I told him at first was to recheck the 12 volts with a cheap, standard test light instead of his expensive voltmeter. He looked confused, but came back a few minutes later and said now he does not have 12 volts pulsing on and off, and he found the fuse link wire burned open. He was my buddy after that. There was nothing wrong with his diagnosis, except he didn't go far enough.

Digital voltmeters work by measuring electrical pressure, (voltage). To do that, it takes just barely a tiny tickle of current to do that. The drawback I started to describe about fuse link wires is when they burn open, the last step is for some arcing to take place between the two ends of the wires. That arcing leaves a carbon track behind on the inside of the insulation, similar to what we often found inside distributor caps. That little film of carbon can pass enough current for a voltmeter to see 12 volts at the end of the line. Think of having 50 psi of water pressure at a faucet and at the end of the garden hose. That carbon track would be like standing on the hose and blocking it by 99 percent. You'll still have 50 psi at the nozzle, . . . until you open the nozzle and try to get some water flow, (current). Barely a dribble of water will get through, and now, with the nozzle open, you don't have 50 psi there anymore.

What would have made the K-car problem faster to find was if he had taken the voltage reading with the connector plugged in. By unplugging it, that was like having the hose nozzle closed off. Full pressure will still be at the nozzle as long as you don't have the hose 100 precent blocked with your foot. That 50 psi is a false reading. It isn't there when you want the system to do some work, in this case, spray water. The 12 volts he had at the motor's connector was there until he connected it to the motor and tried to get enough current to do some work, then it was gone.

The old-style, common test light with an incandescent bulb inside requires current flow through it to do its thing. Not enough current can get through the carbon track to make the test light turn on, so it gives the more accurate result.

This applies to any high-current circuit like heater fans, head lights, charging systems, wipers, and things like that. Besides just checking to see if you have the required 12 volts, you must also see if the circuit can pass the needed current. There's two ways to make it want to draw the required current. One is to simply plug in the item it runs. That was the radiator fan motor in my sad story. That's the time to take the voltage reading, but in some cases that can be hard to do. Being plugged in to get valid readings also applies to sensor circuits. With those, there's usually rubber weather seals around each wire where they go into the connector body. That's a perfect place to poke the meter's test probe. Radiator fan plugs are designed to seal out water when they're connected, but if you're careful, you can usually pull them apart just enough that they stay connected, but enough of the terminal is exposed to allow you to take a reading.

So keeping the circuit connected is one way to see if it can pass enough current. The second way is to use a test light instead of a voltmeter. Test lights don't draw nearly as much current as do motor's, but they at least draw some. Voltmeters draw so little, for all practical purposes, we say they draw no current.

In your second dandy photo, you've created the mechanical connection I described. The solder will provide the electrical connection next. When I do door wiring, I don't even twist the strands together. I prefer to just slide the strands from both wires into, or through each other, twist them just enough so they hold together long enough to throw some solder on them, then I slide the heat-shrink tubing over and warm it. I'm less concerned with the solid mechanical connection because when I do these on older Caravans, it takes 11" of wire, but I pull the old wires out of the "A" pillar and out of the front of the door, then splice in 22" of each new wire. There can be up to 22 wires if the van has door speakers, courtesy lights, power mirrors, and things like that. When I'm done, I push the splices inside the front of the door where they aren't going to flex. Half of what remains gets stuffed inside the "A" pillar, but you gotta watch that it doesn't coil up on the parking brake assembly. That puts those splices inside too where they won't be flexing. If that repair ever needs to be done again, you just pull the extra out of the "A" pillar and you're half done. Only have to cut and splice on the door end of each wire.

I also got a chuckle out of your comment, " I'm more of a hands-on learner than a book learner.". In my three miserable years in college, one of the very few things of value I learned was that different people learn best in different ways. I knew that already, but needed to hear it from someone else to solidify my thought. Years later I used that comment in my classroom when explaining why electrical theory and suspension and alignment theory are so difficult to learn. It's because people in Automotive classes, carpentry programs, and other hands-on programs typically learn best by taking things apart, manipulating those parts, and seeing how they interact. People good at Electronics learn best by hearing descriptions and visualizing theoretical concepts. A confused Automotive student, simply made aware of why electrical theory is so hard to learn, finds it a lot easier after knowing why, especially when I can compare anything electrical to water flow, which is something we've all seen and played with. We had to have our book learnin' too, but if you did that the night before, you had questions the next day in class, and that formed the basis of our "class discussions" before we went out to the shop for the day.

I have to add one more comment of value. In nine years of teaching Automotive, three of my top students were girls, and the guys had a lot of respect for them. I don't know if they just tried harder than the guys who grew up in the field, but one in particular would run you over with enthusiasm when she was given a job to work on. We had a lot of fun in our shop.

As before, keep me updated on your progress, and bring on any other questions.
Oct 7, 2023 at 6:00 PM
Avatar
ALTHEA MAYBERRY
  • MEMBER
  • 65 POSTS
Hello again. I guess I should have told you where the red pigtailed wires go in the photo. The single wire goes into the fuse box and the other two, one comes from the bulkhead connector and the other goes into the half-moon connector for the ignition switch.

When I began my automotive class there was one other girl besides me, but she didn't stay long. I guess she decided she didn't like it and dropped the class.

Anyway, I was brought up around cars. My dad fixed cars as a side job in my grandma's backyard and I was always poking my nose in his business. By the time I was 6, I knew more about cars than any other 6-year-old. After he was discharged from the Navy, he went into stock car racing. He built his own cars and raced them for several years. Then about 1966, he learned my mom was pregnant with me, and then he got into a wreck while racing one night and landed in the hospital for several days. After that, he decided to quit racing, went into paint contracting, and did backyard mechanics.

Also, every boyfriend I ever had, except for two, were mechanics, and I was married for 30 years to a mechanic. So, I do have a pretty extensive background in automotive. I prefer old vehicles as opposed to newer ones. I don't like all the junk covering the engine and it's harder to do what should be a simple tune-up. I don't know everything and this is my first time tackling a major wiring issue.
Oct 8, 2023 at 10:54 AM
Avatar
CARADIODOC
  • CERTIFIED EXPERT
  • 34,308 POSTS
First weekend after July 4th for the last 20 years I sit in the swap meet of the nation's second largest old car show at Iola, WI and sell and repair car radios, mostly Chrysler stuff. Make a lot of new friends every year. In conversations, about one out of three people can't stand all the unnecessary use of technology, meaning computers to do things that never needed computers before. There's a huge market up here for those who drag older rust-free cars up from down south. I still have my first new car, an '80 Plymouth Volare, with 45,000 miles. What a pleasure to drive. Also just dug out my only other new car, a '93 Dynasty with just under 5,000 miles. Doubled the miles I put on last year. This year I drove it two miles. So comfortable and quiet.

Anyway, I agree with your assessment. There's no arguing cars today are cleaner, and no one wants to go back to the old days in that respect, but if my carbureted Volare can consistently get 28.3 mpg with a 4,400 pound car with chromed steel bumpers, why can't a little plastic car that weighs half of that get 80 mpg with all the current technology?

Now I'm disgruntled. Will need to go shopping in Home Depot. That always helps.

As before, please keep me updated on your progress with the wiring problem.
Oct 8, 2023 at 2:46 PM
Avatar
ALTHEA MAYBERRY
  • MEMBER
  • 65 POSTS
Hello Caradiodoc, I just thought I'd give you an update on my truck. I'm just taking my time going through the wiring. However, I have taken a big break from this project and haven't worked on it since the middle of October.

Thea
Dec 11, 2023 at 1:35 PM
Avatar
CARADIODOC
  • CERTIFIED EXPERT
  • 34,308 POSTS
I'm still here when you need me.
Dec 11, 2023 at 1:45 PM
Avatar
ALTHEA MAYBERRY
  • MEMBER
  • 65 POSTS
Hello Caradiodoc,

After all the winter weather, now I have a break with warm weather, today I decided to do some work on my truck, and guess what? It's alive. Today, I replaced the red wires from the alternator to the 5-way cluster, then from the cluster into the bulkhead, and then from the bulkhead to the half-moon connecter for the ignition switch. Then after I got everything connected back up, I put in the key, and it turned over. Now I have to test for spark and hopefully, it's there. If it starts tomorrow, then I'll install the brand-new aluminum radiator and electric fans I purchased for it last March. I'm so proud of myself.

Thea
Feb 22, 2024 at 3:52 PM
Avatar
CARADIODOC
  • CERTIFIED EXPERT
  • 34,308 POSTS
Dandy. Keep me posted.
Feb 22, 2024 at 6:09 PM
Avatar
ALTHEA MAYBERRY
  • MEMBER
  • 65 POSTS
Hello Y'all, I just thought I'd give an update about my truck. Just today, it finally fired and ran for a few seconds. It may have run longer if it didn't have massive vacuum leaks because nothing's plugged in. The problem boiled down to a bad red wire that runs from the alternator to the 5-way splice, from the 5-way splice into the bulkhead, and then from the bulkhead into the half-moon connector on the ignition switch. I spent the time tracing it all down and replacing it. So I did all this other stuff to it, including taking the heads off and lapping the valves, which needed doing anyway and that wasn't the problem. Anyway, while I was at it I also replaced the timing set.

Now to put it all back together and install the brand new custom aluminum radiator with electric fan. Then it'll be good to go.
Mar 10, 2024 at 3:20 PM
Avatar
CARADIODOC
  • CERTIFIED EXPERT
  • 34,308 POSTS
Wonderful news. For the record, starting in 1972, and possibly earlier, every dark blue wire under the hood got 12 volts when the ignition switch was turned to "run". Later, on many truck models, that changed to a red wire. You'll find one at the alternator, one at the voltage regulator, one to the electric choke heater, and one to the ignition module or ballast resistor.

That curved connector you mentioned was a good place to find an overheated pair of connector terminals. You could see the blackened area around them. That connector was only needed to allow the steering column to be installed on the assembly line. After that, if you find a burned connection there, just cut the wires back at least four inches on each side, then splice in a new section of the same diameter. In those first four inches, the copper wire gets hardened from being hot. I cut that away because solder won't adhere to it.

Seal the connections with heat-shrink tubing that you slide on before pushing the strands into each other. Don't use electrical tape because that will unravel into a gooey mess on a hot day.

Happy to hear this is coming along. Keep me updated.
Mar 10, 2024 at 10:00 PM
Avatar
ALTHEA MAYBERRY
  • MEMBER
  • 65 POSTS
Thanks for the extra info on the red wires. I will check those to see what condition they are in. Before I wrap all these wires back up, I want to be sure I don't need to replace any other wires. So comes my next wiring question.

There are three wires that plug into the oil-sending unit. One of those wires was a red wire, which is one that I have replaced. The other two wires are a blue wire and a yellow wire--very brittle. I have had this unplugged for so long that I don't remember where they plug into. I've been studying the schematics in my Haynes manual but it's so confusing to look at. It has two devices, which is greatly confusing to me where the schematic is concerned.

The first device is a small can that has a white wire going to it, the second device is a three-pronged sensor with three wires-- red, blue, and yellow (I have included photos for clarity). On my dashboard, there is the pressure gauge and a dummy light. I don't understand why it has both, but I only care about the gauge and not so much the light. So, what do I need to just make the gauge work? I'm beginning a new process called the process of elimination. If it's not needed, it's coming out. For example, half of the air conditioning unit is missing, so I'm taking it out and I don't need the wiring so it's coming out as well.

So, to keep the oil pressure gauge which do I need to eliminate, the can or the three-prong sensor? If I need to keep the sensor or keep it all, I need to know where the blue and yellow wires go. By the way, I'm not using the choke heater. It will be heated by the internal heat riser.

I am also confused by the EGR valve. As you can see in the photo with the carburetor and EGR, the engine doesn't have the original carb installed. It's an older 2bbl Carter/Holly. As long as I've had this truck, the EGR has never been plugged in. So, I'm scratching my head wondering why it's never been plugged in and where it plugs into. I don't know what the people who had it before me did to it, but they got it all messed up.

Again, thanks for all your help thus far.

Thea
Mar 11, 2024 at 10:03 AM
Avatar
CARADIODOC
  • CERTIFIED EXPERT
  • 34,308 POSTS
First, for many years, Chrysler used thermal dash gauges. They used a bimetallic strip with a small heater wire wrapped around it. I don't know when they dropped that style, but if you have them, the clue is when you turn the ignition switch off, the coolant temperature, oil pressure, and gas gauges will stay put for a few seconds, then slowly and smoothly drop down to the left. GM used magnetic gauges that respond instantly. They had to add all kinds of complicated circuitry to prevent their gas gauges from bouncing around.

For a real long time, Chrysler was the world's leading innovator for things that actually benefited car owners. One of those innovations was the introduction of "telltales", meaning little red lights built into the gauges to get your attention. I had them on my two '78 LeBarons. My '80 Volare doesn't have them, and I miss them. Their purpose was to grab your attention when you needed to see what a gauge was indicating. Today we get warning messages on a display screen. Without the "Oil" warning light on your dash, you could drive too far with low or no oil pressure if you don't check the gauge often enough.

The first unit you mentioned is an odd design of an oil pressure switch. I added arrows in the diagram. When the engine is not running, or when you lose oil pressure, the switch is as drawn. 12 volts is applied to one side of the "Oil" light on the dash, through the ignition switch. Current flows through the bulb, out of the cluster, then follows the black arrows. That's the white wire, (might look yellow on the truck), through the switch, to ground. The light turns on.

When there's oil pressure, the bar shown inside the switch moves up to connect those two terminals. Those are the red and dark blue wires. The red one has 12 volts on it when the ignition switch is turned to "run". Current flows through that switch to the choke heater. The choke heater only operates when the engine is running and has oil pressure.

There were three problems with the heat-riser valve you mentioned. The first was the shaft could rust to the manifold. If it rusted in the open position, exhaust gas would not be blocked, and be redirected to flow through a passage through the intake manifold, then out the driver's side exhaust manifold. That flow ran right under the thermostatic choke spring to warm it up. Chrysler's parts department has a spray can of "Rust Penetrant" that was designed to free up these valves. It is really effective as a fast-acting penetrating oil, but it has to be washed off soon, otherwise moisture will follow it in and rust parts even worse.

Even when that valve is free, the second problem is it was very common for that passage to become pugged with carbon. The engine would start fine, then the choke pull-off diaphragm would pull the choke open enough for the engine to run well for a minute or two, but after that, the thermostatic spring didn't get warm, so it wouldn't open the coke the rest of the way. Lots of black smoke from the tail pipe, and it was hard to get the car to move. On earlier engines from the '60s, if you remove the thermostatic spring, there was a stainless steel insert, or plate, to remove, then you could see into that passage and chip the carbon out. As luck would have it, the only place the blockage occurred was right there where you could see it. In later years you had to remove the intake manifold to clean that carbon out. This is no longer a problem due to better additives in gasoline today.

The third problem was caused by uninformed politicians. They randomly decided chokes needed to be fully-open within three minutes of starting the engine. That was easy to accomplish in warmer climates, but up north where I am, engines would not run yet in cold weather. My boss had to drive about a mile from home, then sit on the side of the road for a few minutes until the engine got warm enough to run right. Ended up wasting a lot of gas and created lots more emissions, but it kept the politicians happy. The chokes were simply fully-open too soon.

The only real advantage to having the electric choke heater is if that passage got plugged with carbon, the choke would still open fully and the engine would run properly.

If you're going to eliminate the choke heater, you can replace the switch with a standard oil pressure switch with one terminal for the dash warning light. You can also wire the red and blue wires together to bypass that switch. That's how it was done in the earlier years that heater was used. There was a notice on the visor that if the ignition switch was turned on to play the radio, for example, hard engine starting could occur. That was because the choke heater was on already, and the choke would be fully-open when you finally tried to start the cold engine. That's why they went to the oil pressure switch in the heater circuit.

The second unit you listed is for an oil pressure gauge. There's diaphragm inside that pushes on a movable contact on a rheostat, similar to what's used for a fuel level sensor in the gas tank. It creates a variable resistance. That results in a variable current flow through the heating wire in that gauge.
Mar 11, 2024 at 2:40 PM
Avatar
ALTHEA MAYBERRY
  • MEMBER
  • 65 POSTS
Hi Caradiodoc,

I thought you'd like to hear the engine run. It still needs a lot of help, but it's running. woo hoo!

I also have more questions for you. I included a photo of two items that look like relays, which are located next to the starter relay--the ones with the ice cream cones above them. The one in the middle has a green wire coming out of it. Do you know what it goes to?

Tomorrow, I want to install my brand-new radiator with an electric fan. However, I purchased the radiator last March on Amazon. It's been so long that I don't know what I did with the instructions to hook up the fan. I was hoping if I sent photos, you might be able to help me with it.
Mar 19, 2024 at 6:44 PM
Avatar
CARADIODOC
  • CERTIFIED EXPERT
  • 34,308 POSTS
It's hard to tell without being there and being able to move around, but I had two thoughts about what I might have heard.

At one point it sounded like a rather common problem where the ring gear on the torque converter rubs against the inspection cover on the front of the transmission. There's tabs on both sides of that cover. The noise can occur if one of those tabs didn't go into the spot it is supposed to go, or if the cover got bent during installation. It doesn't take much to cause it to rub. When that happens, remove the cover, then look on the back side for a shiny spot to show where it was rubbing.

The second sound is like a, "pook pook" sound. That occurred on my '78 LeBaron wagon. Look for a pipe coming off the middle of the catalytic converter, then running up to the air filter housing. There's a valve in that pipe. What it's supposed to do is when there's a puff of exhaust gas, the valve closes from that pressure. Between the puffs of exhaust gas, the momentum of its flow creates little pulses of vacuum. That vacuum opens the valve and lets fresh air get pulled down to help the catalytic converter do its thing. The noise occurs when that valve fails. It's attached at the air filter housing through a rubber hose. That hose will be hardened and brittle from being overheated from the exhaust gas getting up there. You'll also hear that noise when the lid is removed from the housing. It's very noticeable, but goes almost completely away when you put the cover back on.

Sorry to say our online service manuals don't have much for wiring diagrams for older models. I'll have to see if I have a manual at home to look at. The unit on the left of your photo has something to do with emissions. I have that on my '80 Volare, but I never looked into what it's for.

My guess is for your radiator fan, the fan motor has only two wires, so it's a single-speed, on or off affair. The gold sensor most likely is just a temperature switch. To verify that, measure its continuity between the terminal and the threads. You should find an open circuit, or infinite reading. Actual coolant temperature sensors can look exactly the same, but they have a temperature variable resistor inside. Those are meant for dash gauges and computers. If you have that type of sensor, you'll find some resistance value, probably around tens of thousands of ohms or more, and that value will start to go down when you warm the sensor in your hand.

It's the on / off switch type of sensor we need. Radiator fan motors can draw from 10 to 20 amps. That little switch can't handle that much current. That's why the relay is needed. The switch just turns the relay on with a very tiny current, then the relay's contacts handle the high motor current. I can draw up the typical diagram and post it later. The only thing you'll have to decide is where to get the 12 volts to run the motor. If you tie that directly to a battery positive source, the fan can run after the hot engine is turned off. Some cars were built like that, but it was mostly four-cylinder engines with aluminum heads, to cool them down to reduce warping. Your engine has cast iron heads, so I would power the relay from a switched 12 volt source. That would be anything with that red wire you worked on. I'll draw up both diagrams.
Mar 19, 2024 at 7:26 PM
Avatar
ALTHEA MAYBERRY
  • MEMBER
  • 65 POSTS
Thanks for your quick response. However, I thought it would be helpful for you to know that the truck doesn't have a catalytic converter. I conjecture that It was removed when whomever had the truck before me removed the original 1985 engine, put in a 79 and ran straight pipes on the exhaust. I installed a y-pipe and ran a glasspack on it.

My friend Marty, who is a retired ASE technician, thinks the oil pressure isn't coming up--plus the oil pressure gauge isn't responding.Tomorrow I'm going to remove the valve covers to see if oil is getting to the top. I don't think I installed the rocker arm assembly backwards, but it doesn't hurt to check. I know the new oil pump is primed because I loosened the oil filter and oil came spilling out.
Mar 19, 2024 at 8:06 PM
Avatar
CARADIODOC
  • CERTIFIED EXPERT
  • 34,308 POSTS
Here's the diagrams for your fan. I figured the red wire is the 12-volt feed for the fan, based on the fuse holder. I'm taking a guess the blue wire is the switched 12 volts going to the fan motor, so that's the color I used on the diagrams.

In the first diagram, the gray wire, (white on your relay socket), is connected to the red wire, and both are tied right to the battery positive circuit. This way, the relay will turn on and the fan will run any time the temperature switch turns on. The ignition switch doesn't have to be on. If the engine is hot when you turn it off, the fan will continue running, and it could start up unexpectedly if some heat migrates over to the sensor a minute or two after the engine is turned off.

The only difference in the second diagram is that gray (white) wire is connected to a switched 12-volt source. That would include those red wires under the hood. This way the fan will only run if the ignition switch is on.

For the coil of the relay, again, I took a guess at the wire colors. Black is normally for ground circuits, so I drew that one going to ground through the temperature switch. That leaves my gray wire, (white) for the 12-volt supply. Once you decide how you want that wire to get its 12 volts, I need to add another clinker to insure there's sufficient confusion. All electromagnetic coils develop a magnetic field that takes a little time to build up. It's when the current is switched off that the field has no choice but to collapse instantly. Doing so causes it to generate a huge voltage spike, often as high as 300 volts. That's what we need to happen in an ignition coil, but for injectors, AC compressor clutches, and relays, those spikes can do a lot of damage, mainly to computer modules that are switching those things on and off. To prevent that from happening, something is usually added somewhere in the circuit to dampen or absorb those spikes. GM does that by placing a resistor across the coil. When a spike occurs, the resulting current flow goes through the resistor to just dampen, or reduce the voltage of that spike. The advantage is resistors don't have a polarity, so the coil can be connected either way. With their terminal basing, the relay can be installed two ways, as long as it will physically fit, and work just fine. The minor disadvantage is resistors don't totally eliminate the spike.

Chrysler, and most other manufacturers use a diode across the coil to totally eliminate voltage spikes. Diodes are one-way valves for electrical current flow. When 12 volts is applied to turn the relay on, the diode is "reverse-biased", meaning it is in there backward, is turned off, and acts like it isn't even there. When the relay is turned off, the spike occurs for an instant, then the diode is "forward-biased", meaning it acts like a piece of wire, and completely eliminates that spike. While this is more effective, it means the coil can not be connected either way like with the GM relays.

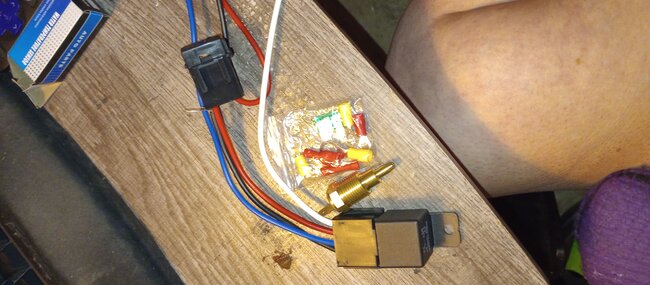
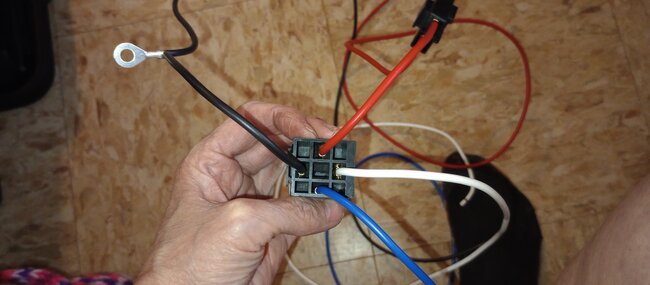
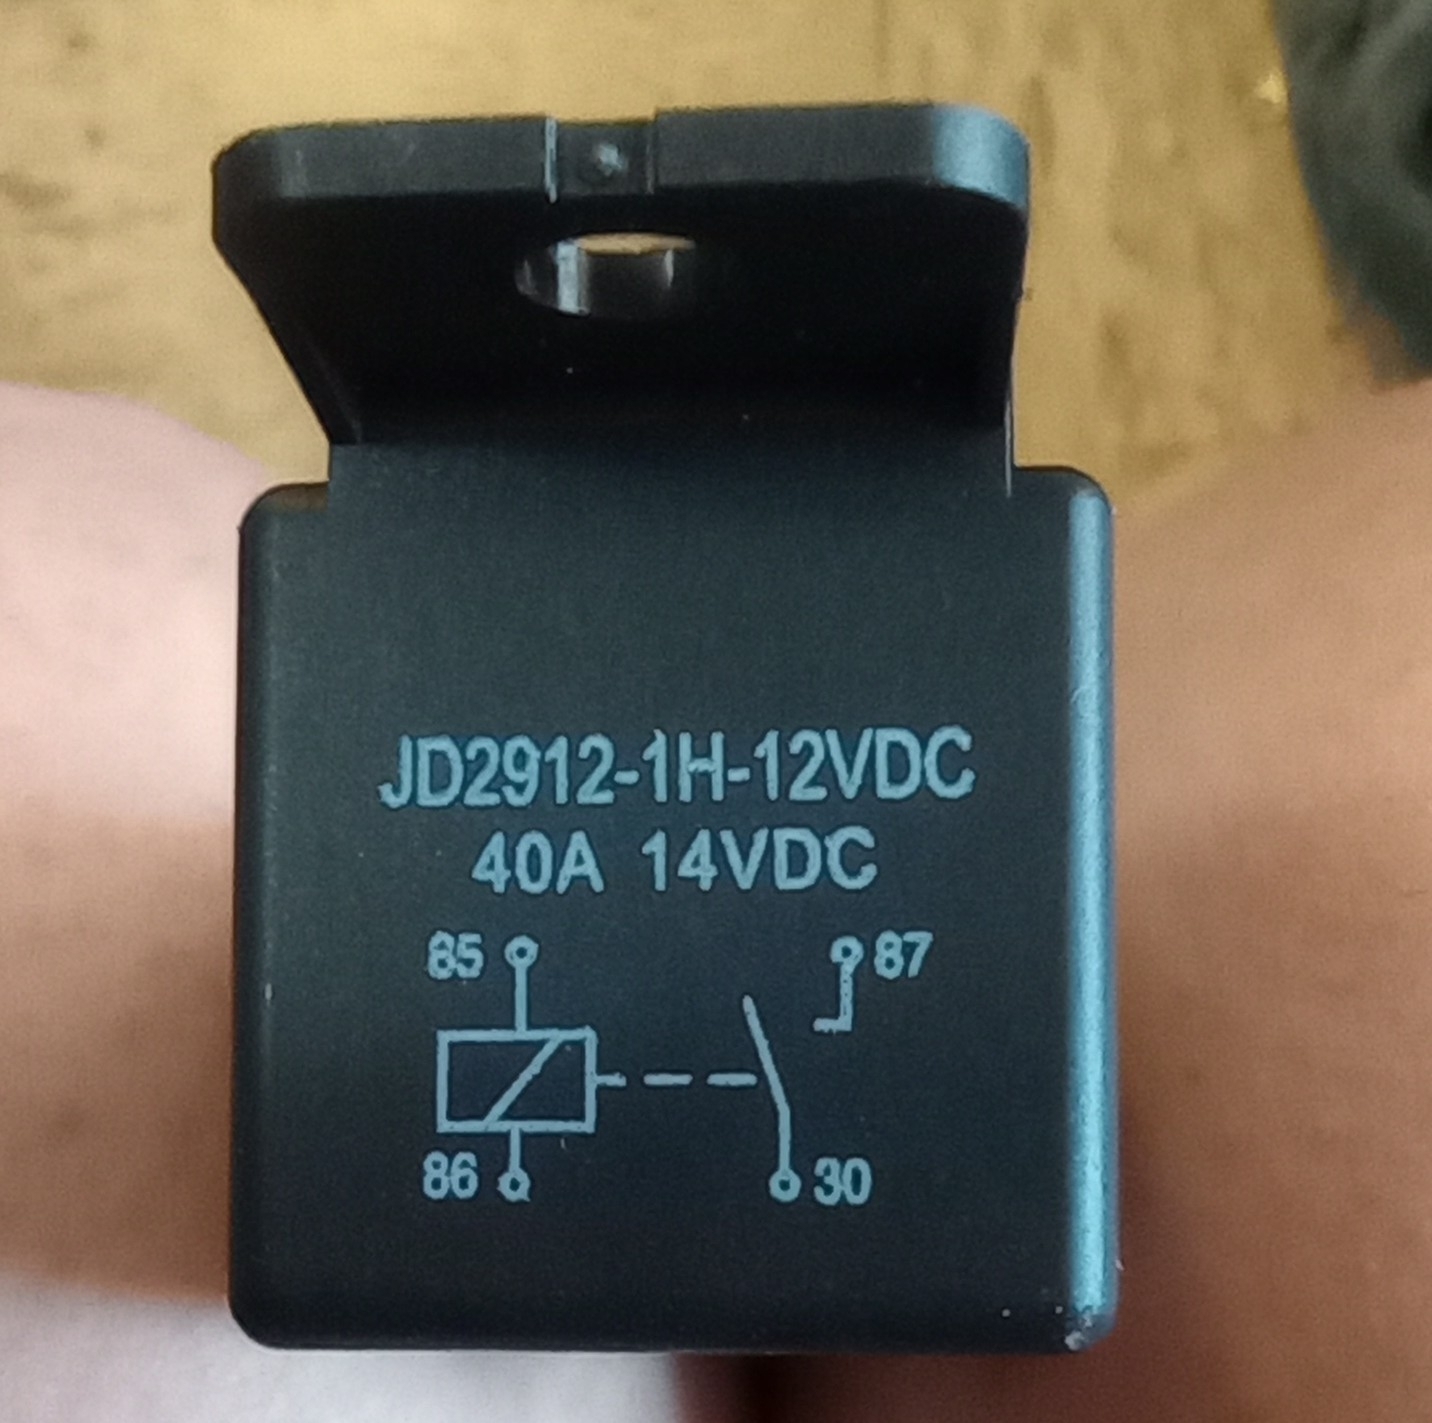
The best way to know how to connect the coil is with the instructions. This whole story is because you don't have them. Instead, start by looking on the relay's cover to see if they printed a little diagram on it. If there is one, try to post a photo of it. Also post one of the bottom of the socket where the wires come out. In my third drawing, this shows the terminal layout for some common relays. Yours most likely matches the top left one. The numbering I used is used by Chrysler and many other manufacturers, but you won't find those on generic aftermarket relays. I'll use those numbers simply for reference.

The middle terminal is 87a. It is rarely used, and may not even be on your relay. If you look at terminals 30 and 87, they form the letter "T". Those are the contacts that carry the high current to the motor. In this case, either terminal can be the red or blue wire.

Now, if I'm right, the black wire is the ground, or negative side of the coil, and the white wire is the positive, or 12-volt end. Those two should correspond to terminals 85 and 86 in my drawing. Those are parallel to each other. Before you go through the work of wiring the socket, then finding out it's wrong, we should verify the colors and polarity. Again, this assumes there's no drawing on the relay's cover.

I should pause here and add another comment of value. Given this is a generic, or universal relay, there may not be a diode across the coil. That would eliminate the need for this entire sad story. Also, since the coil is switched off by a physical switch, those are not affected by voltage spikes, so the diode is not needed in this application, making it further likely there is no diode in the relay. If there is indeed no diode in the relay, either terminal, 85 or 86, can go to the switch, and the other one can get the 12-volts.

What I would do in this case is to simply connect the coil to 12 volts and feel if it clicks. I'd do this by connecting one terminal, 85 or 86, to the battery's negative post with a small clip lead or jumper wire. Then I'd use another clip lead connected to the battery's positive post, then quickly tap it to the other relay terminal and feel for the click. The reason I'd tap the clip lead briefly is if there is a diode in there, and it is forward-biased now, there's nothing to limit current flow. The relay will not click, and if the connection lasts too long, the diode is going to overheat and short. Usually they will burn open after that, then the short will be gone. The relay will work normally, but the spike suppression will be missing.

If the relay clicked, you know that polarity will work in the truck. If you want to be brave and experiment, switch the two clip leads to see if the relay will click with the opposite polarity. Tap the last wire briefly again and feel for the click. If you find that it clicks, there's no diode and terminals 85 and 86 can be connected with either polarity.

This is how I originally figured out how to wire the Chrysler relay, for a custom application, shown in the upper left of my drawings, when I didn't know which terminal was which. The problem is on my first attempt, the diode shorted and smoke came out of the relay. A simple way to avoid this is to add a small light bulb in series with one of the jumper wires. I can make a drawing to explain this better if you need me to. Connect one relay terminal to negative, as before. Connect the other terminal to one terminal of the light bulb. Connect the bulb's other terminal to positive. If the polarity is correct, or if there is no diode in the relay, the bulb will light up about half of normal brightness. It's using up roughly half of the 12 volts, or six volts, leaving the other six volts to run the relay's coil. For most relays that is enough and you'll feel it click. Some relays need more, so they won't click, but the dim bulb tells you the polarity is okay.

A good bulb for this is a small, 194 "peanut" bulb found in dash boards, and side marker and license lamps. It will only allow a maximum of a half amp to flow. It's easy to connect clip leads to the terminals.

Now switch the polarity and do this again. If the bulb is still half of normal brightness, the coil can be connected with either polarity. However, if you find the bulb is full brightness now, that proves there is a diode in the relay and it is forward-biased now. That means it's the wrong polarity and polarity is important.

Now that I shared all that wondrous confusion, let me make a better suggestion. When holding the socket with the terminals toward you and the wires on the back side, use terminal 86 in my drawing for the positive, or 12-volt feed side, and use terminal 85 to go to the temperature switch. The reason for this is it matches the industry standard for relays that do have a diode. Now, if your relay ever fails, you can find hundreds of replacements in any salvage yard. Chrysler has used a couple of other designs, as shown in my drawings, but the i" cube relay has been around since the late '80s, and is still being used today. You'll be able to plug in any relay from any application, without worrying whether it has a built-in diode.

Remember, this all assumes I have the correct wire colors on your socket. The terminals for the blue and red wires should form that letter "T". If I have that wrong, the story is the same, but the colors will have to be changed.
Mar 20, 2024 at 4:42 PM
Avatar
ALTHEA MAYBERRY
  • MEMBER
  • 65 POSTS
Wow! That is confusing. I'm having difficulty wrapping my head around that.

I did an Internet search to see if I could find another relay like mine. I did find one on eBay and it had the wiring diagram with it. I'll upload that too.
Mar 20, 2024 at 5:31 PM
Avatar
CARADIODOC
  • CERTIFIED EXPERT
  • 34,308 POSTS
Dandy. I guessed correctly at the wire colors. I flipped one photo over. Now, if you flip the relay to the left, like you're flipping a page in a book, the socket terminals will match that of the 1" cube relay I posted earlier. They're using the same standardized numbering. If you pull the relay out of the socket, you should see those numbers next to each terminal.

Don't use the ring terminal on the black wire. That would be for a different type of circuit. They added more of that wire to go to the temperature switch. Also, they are showing the white wire going to a 12-volt switched feed. The fan can only run that way when the ignition switch is on.

I also played with the photo of the top of the relay cover. Note the white box I added. Most of the time, if there is a diode across the coil, they'll add a second symbol like that, or something similar, to let you know. I suspect there is no diode in your relay, and for this circuit, there's no need or advantage to having one. Regardless, if you connect the white and black wires as directed, you can use any similar relay from the salvage yard. Most of them will have that fifth, unused terminal in the middle. Your socket has that hole in between the other four terminals, so any relay will fit in it.
Mar 20, 2024 at 8:08 PM