Hi and thanks for using 2CarPros.com.
First, the code you listed indicates a lean fuel mixture. Can the MAF or other things you replaced cause it? Yes. However, many other things can too. First, I would like to suggest checking the following; fuel pump pressure and the engine for a vacuum leak. A vacuum leak allows unmetered air to enter the engine. The result is not enough fuel and too much air which creates a lean mixture. Also, although the pump is new, fuel pressure could be low. If that is the case, it will cause a lean mixture. Here are two links which describe how to check both. Both of these tests require basic tooling. If you do not have the needed items, and most people do not, most parts stores will lend them to you, such as the AutoZone that gave you the code.
https://www.2carpros.com/articles/how-to-check-fuel-system-pressure-and-regulator
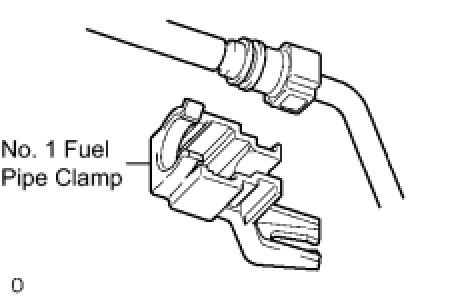
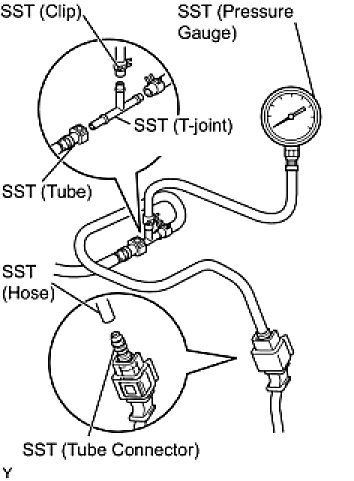
Here are directions for checking fuel pump pressure specific to your vehicle. Pictures 3 and 4 correlate with these directions.
___________________________________________________________________________________________
ON-VEHICLE INSPECTION
1. CHECK FOR FUEL PUMP OPERATION AND INSPECT FOR FUEL LEAK
(a)Check fuel pump operation.
(1)Connect Techstream to the DLC3.
(2)Turn the ignition switch to the ON position and push the Techstream main switch on.
NOTE: Do not start the engine.
(3)Select the following menu items: Power train / Engine and ECT / Active Test / Control the Fuel Pump Speed.
(4)Check for pressure in the fuel inlet tube from the fuel line. Check that sound of fuel flowing in the fuel tank can be heard. If no sound can be heard, check the integration relay, fuel pump, ECM and wiring connector.
(b)Inspect for fuel leak.
(1)Check that there are no fuel leaks anywhere on the system after performing maintenance. If there is a fuel leak, repair or replace parts as necessary.
(c)Turn the ignition switch off.
(d)Disconnect Techstream from the DLC3.
2. CHECK FUEL PRESSURE
(a)Using a voltmeter, measure the battery voltage.
Standard voltage:
11 to 14 V
(b)Discharge the fuel system pressure ().
(c)Disconnect the cable from the negative (-) battery terminal.
(d)Remove the No. 1 fuel pipe clamp from the fuel tube connector.
(e)Disconnect the fuel hose from the fuel main tube.
CAUTION:
- Always read the precautions () before disconnecting the fuel tube connector (quick type).
- The fuel pipe line may spray fuel as a result of retained pressure that remains in it. Do not allow fuel to be sprayed in the engine compartment.
(f)Install SST (pressure gauge) and the fuel tube connector using SST as shown in the illustration.
SST: 09268-31012
09268-41500
90467-13001
95336-08070
SST: 09268-45014
09268-41200
09268-41220
09268-41250
(g)Wipe up any gasoline.
(h)Connect the cable to the negative (-) battery terminal.
(i)Connect Techstream to the DLC3.
(j)Turn the ignition switch to the ON position and push the Techstream main switch on.
NOTE: Do not start the engine.
(k)Select the following menu items: Power train / Engine and ECT / Active Test / Control the Fuel Pump Speed.
(l)Measure the fuel pressure.
Fuel pressure:
304 to 343 kPa (3.1 to 3.5 kgf/cm2, 44.1 to 49.7 psi)
If the pressure is high, replace the fuel pressure regulator.
If the pressure is low, check the fuel hoses and connections, fuel pump, fuel filter and fuel pressure regulator.
(m)Disconnect Techstream from the DLC3.
(n)Start the engine.
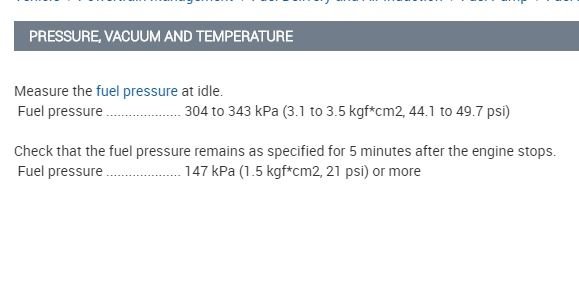
(o)Measure the fuel pressure at idle.
Fuel pressure:
304 to 343 kPa (3.1 to 3.5 kgf/cm2, 44.1 to 49.7 psi)
(p)Stop the engine.
(q)Check that the fuel pressure remains as specified for 5 minutes after the engine has stopped.
Fuel pressure:
147 kPa (1.5 kgf/cm2, 21 psi) or more
If the pressure is not as specified, check the fuel pump, pressure regulator and/or injectors.
(r)After checking the fuel pressure, disconnect the cable from the negative battery terminal and carefully remove the SST to prevent gasoline from splashing.
(s)Reconnect the fuel main tube (fuel tube connector).
CAUTION: Always read the precautions () before connecting the fuel tube connector (quick type).
(t)Install the No. 1 fuel pipe clamp to the fuel tube connector.
(u)Check for fuel leaks (Step 1).
___________________________________________________________________________________
https://www.2carpros.com/articles/how-to-use-an-engine-vacuum-gauge
Now, if you find both of the aforementioned items are within specification, there is a very long section in my manual which takes you step by step through the diagnosis process. However, it does require specialized tooling.
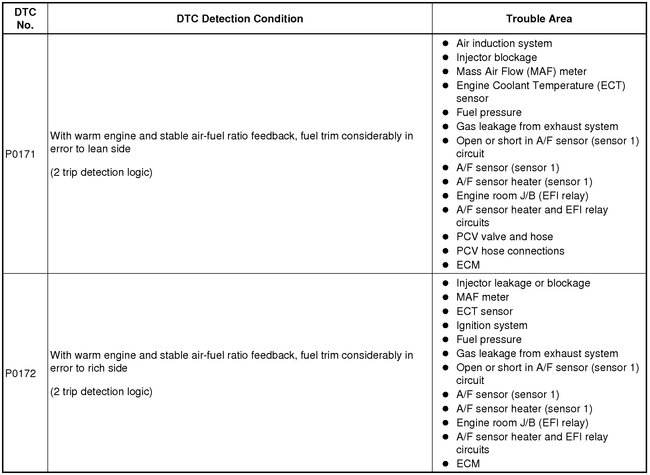
I have attached a picture with the list of possible problems which could lead the the code you are dealing with. Take a look through the possible causes. You will notice things such as the air induction tube, PCV hose... These are all components which could simply not be fitted correctly, torn, loose... allowing unmetered air to enter the engine.
Picture 2 includes the manufacturer's specifications for fuel pressure.
Take a look through the items I mentioned as well as the picture I attached. Let me know if you have questions, need help, or if you require additional information. One last thought, if the dealer and other mechanic did not require at least 1.5 hours to check the vehicle, they could not have gone through the diagnostic checks for this code.
I hope this helps you.
Take care,
Joe
Images (Click to make bigger)
Sunday, July 29th, 2018 AT 9:06 PM


