Welcome back:
In 1995, the manufacturer was changing from an OBD 1 to an OBD 2 diagnostic system. If you have the OBD 1, follow this link to identify what trouble codes are stored. It should help us.
https://www.2carpros.com/articles/honda-car-1990-1995-obd1-code-retrieval-procedure-and-definition-table
If it is OBD 2, scan the computer to see if codes are stored. The crank sensor isn't the easiest to replace, and I would hate to see you replace it only to find it didn't resolve the issue. If you do have an OBD 2 scanner with live data, see if the RPM signal is lost when it begins to stall.
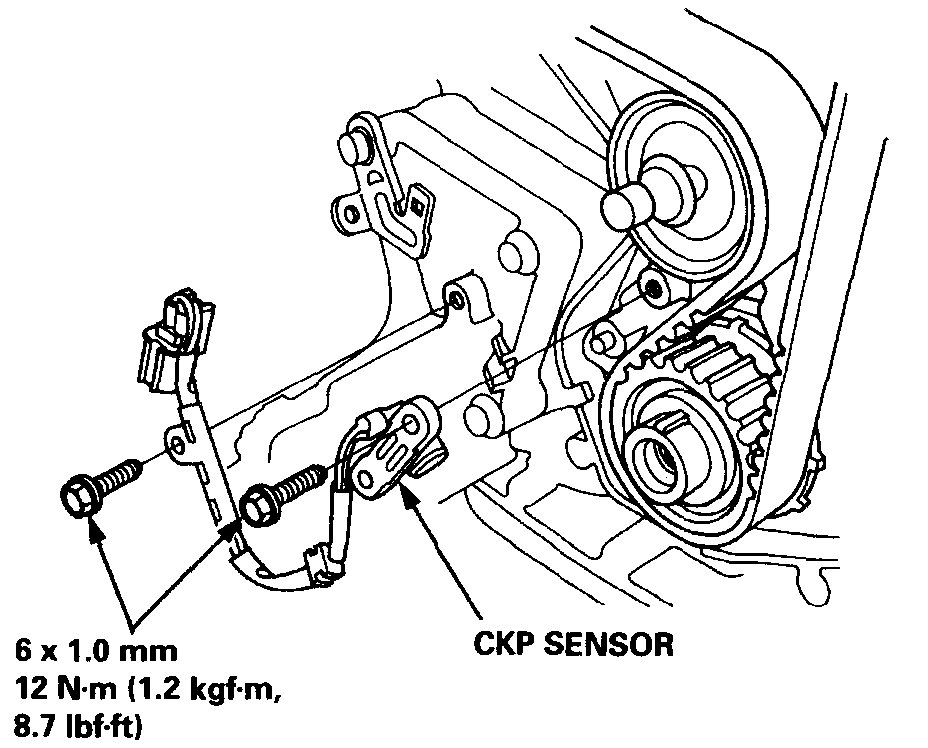
If you decide to replace it, here are the directions. The attached pic correlates with the directions.
_____________________
1995 Honda Accord Sedan V6-2.7L SOHC
Procedures
Vehicle Powertrain Management Sensors and Switches - Powertrain Management Sensors and Switches - Computers and Control Systems Crankshaft Position Sensor Service and Repair Procedures
PROCEDURES
1. Remove the tire/wheel and splash shield.
2. Remove the bolts, then loosen the mount bolt and pivot the side engine mount out of the way.
3. Loosen the idler pulley center nut and adjusting bolt, then remove the A/C compressor belt.
4. Loosen the alternator mounting bolt, nut and adjusting bolt, then remove the alternator belt.
5. Loosen the mounting nuts and adjusting nut, then remove the P/S pump belt.
6. Remove the dipstick and pipe.
7. Remove the crankshaft pulley.
8. Remove the upper covers and lower cover.
NOTE: Do not use the upper and lower covers for storing removed items.
pic 1
9. Remove the CKP sensor from the cylinder block.
10. Install the CKP sensor in reverse order of removal.
_________________________
Let me know what you find or if you have other questions.
Take care,
Joe
Image (Click to make bigger)
Tuesday, October 1st, 2019 AT 8:02 PM


