Camshaft sensor location?

Tiny
TODD BEAULIEU
  • MEMBER
  • 2007 KIA OPTIMA
  • 2.7L
  • V6
  • 2WD
  • AUTOMATIC
  • 115,000 MILES
Rear bank of plugs do not fire. Engine tester said rear cam sensor failure. I have not been able to find the location of the sensor.
Tuesday, January 23rd, 2018 AT 2:58 PM

20 Replies

Tiny
MHPAUTOS
  • MECHANIC
  • 31,937 POSTS
Not a great pic but I hope this helps, Check out the diagrams (Below). Please let us know if you need anything else to get the problem fixed.
Was this
answer
helpful?
Yes
No
Thursday, January 25th, 2018 AT 1:04 AM
Tiny
RELLE51
  • MEMBER
  • 1 POST
  • 2006 KIA OPTIMA
  • 6 CYL
  • AUTOMATIC
  • 78,000 MILES
Where is the camshaft position sensor located on my engine? I cannot seem to find anything that looks like the camshaft part
Was this
answer
helpful?
Yes
No
+3
Friday, January 8th, 2021 AT 11:59 AM (Merged)
Tiny
CJ MEDEVAC
  • MECHANIC
  • 11,005 POSTS
It is mounted on the rear of the cylinder head

See the guide below, it will help. Not vehicle specific but it will give you a good idea of what you are in for

https://www.2carpros.com/articles/camshaft-angle-sensor-replacement

See diagrams below for location
Was this
answer
helpful?
Yes
No
+2
Friday, January 8th, 2021 AT 11:59 AM (Merged)
Tiny
JACOBANDNICKOLAS
  • MECHANIC
  • 109,858 POSTS
It is mounted at the rear of the cylinder head.
Was this
answer
helpful?
Yes
No
+3
Friday, January 8th, 2021 AT 11:59 AM (Merged)
Tiny
ISAAC HARMON
  • MEMBER
  • 2 POSTS
  • 2006 KIA OPTIMA
  • 2.7L
  • V6
  • 2WD
  • AUTOMATIC
  • 180,000 MILES
I am not sure if there is more than one sensor because they had a left and a right one so I bought both. I could use some help with the locations for both or if there is only actually one I will return the one I don’t need. Thanks for any advice or help in advance.
Was this
answer
helpful?
Yes
No
Friday, January 8th, 2021 AT 11:59 AM (Merged)
Tiny
KASEKENNY
  • MECHANIC
  • 18,907 POSTS
That is correct. You have one for each bank of cylinders. Attached is the location views for both sensors. Let us know if you need more info. Check out the diagrams (Below). Please let us know if you need anything else to get the problem fixed. Thanks
Was this
answer
helpful?
Yes
No
+1
Friday, January 8th, 2021 AT 11:59 AM (Merged)
Tiny
MACKBOLAN357
  • MEMBER
  • 3 POSTS
  • 2005 KIA OPTIMA
  • 2.7L
  • 6 CYL
  • 2WD
  • AUTOMATIC
  • 136,000 MILES
Went to AutoZone because CEL came on scanned for codes (P0340-Camshaft Sensor), and P01360 Heated 02 Sensor Bank 1 Sensor 1).

I know I can replace the 02 sensor, have the tools, just looking for confirmation on location of items.

02 sensor Bank 1 sensor 1 location is passenger side near firewall on exhaust manifold pipe. Correct?

Camshaft position sensor on this engine is hard to find. Can someone provide illustrastions/or pics as to where exactly it is?

A son trying to help his 72 yr old mom from being ripped off.
Thank You,
Rich
Was this
answer
helpful?
Yes
No
Friday, January 8th, 2021 AT 11:59 AM (Merged)
Tiny
KHLOW2008
  • MECHANIC
  • 41,814 POSTS
Hello,

Here is a guide to help you step by step to change it out with diagrams below to show the location of the sensor for your car.

https://www.2carpros.com/articles/camshaft-angle-sensor-replacement

Check out the diagrams (Below). Please let us know if you need anything else to get the problem fixed.
Was this
answer
helpful?
Yes
No
-1
Friday, January 8th, 2021 AT 11:59 AM (Merged)
Tiny
LWARCOX
  • MEMBER
  • 2 POSTS
  • 2003 KIA OPTIMA
  • 4 CYL
  • FWD
  • AUTOMATIC
  • 156,000 MILES
How do I ensure the blades on the exhaust cam are located in the proper position for the camshsft positioner is timed correct?
Was this
answer
helpful?
Yes
No
Friday, January 8th, 2021 AT 11:59 AM (Merged)
Tiny
DAVE H
  • MECHANIC
  • 13,383 POSTS
Removal
CAUTION:To prevent engine damage, DO NOT rotate crankshaft counterclockwise (as viewed from timing belt end of engine).

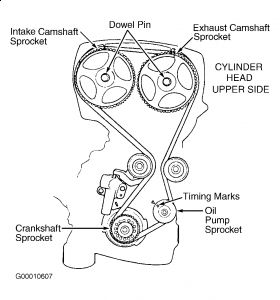
Disconnect negative battery cable. Remove drive belts and drive pulleys from crankshaft and water pump. Remove timing belt covers. To align timing marks, rotate engine clockwise so No. 1 cylinder is at TDC of compression stroke. Ensure camshaft sprocket timing marks align with upper surface of rocker cover. Dowel pin of camshaft sprocket should be pointing upward. See Fig. 1 .
Remove timing belt auto tensioner. If reusing timing belt, place mark on timing belt to indicate direction of belt rotation. Remove timing belt. Remove camshaft sprockets.
Remove plug at left side of block, and insert a screwdriver to hold left counterbalance shaft in position. Screwdriver will have to be inserted at least 2.36" (60 mm). Remove oil pump sprocket nut and sprocket. See Fig. 2 .
Loosen right counterbalance shaft sprocket mounting bolt. Remove tensioner "B" and timing belt "B". See Fig. 2 . Remove crankshaft sprocket "B" from crankshaft.
Fig. 1: Identifying Timing Belt Alignment Marks

https://www.2carpros.com/forum/automotive_pictures/266999_kia_41.jpg


Installation
Tips Click a link to view tip
Tech1Tip: timing belt alignment

Install crankshaft sprocket "B" onto crankshaft. Ensure flange is properly positioned. Lightly oil outer surface of spacer, and then install spacer to right counterbalance shaft, with rounded edge of spacer inward.
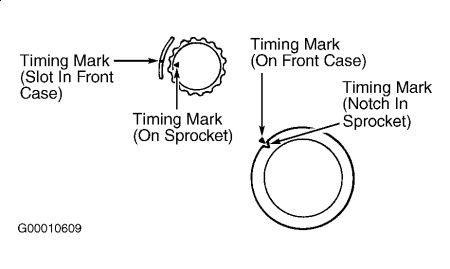
Install right counterbalance shaft sprocket. Tighten flange bolt tightly by hand. Align timing marks on each sprocket and on front case. See Fig. 4 .
When installing timing belt "B", ensure there is no slack in tension side. Install tensioner "B" in center of pulley on left side of mounting bolt, and in pulley flange toward front of engine. See Fig. 5 . Align timing mark of right counterbalance shaft sprocket with timing mark on front case.
To tighten timing belt "B", lift tensioner "B" so tension side is pulled tight. Tighten bolt to secure tensioner "B". DO NOT turn shaft, or belt will be over-tightened.
Ensure timing marks are aligned. Ensure center of span on tension side of timing belt "B" can be depressed by hand. Ensure belt deflection is .20-.30" (5-7 mm).
Install crankshaft sprocket flange and sprocket. Ensure flange is mounted in proper direction, with chamfered side toward block. Install special washer and sprocket bolt to crankshaft. Tighten sprocket bolt to specification. See TORQUE SPECIFICATIONS .
Insert long screwdriver through plug hole in left side of cylinder block to hold counterbalance shaft in position. Install oil pump sprocket, and tighten nut to specification. See TORQUE SPECIFICATIONS . Install camshaft sprockets, and tighten bolts.
If auto tensioner rod is fully extended, place it in soft-jawed vise, and compress rod until hole in rod lines up with hole in auto tensioner housing. Insert stiff wire to hold rod in this position. Install auto tensioner, leaving wire in place.
CAUTION:If timing marks on camshaft sprockets do not line up properly, DO NOT rotate sprocket more than 2 teeth in either direction, or valve and piston will touch. If necessary, remove and reposition camshaft sprocket.

Install crankshaft sensor. Set timing marks of camshaft sprockets with notches on upper side of rocker cover and dowel pins straight up. Align crankshaft sprocket timing marks. Align oil pump sprocket timing marks.
Install timing belt in order around crankshaft sprocket, oil pump sprocket, idler pulley, exhaust camshaft sprocket, intake camshaft sprocket and tensioner pulley.
Gently raise tensioner pulley so belt will not sag, and then temporarily tighten center bolt. Ensure timing mark of each sprocket is still aligned. Remove wire from auto tensioner.
Rotate crankshaft 2 complete turns clockwise. Leave in this position for about 5 minutes. Measure auto tensioner protrusion "A" (distance between tensioner arm and auto tensioner body). Ensure auto tensioner protrusion is .22-.35" (6-9 mm). See Fig. 3 . Install timing belt lower cover and upper cover.
Fig. 4: Identifying Front Case Timing Marks

https://www.2carpros.com/forum/automotive_pictures/266999_kia_42.jpg

Was this
answer
helpful?
Yes
No
Friday, January 8th, 2021 AT 11:59 AM (Merged)
Tiny
WILLINGTOLEARN
  • MEMBER
  • 24 POSTS
  • 2002 KIA OPTIMA
  • 2.4L
  • 4 CYL
  • 2WD
  • AUTOMATIC
  • 180,000 MILES
I've replaced the crank sensor, IAC, IFS, camshaft sensor, fuel pump relay, fuel pump, EVAP canister. Car was running fine then cut off on me a couple of times. Check engine light came on code P0340. Got another cam sensor OE and the connector because it fell apart. Now car starts run about 3 to 5 seconds and cuts off. Turn the key restarts and does the same thing. Still shows code P0340. New connector had all white wires I have pink wire on top, black ground in the middle, and signal wire on the bottom when plugged into sensor. I need help. Did I wire it up wrong?
Was this
answer
helpful?
Yes
No
Friday, January 8th, 2021 AT 11:59 AM (Merged)
Tiny
JACOBANDNICKOLAS
  • MECHANIC
  • 109,858 POSTS
Welcome to 2CarPros.

Interestingly, there are two black wires and one pink. Why they would use black two times in the same plug is beyond me.

With that, take a look at picture 1. It shows the plug and indicates what each pin is for. Pin 3 is ground. Check for continuity to confirm.

Pin 2 is for the pink wire. Pin 3 is for the FI relay.

Let me know if this helps or if you have other questions.

Joe
Was this
answer
helpful?
Yes
No
+1
Friday, January 8th, 2021 AT 11:59 AM (Merged)
Tiny
WILLINGTOLEARN
  • MEMBER
  • 24 POSTS
Thanks, I'll try it. I went over the weekend to a salvage yard and got a connector off of a 2004 Optima and it has a pink, yellow, and black. After I find which one is ground I'm going to connect pink to pink, black to black ground, and yellow to the other black wire. It may be the weekend before I get a chance to get back to it. But I will let you know what happens. Oh yea, I got the whole harness from the IFS which has the fuel injector connectors and the sensor that's bolted with cam sensor. Will let you know this weekend what happens.
Was this
answer
helpful?
Yes
No
Friday, January 8th, 2021 AT 11:59 AM (Merged)
Tiny
JACOBANDNICKOLAS
  • MECHANIC
  • 109,858 POSTS
Welcome back:

The part you got from the 2004, was it the same size engine?

Joe
Was this
answer
helpful?
Yes
No
Friday, January 8th, 2021 AT 11:59 AM (Merged)
Tiny
WILLINGTOLEARN
  • MEMBER
  • 24 POSTS
Yes, the 2.4.
Was this
answer
helpful?
Yes
No
Friday, January 8th, 2021 AT 11:59 AM (Merged)
Tiny
WILLINGTOLEARN
  • MEMBER
  • 24 POSTS
I'm coming to realize that Kia is a little different.
Was this
answer
helpful?
Yes
No
Friday, January 8th, 2021 AT 11:59 AM (Merged)
Tiny
JACOBANDNICKOLAS
  • MECHANIC
  • 109,858 POSTS
Welcome back:

Anytime you change model years, there are differences. Were you successful in replacing the plug?

I also wanted to ask you if you have a live data scanner. If you do, plug in into the OBD port and go to engine RPM. Start the car and see if the RPM signal stops immediately when the engine begins to stall. Let me know what you find.

Joe
Was this
answer
helpful?
Yes
No
Friday, January 8th, 2021 AT 11:59 AM (Merged)
Tiny
WILLINGTOLEARN
  • MEMBER
  • 24 POSTS
Today it's raining. I did order a scanner with live data. I'll let you know what happens once the rain stops and I put the other plug on and check the live data. Thanks for the help.
Was this
answer
helpful?
Yes
No
Friday, January 8th, 2021 AT 11:59 AM (Merged)
Tiny
WILLINGTOLEARN
  • MEMBER
  • 24 POSTS
Replaced the plug and all is well now. Running with no problems. Thanks for all your help.
Was this
answer
helpful?
Yes
No
Friday, January 8th, 2021 AT 11:59 AM (Merged)
Tiny
JACOBANDNICKOLAS
  • MECHANIC
  • 109,858 POSTS
Welcome back:

You are very welcome. I'm glad to hear it not giving you any more trouble. Let us know if we can help in the future.

Take care,
Joe
Was this
answer
helpful?
Yes
No
Friday, January 8th, 2021 AT 11:59 AM (Merged)

Please login or register to post a reply.

Sponsored links