TIMING BELT REPLACEMENT - 2.0L - DOHC -2000 Kia Sportage
Removal
1.Disconnect negative battery cable. Remove 2 air ducts mounting bolts from radiator. Loosen fresh air duct clamp at intake housing. Remove hose at resonance chamber. Remove fresh air duct. Remove cooling fan shroud 5 bolts. Remove cooling fan clutch-to-pulley 4 nuts.
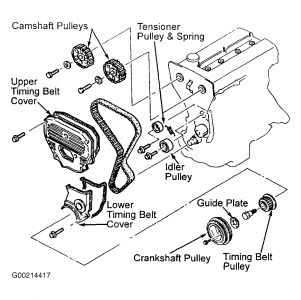
2.Remove accessory drive belts. Remove cooling fan and pulley. Remove lower engine splash guard. Remove crankshaft pulley from crankshaft. It is NOT necessary to remove center bolt. Remove upper and lower timing belt covers. See Fig. 1 .
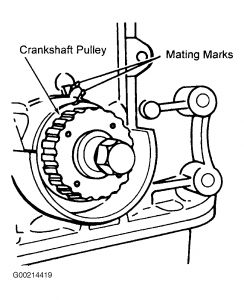
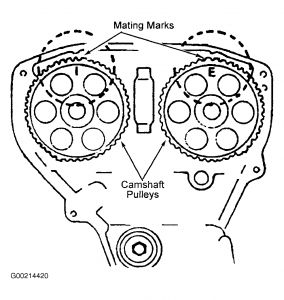
3.Rotate crankshaft to align camshaft and crankshaft timing marks. See Fig. 2 and Fig. 3 . Camshaft "I" and "E" marks should align with marks on rear cover.
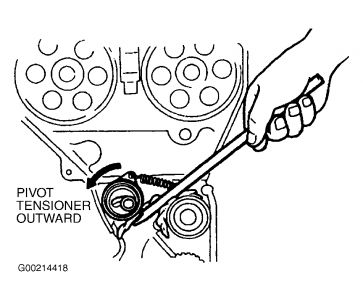
4.Loosen tensioner pulley bolt. Pivot tensioner pulley outward to remove tension from timing belt, then retighten tensioner lock bolt. See Fig. 4 . Mark timing belt rotation direction if old belt is to be reinstalled. Remove timing belt.
Installation
1.Ensure crankshaft and camshaft pulleys are still aligned. See Fig. 3 . Install timing belt so that there is no looseness at tension side, and at camshaft pulleys. If reusing old belt, ensure belt is installed in original direction of rotation. Loosen tensioner pulley bolt.
2.Turn crankshaft 2 revolutions in normal direction of rotation. Check that timing marks are correctly aligned. If timing marks are not correctly aligned, remove belt and realign. After belt, repeat rotation prodecure.
3.Turn crankshaft to align "S" mark of exhaust camshaft pulley with rear cover seal plate mating mark. Tighten tensioner pulley bolt.
4.Check that belt deflection is .30-.33" (7.5-8.5 mm) with 22 lbs. (10 kg) of downward pressure on belt, midway between two camshaft pulleys. 5.Install timing belt guide plate with flat side toward belt. Install timing belt covers. 6.To complete installation, reverse removal procedure. Adjust drive belts to proper tension.
Apr 7, 2021 at 6:43 AM