OK, JEEP GUY
WARNING---Your Harmonic Balancer is basically a ring pressed over a "Pulley" sorta dealee, with rubber filler between the 2 pieces...this dampens crank vibrations, your engine produces. UNFORTUNATLY, your timing mark is CUT into the outer RING. If the rubber filler deteriorates (age, heat) the outer ring could slip slightly, making your mark, not being "Calibrated" to the position of number one piston. If this has happened, it will be impossible to correctly set timing. You should replace the balancer, if it has the rubber falling out, or timing is erratic (while setting), and setting timing will only run the engine, at a WAY off the mark setting, the balancer can be tested, but is Very Involved, for a beginner!
THESE STEPS SHOULD WORK, IF-IF-IF YOUR ENGINE WAS RUNNING, BEFORE YOU START THESE ACTIONS!
Now that you have all necessary/or wanna keep vacuum lines, "updated", and any "open" vacuum ports capped. You have checked the manifold and carb for tight fasteners.
IF WE HAVE A PROBLEM...STOP....LET ME HELP YOU, BEFORE SOMETHING BAD HAPPENS TO YOU OR MR. JEEP!
We are ready to Check and move the timing (if necessary). Then we will move on to "Tweaking" the Carburetor. I know you are concerned about maybe needing to replace this one, Lets try to make this one work, before we get another (if we do get another, lets get one for an older model Jeep, such as a 1979, it will be pretty much "GENERIC", and will not have the stepper motor and extra crap, yours has now!) (SIMPLICITY!)
HERE ARE STEPS TO TIMING ---my numbers are here for you to reference me, with something you do not understand.
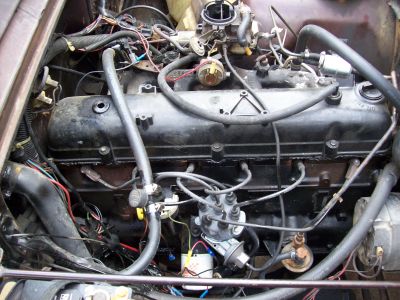
1) Take the entire AIR CLEANER ASSEMBLY OFF...The only tube you should have to remove, is the "Fresh Air" to the valve cover (make up air, for the PCV [positive crankcase ventilation])
2) Let's stick our head under the frontend, find the harmonic balancer, and with a soapstone or piece of chalk, rub the timing mark (chalking the groove) and wiping off the access with your finger. It may be necessary to bump the starter to get the mark to the bottom; the mark is at the rear of the harmonic balancer, closest to the engine. It is a straight cut, perpendicular to the H.B. (see manual, 258 6 Cyl, for location)
3) Let's go to the driver side, front of the engine. We are looking IN-BETWEEN the Water pump pulley and Where the Lower Radiator Hose, hooks to the water pump....you should see a "SCALE" (timing marks) Shoot some kinda spray (WD40-purple power etc.) on them, and wipe them off good!
Observe the scale, you will not be able to see it all (the water pump is in the way) but if you move toward the radiator, you will view enough to learn how it works. (You can maybe see it in your manual, too)(Make sure it's a 258, in the manual!) I will not go too far into: ATDC (after to dead center) or BTDC (BEFORE TOP DEAD CENTER) or TDC (TOP DEAD CENTER)
The later, BTDC, is what we are gonna deal with, SPARK BEING INITIATED, ---BEFORE THE PISTON REACHES THE TOP---, on COMPRESSION STROKE.
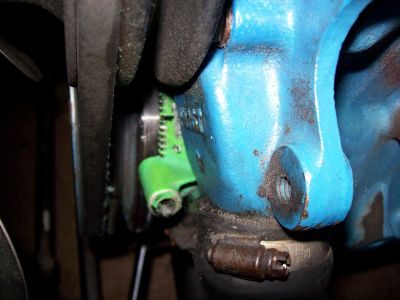
So just any "Scooby-Doo" can understand this, we're gonna refer to this stuff as: The very bottom mark is +2 degrees (ATDC)......up a mark, "0" (ZERO, TDC"”Number 1 piston is at very top of travel, When the Harmonic Balancer Mark CORROSPONDS to this mark).
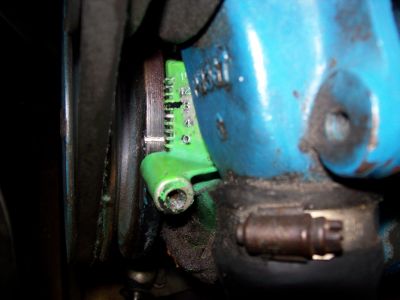
In this Pic, My Harmonic Balancer is "servicable"----Timing (not running) is at "ZERO MARK" (Piston is Top Dead Center [TDC])......mark below this is "2 ATDC" ALL ABOVE CHALK MARK IS--BTDC
YOU SHOULD BE ABLE TO SEE "0" and some other numbers, on the timing chain cover, from radiator vantage point!......up a mark, -2 degrees (BTDC).....up a mark, -4 degrees (BTDC)....up a mark, -6 degrees (BTDC)....up a mark, -8 degrees (BTDC)...............UP ½ A MARK!!!, -9 degrees (BTDC) ETC. ETC. [EACH MARK IS 2 DEGREES]
You'll see the marks, but maybe not all of the numbers. You're gonna have to count marks!
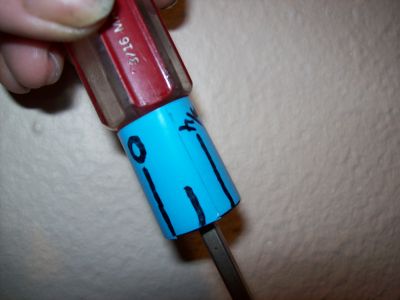
THIS IS BETWEEN MARKS!!! My manual says this is your mark! (9 degrees BTDC), To Time, to! WITH A FINE TIP MARKER (or white-out, gotta see it!)----draw a line in-between -8 and -10 MARKS----this is your EZ reference mark to see while timing!
CALL THIS, "PERFECT TIMING PICTURE". I marked my cover, "9 Degrees"JUST FOR YOU! (my timing is different than yours, because #1,manual says, and #2, I experiment!) This pic, not runningWhen timing light is used, it will sorta "STOP MOTION", and your view will look EXACTLY like this, when you are PERFECTLY TIMED!
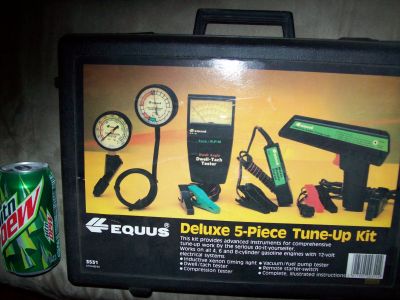
4) We now need to hook up the TACH/DWELL METER. We must time, at a slower engine speed (manual says your speed is 680 RPM----WE ARE GOING TO GO WITH 700 RPM, explain later!), otherwise the "centrifugal advance", inside the distributor, will ADVANCE your TIMING, because engine speed is high, and the spark must "SHOOT" SOONER to get the spark there at the right moment! (if you think about it, the engine runs: SLOW----GRADUATINGFAST!, ELECTRICITY moves at 200 MPH ONLY, you can't speed IT up, or slow It down----this is the reason for Timing, and advances; SHOOT THE SPARK SOONER AND SOONER as engine RPM climbs, so that the actual SPARK hits, just when the Piston is going down! (Basically, time it by the Specs, all will go fine!)
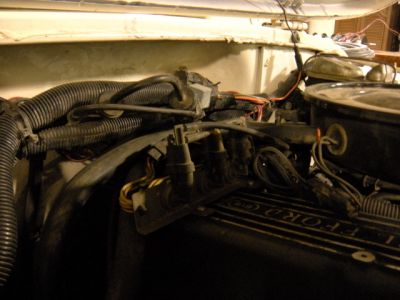
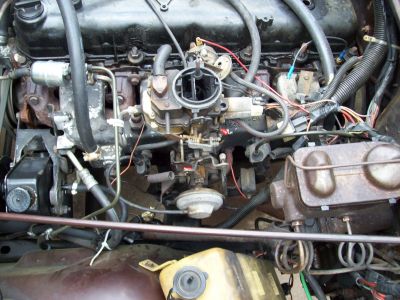
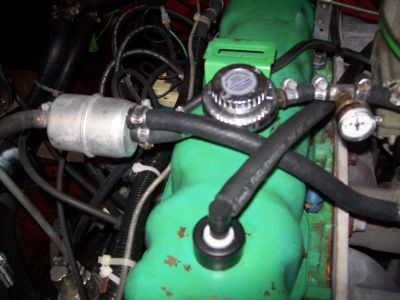
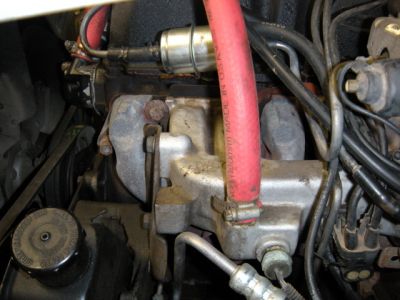
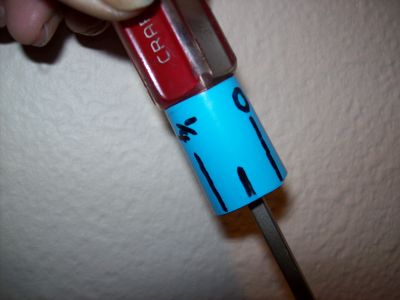
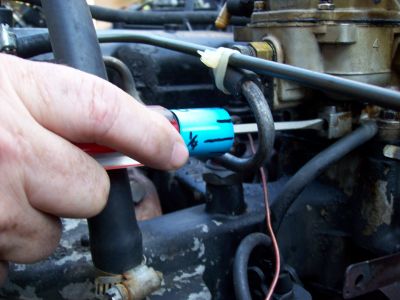
Attach your Tach/ Dwell meter by connecting the NEG wire to a ground, and the other "Sender Wire" to NEGATIVE SIDE OF COIL, in pics of RONs JEEP, if you are on passenger side, THE RIGHT SIDE OF THE COIL. (You will need to stick a paperclip or similar, into the plastic connector, to contact the metal!) Later you can do like Ron and I, and CUT the NEG Coil wire, and butt-spliced it back together w/ extra pigtail in the splice---sort of a Test Port.) You must INSURE your paperclip, stays connected, so that you meter will work!
(Your Battery may be in 180 degrees from mine, or the pos-neg posts swapped) METER GRD is just left of the meter on BATTERY NEG GRD, the sender is "GREEN" attached to the small SCREWDRIVER, I have inserted into "NEG COIL"Note---above dipstick ring, male/female bluish connectors, this is my "Add ON", "Test Port, ON NEG WIRE" [the female just loops off of the male, sorta like a lanyard and cap!] I clip onto the male connector (female "cap", is "live" as well)--instead of the screwdriver trick!
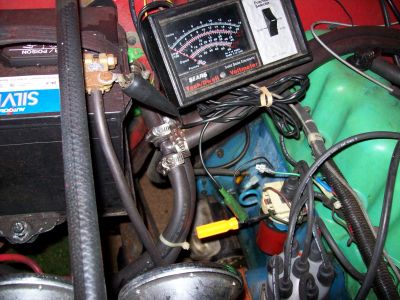
When you are connected, place meter on drivers side of engine (mine will sit between Carb and valve cover) So that you can adjust carb speed, and see it too!
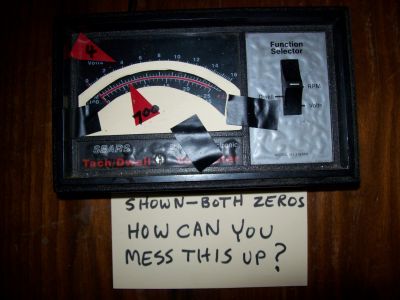
MAKE SURE IT IS SET IN THE "TACHOMETER" POSITION!
LET'S KEEP METER AND WIRES---AWAY FROM FAN!!!---AWAY FROM HOT, EXAUST MANIFOLD!!!
Fire Him up, read meter---GET FAMILIAR WITH METER! ---6 CYLINDER SCALE!
LINE TO BE USED.....Where 700 RPM IS----YOU MAY MARK THE FACE, WITH A SMALL SLIVER OF TAPE----PREFERRED ABOVE OR BELOW, THE SCALE YOU NEED TO USE----JUST TO "MAKE" YOU USE THE RIGHT "LINE" and RIGHT SPEED!
WE WILL NOT GET ACCURATE READING, UNTIL YOUR TEMPERATURE, REACHES NORMAL WARMED UP TEMP. WE WILL MAKE NO ADJUSTMENTS, UNTIL IT IS UP TO TEMP"”TIMING OR CARB!
INSURE THROTTLE IS AT REST, ON ITS STOP!
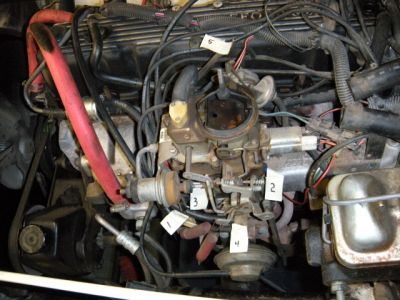
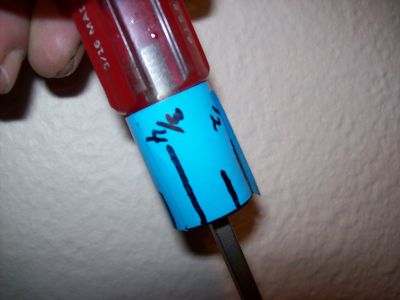
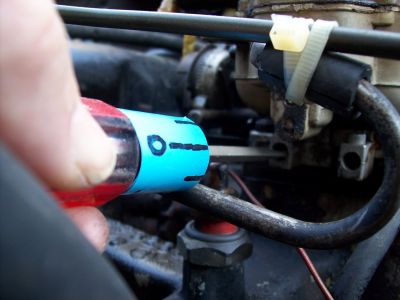
5) TEMP IS GOOD! You have "KICKED DOWN" the CHOKE HIGH IDLE...........Look in the CARB, the Choke Butterfly (plate) should be WIDE OPEN"”NO CHOKE!......You are running X?"”RPM, Go to the throttle arm on the Carb, there are 2 Adjustment screws, the one closer to you, IS OUR SCREW, the other is for your Chokes Idle Speed during warm-up (it will be adjusted later, but if its "engaged" now, we will need to disengage it), to make this IDLE SPEED ADJUSTMENT!
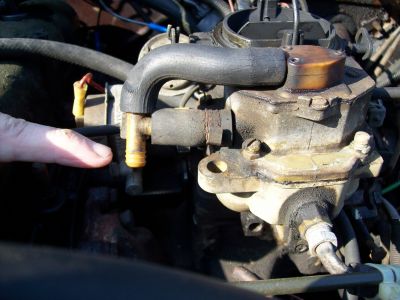
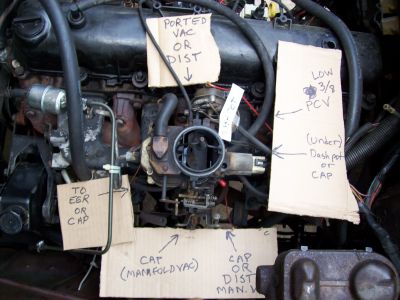
"OUR SCREW"--little screwdriver in it!My extra, somewhat, new '79 BBD (before the Weber and Holley), note everything is capped for storage, and there is no stepper motor, this type would be recommended if yours became TERMINAL! Sorta my 2carguy model for now!
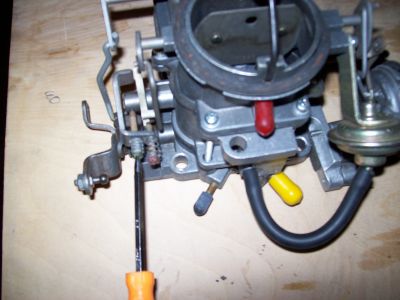
If all is Good, Screwing (OUR SCREW) in will increase idle, backing it out, decrease it---if not! Return spring for carb is messed up, orMaybe the screw beside "our screw"---- Choke step cam screw is out of adjustment (back that screw out, till its not touching plastic cam steps, then see if OUR SCREW works right)
GET US TO 700 RPM NOW!----AFTER WE TIME IT, GET US BACK TO 700 RPM, THEN CHECK IT, RE-ADJUST IF NECESSARY (when we are done, we will be at 9 Degrees @ 700 RPM)THEN WE WILL ADJUST CARB!
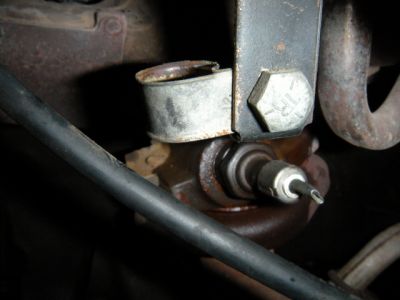
6) HOW TO HOOK UP THE TIMING LIGHT CORRECTLY! (EZ!)
WARM ENGINE TO TEMP / Leave Dwell/tach attached
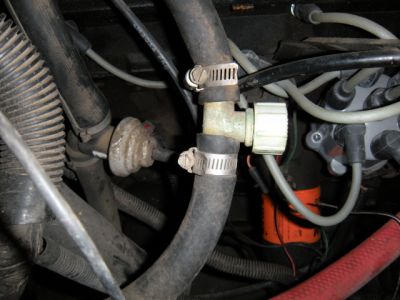
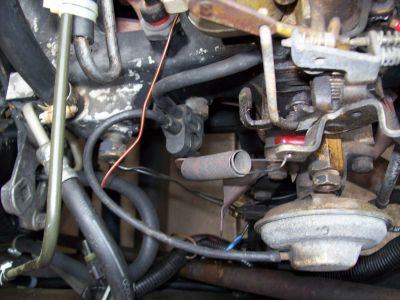
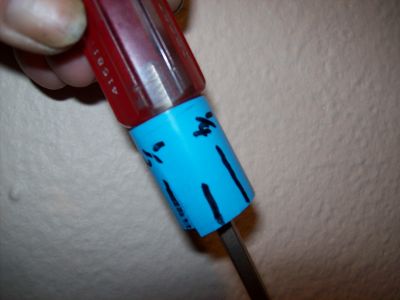
We will call this the "COMBO PIC", 3 operations, I mention below can be found in this pic!
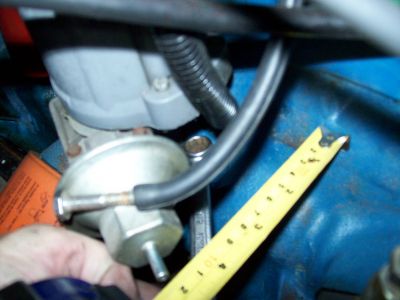
Go to the distributor; remove the vacuum line and plug the line with a tight fitting bolt (SEE "COMBO PIC"), this will be hooked back up after timing is done. When you removed this line, while the Jeep is running, you would have noticed, a change in the sound, and with your finger, you should feel SUCTION, If not, we may not be hooked to manifold vacuum!(we want manifold vacuum on this line) (Since we are hooked to manifold vacuum, your distributer was advanced, about 10 Degrees; it must not be advanced, for initial [zeroing] timing)---that why we removed and temporarily plugged this line.
A CJ lacking all of the "EXTRA" stuff, will idle and run better using, manifold vacuum, instead of ported vacuum, to advance the distributor.
7) SHUT OFF THE ENGINE!
Heater hoses are close; you might wear a thin glove, in here. With a tape measure, just so YOU CAN GET IT BACK ORIGINAL, if things do not go well for you! Measure from the T1T on the distributor, to a point, I prefer to the block. If you move the distributor, you could measure it back in place. (SEE COMBO PIC)This is extremely helpful if your Harmonic Balancer "slipped" and is no longer showing accurate timing marks......always look at/ record your readings, before you start moving the distributor. This will also help you figure out whether you capped of the Vacuum Advance Line!...prior to you trying to time, and things seem "out of whack"....And you start calling me bad names!.....then you figure out you did not complete all of the steps!......And you forget to apologize to me for the bad names!
I ALSO INCORPORATE THIS MEASURING IN, WHEN I CHANGE OUT A DISTRIBUTOR, IT SAVES ON SEVERAL STEPS!.......If you want I can explain how to "Change Out" the distributor EZily, if it has not already been Removed (pulled out of the Cam Gears!)
Break loose the distributor-hold down clamp, with a ½ inch, "boxed in" wrench (See Combo Pic), SLIGHTLY, enough so that moving the distributor, is a little hard to turn, NOT LOOSE AS A GOOSE! Measure it (the T1T) back to initial setting!(if real loose, when you do your final "lock down" your reading will move!) WHEN YOU START TIMING,......THIS: "SHOOT and LOOK", and then adjust the distributor"......ADJUSTING CAN BE DONE BY ONE MAN, 2 men makes it EZer, you will be moving from one side to the other, if by yourself! We'll move on!
8) CRANK BACK UP, REACH TEMP AGAIN!
Connect the POSITIVE to POSITIVE BATTERY
NEGATIVE TO NEGATIVE BATTERY (reversed"”light will not work)
I did not show this EZ step in a pic, if you cannot clip onto battery w/ 2 leads, this other stuff is WAY OVER YOUR HEAD!
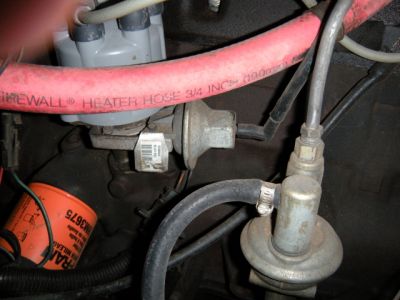
CONNECT THE PICK-UP TO NUMBER 1 PLUG WIRE (below), Insure the "Notch or clamp" engulfs the wire circumference. (Keep it away from the other wires, fan, and exhaust!) SEND THE GUN TO THE DRIVERS SIDE, thats where you will need it! (NUMBER 1 WIRE IS THE CLOSEST SPARK-PLUG WIRE, TO THE RADIATOR!)
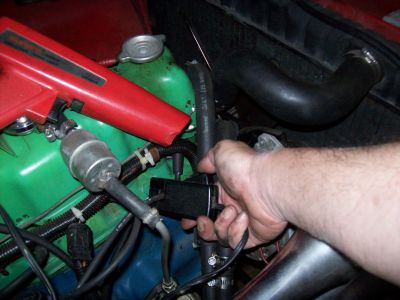
We use number 1 plug wire because the timing marks on the timing cover correspond with the position of number 1 piston. (If you were to make a perfect mark, 180 degrees from factory mark, you could do timing off of #6 wire, just throwing stupid stuff to make you understand, engine operation!)
The other pistons, in their respective positions, on the crankshaft, follow along firing at 60 degree intervals. 1---1st, 60D...5, 60D...3, 60D...6, 60D...2, 60D...4 (Firing order 1-5-3-6-2-4) ONE CRANK REVOLUTION! Every moving, internal part is CALIBRATED TO NUMBER 1 PISTON AT "ZERO"! (Top of its travel)
9) We are going to stay out of the fan! (The timing light will give the ILLUSION, the fan is not moving!)---IT IS!---WATCH OUT!
MAKE A NOTE OF WHAT THE TIMING IS BEFORE YOU MOVE THE DISTRIBUTOR!YOUR DISTRIBUTOR T1T MEASUREMENT WILL GET YOU BACK (CLOSE) IF YOU MUST RETURN TO THIS STARTING POINT!
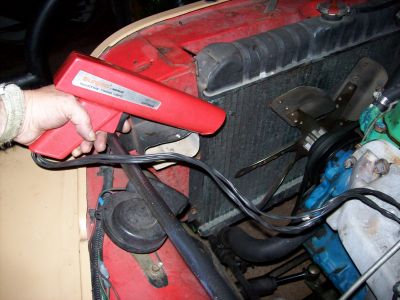
Go to the radiator vantage point; aim your timing light at the marks, PULL THE TRIGGER---AWAY FROM THE FAN, YOU CAN SEE THIS, WITHOUT GETTING SUPER CLOSE TO THE ENGINE! (SEE PIC BELOW!)
This is the spot, stay in the SHADE!, Trigger finger against the Grill Support RODs (mine have 3/8 fuel line over them to make them look "COOL") No need to get any closer to the fan, or timing scale!
Search UP and DOWN the Balancer, with your eyes. You will see the WHITE CHALK MARK!
The T1T on the distributor, will probably only need to move, LESS THAN 3/4 OF AN INCH, EITHER WAYTO MAKE YOUR ADJUSTMENT!
Move the distributor T1T toward the engine slowly, the timing mark will go---UP--- the scale (engine speed will increase) THIS IS ADVANCING THE TIMING
Move the distributor T1T away from the engine slowly, the timing mark will go---DOWN----on the scale (engine speed will decrease) THIS IS RETARDING THE TIMING
THE WAY I REMEMBER THIS, IS: IN (toward engine) 'CREASE (speed) UP (mark moves up)
IN-CREASE UP! Stupid Huh?...Do it your way then!
"INCREASE" works with our Distributor because.....Our rotor button turns CLOCKWISE.
YOU WILL UNDERSTAND WHAT TO DO, TO HIT THE MARK, REAL QUICK!
HIT YOUR FELT MARKER MARK (or white-out mark), WITH THE CHALK MARK (on H.B.).....9 Degrees! (AS IN EARLIER PIC!)
Check your Tach! 700 RPM...or...make it happen (carb idle screw!)
Check/ adjust timing again....continue until, 9 Degrees at 700 RPM
TIGHTEN HOLD DOWN on DISTRIBUTOR
VERIFY NOTHING MOVED
AT EVERY FLASH, IT SHOULD LOOK LIKE---"PERFECT TIMING PICTURE" (I now, show again, below)
RE-ATTACH YOUR VACUUM ADVANCE VACUUM LINE TO THE DISTRIBUTOR (engine may speed up!)
MAKE 700 RPM HAPPEN AGAIN!
SHUT OFF ENGINE!
REMOVE TIMING LIGHT AND DWELL/ TACH
YOU ARE TIMED!READY TO ADJUST CARBURATOR!
Later you can play or "Experiment" with your timing, from about 6 degrees to 16 degrees, For POWER or MILEAGE, (alot of other factors could play in with this) you sorta got to know the limitations, such as "Detonation" or "Pinging" or "Spark Knock"---discuss later. (good thing for you to read up on, IN YOUR MANUAL, find definitions and causes!)
If you were lost, look for---Timing light on wrong PLUG WIRE---engine speed too high---did not mark the right stuff---dist. vac. was not detached and temporily plugged---HARMONIC BALANCER "SLIPPED" NO LONGER IS "CALIBRATED" TO THE PISTON.
Turddog gives, yet another wonderful answer,
Let me know if you need help!
Love, Turddog
May 2, 2010 at 11:31 AM