2. Position the engine cylinder head gasket (with the numbers facing up) onto the cylinder block.
CAUTION: Engine cylinder head bolts should be reused only once. Replace the head bolts if they were used before or it they have a paint dab on the top of the bolt.
Fig. 6 Engine Cylinder Head Assembly
3. With bolt # 14 held in place (tape around bolt), install the engine cylinder head. Remove the tape from bolt # 14.
4. Coat the threads of stud bolt # 11 with Loctite (TM) 592 sealant, or equivalent.
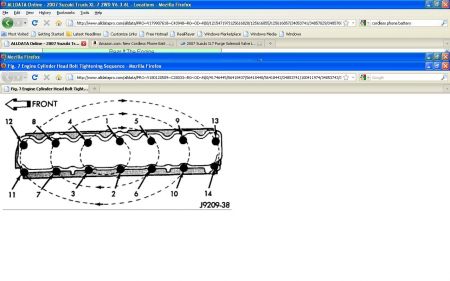
Fig. 7 Engine Cylinder Head Bolt Tightening Sequence
5. Tighten the engine cylinder head bolts in sequence according to the following procedure Fig. 7 :
1. Tighten all bolts in sequence (1 through 14) to 30 N.m (22 ft. lbs.) torque.
2. Tighten all bolts in sequence (# 1 through 14) to 61 N.m (45 ft. lbs.) torque.
3. Check all bolts to verify they are set to 61 N.m (45 ft. lbs.) torque.
4. Tighten bolts (in sequence):
o Bolts # 1 through 10 to 149 N.m (110 ft. lbs.) torque.
o Bolt # 11 to 13 N.m (100 ft. lbs.) torque.
o Bolts # 12 through 14 to 149 N.m (110 ft. lbs.) torque.
CAUTION: During the final tightening sequence, bolt # 11 will be tightened to a lower torque than the rest of the bolts. DO NOT overtighten bolt # 11.
5. Check all bolts in sequence to verify the correct torque.
6. If not already done, clean and mark each bolt with a dab of paint after tightening. Should you encounter bolts which were painted in an earlier service operation, replace them.

There you go.
Wednesday, September 15th, 2010 AT 1:54 PM


