THERMOSTAT
Removal (Non-Supercharged)
Open the engine compartment hood to service position and install body protection covers. Carefully remove the engine covers, taking care not to damage the plastic retainers or the rubber inserts.
Drain the cooling system. See COOLING SYSTEM. Retain the coolant drain tray in position to catch any spillage when removing the thermostat cover.
Loosen and reposition the lower hose clamp. Remove the lower hose from the thermostat cover. See Fig. 186.
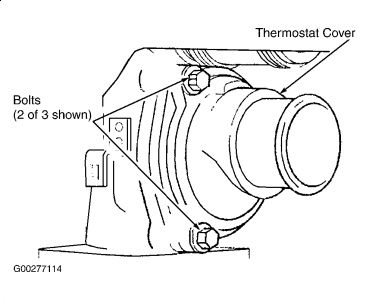
Remove the 3 thermostat cover bolts and remove the thermostat cover from the housing. See Fig. 187.
Remove the thermostat from the housing and discard the seal. See Fig. 188.
Installation
Install a NEW seal to the thermostat. Install the thermostat so that the vent ball valve locates in the recess in the cover. See Fig. 188.
Install the thermostat cover and the 3 thermostat cover bolts. Tighten thermostat cover bolts to specification. See TORQUE SPECIFICATIONS. See Fig. 187.
Install the lower radiator hose to the thermostat cover. Reposition hose clamp to secure hose. See Fig. 186.
Carefully install the engine covers, taking care not to damage the plastic retainers or the rubber inserts.
Refill cooling system. See COOLING SYSTEM.
Check for leaks and that all coolant hoses are securely connected. Move the engine compartment hood from the service position and connect the gas struts. Remove the body protection covers and close the engine compartment.
Fig. 187: Removing & Installing Thermostat Cover Bolts (Non-Supercharged)
Courtesy of JAGUAR CARS, INC.
Removal (Supercharged)
Open the engine compartment hood to service position and install body protection covers.
Drain the cooling system. See COOLING SYSTEM. Retain the coolant drain tray in position to catch any spillage when removing the thermostat cover.
Loosen and reposition the lower hose clamp. Remove the lower hose from the thermostat cover. See Fig. 189.
Remove the 3 thermostat cover bolts and remove the thermostat cover from the outlet pipe. Remove the thermostat and the seal from the outlet pipe. Discard the seal. See Fig. 190.
Installation
Install a NEW seal to the thermostat. Install the thermostat so that the vent ball valve locates in the recess in the cover. See Fig. 190.
Install the thermostat cover and the 3 thermostat cover bolts. Tighten thermostat cover bolts to specification. See TORQUE SPECIFICATIONS.
Install the lower radiator hose to the thermostat cover. Reposition hose clamp to secure hose. See Fig. 189.
Refill cooling system. See COOLING SYSTEM.
Check for leaks and that all coolant hoses are securely connected. Move the engine compartment hood from the service position and connect the gas struts. Remove the body protection covers and close the engine compartment.
Apr 4, 2010 at 12:29 AM