You're very welcome. I am not sure if the exact procedures for replacing brake pads and rotors will be in your Honda manual or not, however, I will post the replacement instructions here for your vehicle. You can also check out our video series on the basics of replacing a vehicle's brake pads and rotors (link is below)..
http://www.2carpros.com/car_repair_video/how_to_change_brake_pads_rotors.htm
BRAKE PAD INSPECTION:
The front brake pads may be inspected without removal. With the front end elevated and safely supported, remove the wheel(s). Unlock the steering column lock and turn the wheel so that the brake caliper is out from under the fender.
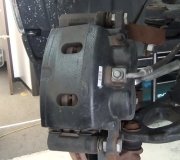
View the pads (both inner and outer) through the cut-out in the center of the caliper. Remember to look at the thickness of the pad friction material (the part that actually presses on the disc) rather than the thickness of the backing plate which does not change with wear. Replace the brake pads if the remaining lining is below 3 / 32 in. (2.4mm).
Remember that you are looking at the profile of the pad, not the whole thing. Brake pads can wear on a taper which may not be visible through the window. It is also not possible to check the contact surface for cracking or scoring from this position. This quick check can be helpful only as a reference; detailed inspection requires pad removal.
BRAKE PAD REMOVAL:
If equipped with an air bag, disconnect the negative battery cable and properly disable the Supplemental Restraint System (SRS).
Loosen the lug nuts, then raise and support the vehicle safely.
Remove the wheel.
As required, separate the brake hose clamp from the strut or knuckle by removing the retaining bolts.
Remove the lower caliper retaining bolt and pivot the caliper upward, off the pads.
Remove the pads, shims and pad retainers.
BRAKE PAD INSTALLATION:
Clean the caliper thoroughly; remove any rust from the lip of the disc or rotor. Check the brake rotor for grooves or cracks. If any heavy scoring is present, the rotor must be replaced.
Install the pad retainers. Apply a brake-quiet compound (available at most auto parts strores) to both surfaces of the shims and the back of the disc brake pads. Do not get the compound on the braking surface of the pad.
Install the pads and shims. The pad with the wear indicator goes in the inboard position.
Push in the caliper piston so the caliper will fit over the pads. This is most easily accomplished with a large C-clamp. As the piston is forced back into the caliper, fluid will be forced back into the master cylinder reservoir. It may be necessary to siphon some fluid out to prevent overflowing.
Pivot the caliper down into position and tighten the mounting bolt to 33 ft. lbs. (45 Nm).
Connect the brake hose to the strut or knuckle, if removed. Install the wheel and lower the vehicle to the ground.
Check the master cylinder and add fluid as required, then install the master cylinder cover.
Depress the brake pedal several times and make sure that the movement feels normal. The first brake pedal application may result in a very "long" pedal due to the pistons being retracted. Always make several brake applications before starting the vehicle. Bleeding is not usually necessary after pad replacement.
Braking should be moderate for the first 5 miles or so until the new pads seat correctly. The new pads will bed best if put through several moderate heating and cooling cycles. Avoid hard braking until the brakes have experienced several long, slow stops with time to cool in between. Taking the time to properly bed the brakes will yield quieter operation, more efficient stopping and contribute to extended brake life.
If equipped, enable the SRS system and connect the negative battery cable.
BRAKE ROTOR INSPECTION:
The brake disc develops circular scores during braking due to trapped dust and road grit. Excessive scoring not only contributes to squealing brakes but also shortens the life of the brake pads. However, light scoring of the disc surface, not exceeding 0.015 in. (0.38mm) in depth, will result from normal use and is not detrimental to brake operation. In general, if the scoring is deep enough to catch a fingernail passing over it, it's too deep and requires corrective action.
Disc run-out is the movement of the disc from side-to-side; caused by warpage or distortion. Excess run-out causes wobble or pounding in the brake pedal. Position a dial indicator in the middle of the pad wear area and turn the disc, while checking the indicator. If disc run-out exceeds 0.004 in. (0.10mm), replace or refinish the disc.
Disc parallelism is the measurement of variations in disc thickness at several locations on the disc circumference. It indicates whether or not the two faces of the disc are true and parallel. To measure parallelism, place a mark on the disc and measure the disc thickness with a micrometer. Repeat this measurement at eight (8) equal increments (about 45 degrees apart) on the circumference of the disc. If any of the measurements vary more than 0.0006 in. (0.015mm), replace the disc.
BRAKE ROTOR REMOVAL:
If equipped with an air bag, disconnect the negative battery cable and properly disable the Supplemental Restraint System (SRS).
Loosen the lug nuts, then Raise and safely support the vehicle on jackstands.
Remove the wheels.
Remove the steering knuckle from the vehicle. Please refer to for procedures.
Remove the 4 bolts retaining the hub unit to the steering knuckle and remove the hub unit.
Remove the 4 bolts, then separate the hub unit from the brake rotor.
BRAKE ROTOR INSTALLATION:
Assemble the disc to the hub unit and tighten the bolts to 40 ft. lbs. (55 Nm).
When installing the hub to the knuckle, use new self-locking bolts and tighten them to 33 ft. lbs. (45 Nm).
Install the steering knuckle.
Lower the vehicle and check for proper brake operation.
If equipped, enable the SRS system and connect the negative battery cable.
As for the A/C issue, I would suggest starting with a check of the freon level and pressure.
Let me know if you need further assistance..
Thanks for using 2CarPros.com!
Tuesday, April 28th, 2009 AT 7:51 PM


