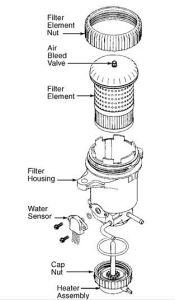
I remove the inner wheel well, it's easier. Here is how. Drain the fuel from the fuel filter. Refer to Water-in-Fuel Draining.
Disconnect the following electrical connectors:
"Â Water-in-fuel sensor (1)
"Â Fuel heater (2)
Reposition the fuel hose clamps.
Remove the fuel hoses from the fuel filter/heater element housing.
Disconnect the electrical and vacuum lines from the following:
"Â The exhaust gas recirculation (EGR) valve vent solenoid
"Â The EGR valve vacuum sensor
"Â The EGR valve solenoid
Remove the fuel filter bracket bolts.
Remove the fuel filter/heater element housing.
Remove the fuel filter bracket from the fuel filter/heater element housing.
Remove the fuel filter from the fuel filter/heater element housing.
Inspect the fuel filter, replace if necessary.
Installation Procedure
Install the fuel filter to the fuel filter/heater element housing.
Notice: Use the correct fastener in the correct location. Replacement fasteners must be the correct part number for that application. Fasteners requiring replacement or fasteners requiring the use of thread locking compound or sealant are identified in the service procedure. Do not use paints, lubricants, or corrosion inhibitors on fasteners or fastener joint surfaces unless specified. These coatings affect fastener torque and joint clamping force and may damage the fastener. Use the correct tightening sequence and specifications when installing fasteners in order to avoid damage to parts and systems.
Install the fuel filter bracket to the fuel filter/heater element housing.
Tighten
Tighten the bolts to 20 N Â m (15 lb ft).
Install the fuel filter bracket bolts.
Tighten
Tighten the bolts to 20 N Â m (15 lb ft).
Connect the electrical and vacuum to the following:
"Â The EGR valve vent solenoid
"Â The EGR valve vacuum sensor
"Â The EGR valve solenoid
Connect the fuel hoses to the fuel filter/heater element housing.
Reposition the fuel hose clamps.
Prime the fuel system.
Connect the following electrical connectors:
"Â Water-in-fuel sensor (1)
"Â Fuel heater (2)
Connect the negative battery cable. Refer to Battery Negative Cable Disconnection and Connection.
Start the engine and inspect for fuel leaks.
When your done, there is a bleeder screw next to the primer open it and crank the engine until all the air is out, then close it and pump the primer about 40 times or until it gets stif, then it should start.
SPONSORED LINKS
Tuesday, April 16th, 2019 AT 6:43 PM
(Merged)

