Removal:
When performing service around the SIR system components or wiring, the SIR system mustbe disabled. Failure to do so could result in possible air bag deployment, personal injury or unneeded SIR system repairs.
Make sure the switch is in the off position.
Remove the steering wheel (instructions below).
Disconnect the tilt wheel lever by pulling it out.
Remove the knee bolster and the Torx head screws from the lower column cover.
Lower the cover by tilting it down and then sliding it back to disengage the locking tabs.
Remove the Torx head screws from the upper column cover.
Remove the steering column lock set and the upper cover.
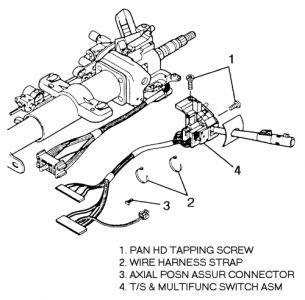
Disconnect the wiring harness straps from the steering column wiring harness.
Remove the retainer from Connector Position Assurance (CPA) if equipped.
Disengage the connector from the Brake Transmission Shift Interlock (BTSI) if equipped.
Unplug the gray and black connectors from the bulkhead connector.
Unfasten the Torx head screws from the switch and remove the switch.
((( Exploded view of the multi-function switch-1996-98 C/K series)))

Installation:
Installation is the reverse of removal but please note the following important steps.
Install the switch. Use a small blade screwdriver to compress the electrical contact and move the switch into position. The electrical contact must rest on the canceling cam assembly.
Fasten the Torx head screws on the switch. Tighten the screws to 53 inch. lbs. (6 Nm).
Install the upper column cover and fasten the column bracket nuts. Tighten the nuts to 22 ft. lbs. (30 Nm).
Install the knee bolster and the steering column cylinder lock. Tighten the column cover Torx screws to 12 inch. lbs. (1.4 Nm).
Install the lower column cover and tighten the Torx screws 53 inch. lbs. (6 Nm).
Make sure the switch is in the off position and install the steering wheel. Refer to this section for this procedure.
Enable the SIR system (if equipped).
Removal of steering wheel:
Disconnect the battery ground cable.
On models equipped with a drivers side air bag, perform the following procedure:
Disable the Supplemental Restraint System (if equipped).
On all but 1996-1998 models equipped with a air bag, unfasten the screws at the rear of the steering wheel.
On 1996-1998 models equipped with a air bag, turn the steering wheel 90 ° to access the rear shroud holes to the inflator module. Insert a screwdriver in the holes and push the leaf spring to release the pin. Turn the steering wheel 180 ° to access the remaining shroud holes and using the screwdriver, release the remaining pins.
Tilt the inflator module rearward from the top to access the wiring. Tag and unplug the lead wire from the clip on the module, the lead wire from the clip on the steering wheel and the Connector Position Assurance (CPA) and retainer from the module.
If not equipped with a drivers side air bag, remove the horn pad or button cap and disconnect the horn wires.
Mark the steering wheel-to-steering shaft relationship.
If equipped, remove the snapring from the steering shaft.
Remove the nut from the steering shaft.
Warning:
Don't hammer on the steering shaft!
Remove the steering wheel with a puller.
Installation of steering wheelL:
Install the wheel. The turn signal control assembly must be in the Neutral position to prevent damaging the canceling cam and control assembly. Tighten the nut to 30 ft. lbs. (40 Nm).
Install the horn pad and horn contact (if equipped).
If equipped with a drivers side air bag, install the inflator module as follows:
Attach the lead wire to the clip on the module, the lead wire to the clip on the steering wheel and the Connector Position Assurance (CPA) and retainer to the module.
On 1996-98 models, install the inflator module by pressing it firmly into the steering wheel so that all four notched pins in the leaf spring are fully engaged. Be very careful that you do not pinch any wires.
On all but 1996-98 models equipped with a air bag, install the inflator module and tighten the screws to 27 inch lbs. (3 Nm).
Connect the battery ground cable and enable the SIR system (if equipped).
Let me know if you need further assistance.
Thanks for using 2CarPros.com!
SPONSORED LINKS
Friday, February 27th, 2009 AT 7:22 PM


