Hi and thanks for using 2CarPros.com.
Please understand, it is hard to tell if it is dangerous not being there to check for excessive play or how much noise it actually makes. If the noise is not loud and there is no play in the bearing, you should be okay for a short period of time, but I would not recommend driving fast for any long distances.
As far as the bearing damaging other components, unless it falls apart, it really should not damage anything.
Here are the directions for checking it to determine how bad it is:
WHEEL BEARING AND HUB
NOTE: The wheel bearing is designed to last for the life of the vehicle and requires no type of periodic maintenance.
The following procedure may be used for diagnosing the condition of the wheel bearing and hub.
1. Remove the wheel and tire assembly, disc brake caliper and brake rotor. See: Brake Rotor/Disc > Removal and Replacement > Brake Rotor - Removal
2. Rotate the wheel hub checking for resistance or roughness.
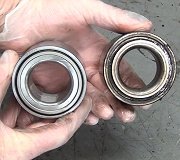
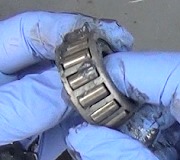
Any roughness or resistance to rotation may indicate dirt intrusion or a failed hub bearing. If the bearing exhibits any of these conditions, the hub bearing will require replacement. Do not attempt to disassemble the bearing for repair. If the wheel bearing is disassembled for any reason, it must be replaced.
Damaged bearing seals and the resulting excessive grease loss may also require bearing replacement. Moderate grease weeping from the bearing is considered normal and should not require replacement of the wheel bearing.
To diagnose a bent hub, measure hub runout. See: Brake Rotor/Disc > Component Tests and General Diagnostics > Brake Rotor
_______________________
If you determine it needs replaced, here are general directions on how it is done.
https://www.2carpros.com/articles/bearing-hub-replacement
Here are the directions specific to your vehicle for replacement. All attached pictures correlate with these directions.
_________________________
FRONT HUB AND BEARING - REMOVAL
REMOVAL
Special Tools:
NOTE: The removal and installation of the wheel bearing and hub from the knuckle is only to be done with the knuckle removed from the vehicle.
1. Remove the steering knuckle from the vehicle. See: Front Steering Knuckle > Removal and Replacement > Front Steering Knuckle - Removal
2. Position the knuckle support fixture as follows:
a. For left side knuckles, place the locator block (2) to the left side (4) on the Fixture. The side of the locator block with the angle cut goes downward, toward the Fixture. Install the mounting screws and tighten them to approximately 54 Nm (40 ft. lbs.).
b. For right side knuckles, place the locator block (2) to the right side (3) on the Fixture. The side of the locator block with the angle cut goes downward, toward the Fixture. Install the mounting screws and tighten them to approximately 54 Nm (40 ft. lbs.).
3. Install the knuckle in the Fixture as shown, guiding the steering arm (1) to rest on the locator block (3) and the brake caliper mounting bosses on the two Fixture pins (2).
4. Place the Fixture (3) with knuckle in an arbor press.
5. Position Remover/Installer (2), in the small end of the hub. Lower the arbor press ram (1) and remove the hub from the wheel bearing and knuckle. The bearing race will normally come out of the wheel bearing with the hub as it is pressed out of the bearing.
6. Remove the knuckle from the Fixture and turn it over.
7. Remove the snap ring (2) from the knuckle using an appropriate pair of snap ring pliers (1).
8. Place the knuckle back in the Fixture (3) in the arbor press ram.
9. Place Installer (2) , on the outer race of the wheel bearing. Lower the arbor press ram (1) and remove the wheel bearing from the knuckle.
10. Remove the knuckle and tools from arbor press.
11. If the bearing race is still pressed onto the hub, install the Bearing Splitter (5), Special Tool , between the hub flange and the bearing inner race (4).
12. Place the hub, bearing race and Bearing Splitter in an arbor press. The press support blocks must not obstruct the wheel hub while it is being pressed out of the bearing race.
13. Place Remover/Installer (2) in the end of the hub (3). Lower the arbor press ram (1) and remove the hub from the bearing race.
_______________________________________
Installation
FRONT HUB AND BEARING - INSTALLATION
INSTALLATION
Special Tools:
CAUTION: When installing the wheel bearing (1) in the knuckle (2) it is important to place the side of bearing with the wheel speed sensor magnetic encoder ring (dark band) (3) in the knuckle first. Otherwise, the wheel speed sensor will not operate correctly.
1. Wipe the bearing bore of the knuckle clean of any grease or dirt with a clean, dry shop towel.
2. Place the knuckle in an arbor press supporting the knuckle from underneath using Cup (4.)
3. Place the NEW wheel bearing (5) magnetic encoder ring side down (see above Caution) into the bore of the knuckle. Be sure the wheel bearing is placed squarely into the bore.
4. Place Receiver (3), larger inside diameter end down over the outer race of the wheel bearing.
5. Place Disc (2) into top of Receiver. Lower the arbor press ram (1) and press the wheel bearing into the knuckle until it is bottomed in the bore of the knuckle.
6. Remove the knuckle and tools from the arbor press.
7. Install a NEW snap ring (2) in the knuckle using an appropriate pair of snap ring pliers (1). Make sure the snap ring is fully seated.
8. Place the knuckle in an arbor press. Support the knuckle from underneath using Remover/Installer (3), smaller end up against the wheel bearing inner race.
9. Place the hub (4) in the wheel bearing making sure it is square with the bearing inner race.
10. Position Remover/Installer (2) in the end of the hub. Lower the arbor press ram (1) and press the hub into the wheel bearing until it bottoms.
11. Remove the knuckle and tools from the press.
12. Verify the hub turns smoothly without rubbing or binding.
13. Install the knuckle on the vehicle.
_____________________
I hope this helps. Let me know if you have other questions. Also, I am sorry that I cannot provide a definitive answer as far as how long it will last. If it is bad enough, it can come apart, so make sure to be careful.
Take care,
Joe
Images (Click to make bigger)
Friday, October 19th, 2018 AT 8:41 PM


