1995 Ford Mustang REMOVE HEATER CORE

188,000 MILES • V8 • 2WD • MANUAL
Avatar
LIFESAVER
  • MEMBER
  • 1 POST
I pulled out my dash to replace my heatercore unbolted the bottom screw the two top bolts and the one under the hood disconect the inlet and outlet hoses. Now i'm stuck I pulled the clamps off the compresser lines, but how do I disconect these mettle lines? So I can remove the heatercore houseing to get to the heatercore?
Nov 8, 2008 at 4:41 AM
Advertisement
Avatar
HORSEPOWERNUTS
  • MEMBER
  • 3 POSTS
NOPE....Sorry,hate to say it but you gotta go and get the release tool to get that fitting to separate.Not to mention its probably charged with coolant.I abandoned my a/c,so I just cut it.Was not charged though.Good luck friend.You can normally get the tool from your local parts store free rental(deposit reqd.).
Jan 1, 2009 at 1:31 PM
Avatar
HORSEPOWERNUTS
  • MEMBER
  • 3 POSTS
oh,and yes.Once you get the housing open,the core is lying in the casing.Good luck with that top screw!!!!!LOL!!!!
Jan 1, 2009 at 1:34 PM
Avatar
DAVE H
  • ✓Experienced Mechanic
  • 13,383 POSTS
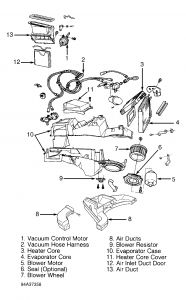
EVAPORATOR CASE ASSEMBLY Removal Disconnect negative battery cable. Remove instrument panel. See INSTRUMENT PANEL . Discharge A/C system using approved refrigerant recovery/recycling equipment. Remove suction accumulator-drier. See SUCTION ACCUMULATOR-DRIER . Remove suction accumulator-drier bracket. Disconnect liquid line and suction accumulator-drier inlet tube from evaporator core at firewall. See REFRIGERANT LINES . Cap refrigerant lines and evaporator core tubes. Disconnect heater hoses from heater core tubes, and plug hoses. Cap heater core tubes. Disconnect Black vacuum supply hose from in-line vacuum check valve in engine compartment. Remove nut attaching evaporator housing to cowl panel. Inside passenger compartment, remove screw attaching bottom of evaporator housing to cowl panel. Remove screw attaching air inlet duct and blower housing support brace to cowl top panel. Remove support brace. Disconnect wiring harnesses from blower motor and blower motor resistor. Pull evaporator case away from firewall. Remove evaporator case from vehicle. See Fig. 6 . Installation Position evaporator case assembly in vehicle. Install screws attaching evaporator case support brackets to cowl top panel. Ensure evaporator case drain tube through firewall is not pinched or kinked. To complete installation, reverse removal procedure. Use new "O" rings lubricated with clean refrigerant oil. Fill cooling system. Evacuate, recharge and leak test A/C system.

https://images.2carpros.com/forum/automotive_pictures/266999_core_3.jpg

Jan 1, 2009 at 1:46 PM
Add a reply
Join 2CarPros for free, one of the most advanced car repair communities on the internet. From first-time drivers to seasoned mechanics, everyone is welcome to reply, share details, and get better answers. You can add a temporary image or video first; uploads are limited to 20 MB.

Frequently Asked Problems for This Vehicle