1987 Ford F150 Truck starting mystery.

1987 FORD F-150
35,000 MILES • 6 CYL • 2WD • MANUAL
Avatar
NEON_MOON_MAN
  • MEMBER
  • 1 POST
Hi all,
I purchased a 87 ford f150 with a 4.9L 300 I6 for $100.00 the motor was bad. I put a 84 f150 4.9L 300 I6 that had been rebuilt with only 35000 miles or so. My question is: What would make the truck try to crank upon releasing the key switch instead of during the springed-action part or ignition part? To me, I don't think it's getting voltage during cranking but it then tries to crank after I release the key! That part definately has voltage. Could this be a bad key switch? Relay? Hmm?

Yes, I went from fuel injection to carb. I'm not using half the wires you normally would. Don't need them. By the way, I have a entire new harness from a third truck installed it this thing also. Everything's well except that I need it to crank in the right position. What's your thoughts?

Thanks!
Apr 3, 2010 at 6:23 PM
Advertisement
Avatar
CJ MEDEVAC
  • ASE Certified Mechanic
  • 11,004 POSTS
  • ASE Certified Mechanic
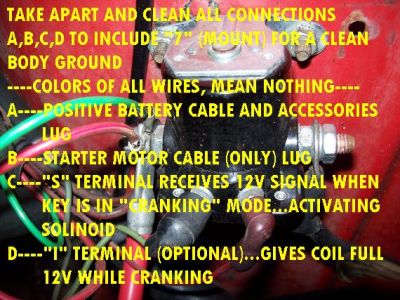
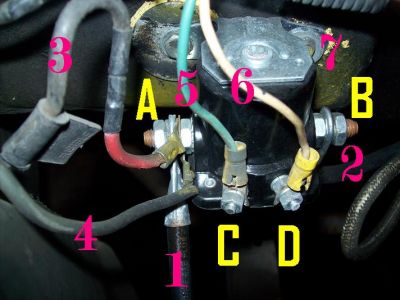
See my profile. Trying to help, sorta pre-made this stuff to save on typing (I'm slow) Locations and Voltages (when they occur during crank-up, may help you find your problem, not saying you are dumb about this, disregard it if you know this already. Yours may not look like this, but TAKE STUFF LOOSECLEANTIGHTEN WELLDO NOT JUST PASS IT OFF AS, "IT LOOKS GOOD". Do not leave off where the Battery cables connect to the Battery clamps! (not the posts) Do them too! While you are at it, Both ends of Pos cable, Both ends of NEG cable. If you still have the problem, you're probably looking at $20 to replace the SOLENOID. Follow Battery Positive cable to find it. My stuff may be OVERKILL, but at least you will know what everything is and does. Like my newly made "NELSOMATIC" stuff? I am cyber stupid, and did that! Keeps me from hunt and pecking so much! Please Reply, Good or Bad. I will continue to try to help you through your whole ordeal, even if this didn't help you. Just continue to Reply at "reply to question". Love, Turddog


https://images.2carpros.com/forum/automotive_pictures/411289_A_B_C_D_EXPLANATION_2.jpg


https://images.2carpros.com/forum/automotive_pictures/411289_A_B_C_D_17_LOCATIONS_2.jpg

"FORD TYPE" SOLINOID SYSTEM, YOUR ACCES., MAY VARY 1) POSITIVE CABLE FROM BATTERY 2) OUT TO STARTER MOTOR 3) ON MY JEEP, THIS GOES TO THE ALTERNATOR 4) THIS FEEDS MY FUSEBOX (ALL OF MY ACCESSORIES) 5) "S" WIRE IS FROM KEY, 12V ONLY WHILE YOU ARE "CRANKING" THIS WIRE ACTIVATES THE SOLINOID'S ELECTROMAGNET, WHICH IN TURN, CONNECTS---A & B INTERNALLY (ONLY THE 2 LARGE GAUGE CABLES CAN HANDLE THE AMPERAGE THE STARTER "PULLS"). WHEN THE SOLINOID IS ACTIVATED, IT THROWS 12V TO STARTER USING THE LARGE GAUGE CABLES (1) POS FROM BATT--THRU SOLINOID INTERNAL CONNECTION--(2) TO THE STARTER, WHILE KEY IS IN "CRANKING" MODE. THIS IS THE TOTAL REASON FOR A SOLINOID, BECAUSE IT WOULD NOT BE PRACTICAL, TO RUN THE HEAVY CABLES TO AND FROM YOUR KEY SWITCH. 6) "I" WIRE (OPTIONAL), FEEDS COIL "FULL 12V", ONLY WHILE "CRANKING", AFTER YOU RELEASE THE KEY, THE COIL REVERTS BACK TO REDUCED VOLTAGE, SUPPLIED BY YOUR KEY IN THE "RUN" POSITION. 7) "MOUNT" GROUND, UNIT MUST HAVE A GOOD GROUND (BATT. TO ENGINE, ENGINE TO FRAME, FRAME TO BODY [ALL MUST CONNECT, SOMEHOW] ) (3 & 4, ON MY JEEP) ARE FUSABLE LINKS, ALL ARE NOT MARKED, MY #3 IS, #4 IS NOT....ITS SORT OF A "WIRE" FUSE. IF THEY ARE GOOD, TUGGING ON THEM WILL BE JUST LIKE A WIRE, WHEN THEY ARE "BURNED UP", THEY WILL STRETCH OUT LKE A RUBBER BAND.


https://images.2carpros.com/forum/automotive_pictures/411289_GOOD_OLE_WILLY_1.jpg

Apr 4, 2010 at 3:50 PM
Join 2CarPros for free, one of the most advanced car repair communities on the internet. From first-time drivers to seasoned mechanics, everyone is welcome to reply, share details, and get better answers. You can add a temporary image or video first; uploads are limited to 20 MB.
Ask a Free Question
Repair Safety Notice: This information is for general instructional purposes only. Vehicle repair can be dangerous. Verify all information, follow manufacturer service procedures, use proper tools and safety equipment, and consult a qualified repair shop when needed.