FUEL FILTER
Removal & Installation (Except Villager In-Tank)
Release fuel pressure. See FUEL SYSTEM PRESSURE RELEASE . Disconnect negative battery cable. Remove fuel filter fittings. See QUICK-DISCONNECT FITTINGS . Remove bolt or clamp and fuel filter. To install, reverse removal procedure.
Remove fuel tank cap. Using Fuel Pressure Gauge (T80L-9974-B), release pressure from system at pressure relief valve (Schrader valve) located on fuel injection manifold rail.
If fuel pressure gauge is not available, disconnect Inertia Fuel Shutoff (IFS) switch. See INERTIA FUEL SHUTOFF SWITCH LOCATION table. Remove fuel filler cap to release fuel tank pressure. Crank engine for 15 seconds to release system pressure.


QUICK-DISCONNECT FITTINGS
Push Connect Coupling
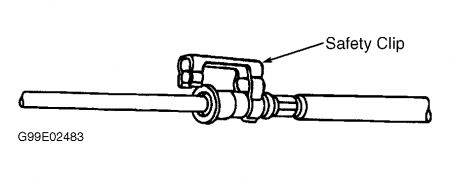
Release fuel pressure. See FUEL SYSTEM PRESSURE RELEASE . Disconnect safety clip from male hose. See Fig. 18 . Install Fuel Line Disconnect (T90T-9550-S) and push it into fitting. Separate fittings.
Before installation, lubricate tube end with clean engine oil. Align tube to fitting and push until a click is heard. Pull on fitting to ensure engagement. Install safety clip.
Fig. 18: Disconnecting Fuel Lines With Push Connect Coupling
Courtesy of FORD MOTOR CO.
"R" Clip Coupling
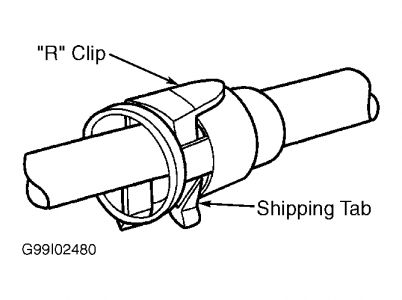
Release fuel pressure. See FUEL SYSTEM PRESSURE RELEASE . Remove shipping tab by bending tab downward. Spread "R" clip and push clip into fitting. See Fig. 19 . Separate fitting from tube.
Before installation, lubricate male tube end with clean engine oil. Insert "R" clip into fitting. Align tube and fitting. Insert tube into fitting and push together until a click is heard. Pull on connection to ensure engagement.
Fig. 19: Disconnecting Fuel Lines With "R" Clip Coupling
SPONSORED LINKS
Friday, December 19th, 2008 AT 10:24 PM

