CV axle fused to wheel hub?

1998 SUBARU FORESTER
55,000 MILES • 2.5L • 4 CYL • 4WD • AUTOMATIC
Avatar
RAMJACCORP
  • MEMBER
  • 27 POSTS
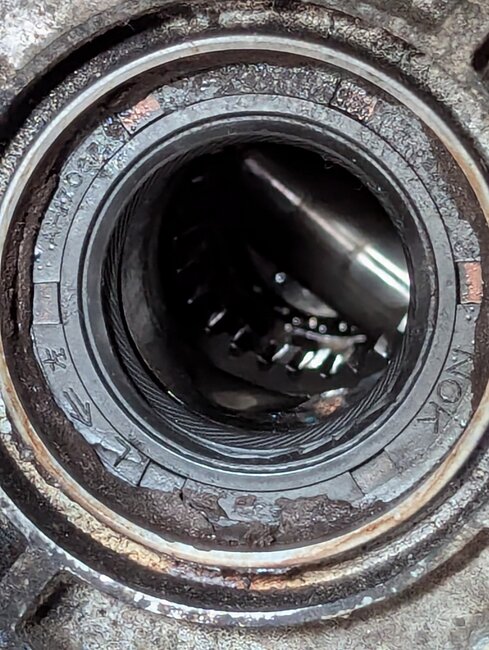
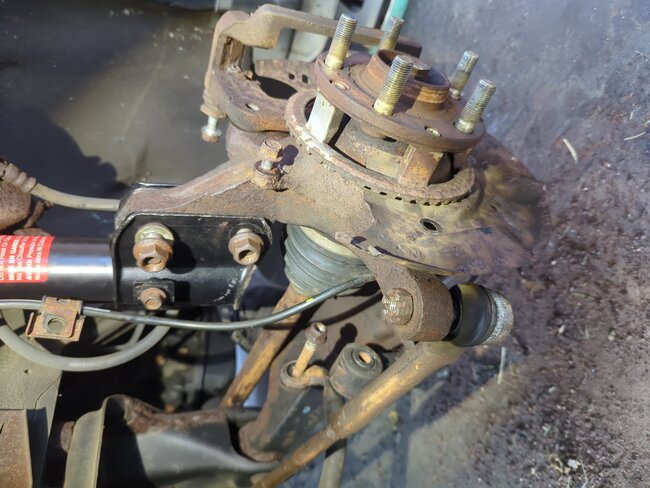
I had to bring a mobile mechanic in to try and free the axle I need to replace (front left), but he couldn't budge it - heat, air hammer, mallets - it's like it's welded together. Now, I need to either remove the entire assembly, and have a machine shop press it apart and rebuild, or buy new hub kit and knuckle, and have them press that together. I just replaced all 4 struts, and money is tight. What would you recommend as the best solution? And should I avoid re-using the existing bearings, after the pounding they just took?
May 29, 2024 at 8:27 AM
Advertisement
Avatar
STEVE W.
  • CERTIFIED EXPERT
  • 15,119 POSTS
Unfortunately, that is common with that design, the rust in the splines and lock together like they were welded. Generally, they resist a light hammer, and they get the hub grappler. If that still doesn't push it out then I order the bearings, hub and axle. Then heat the hub until it's red hot and push it apart. That usually wipes out the bearings and seals and ruins the temper in the axle and hub. If you have an oxy/fuel torch I would go after it with a lot more heat. As you need to press it apart I would at minimum replace the bearings and the axle due to the hammering alone.
May 29, 2024 at 10:20 AM
Avatar
RAMJACCORP
  • MEMBER
  • 27 POSTS
Thanks, Steve. Would you recommend trying a spindle/knuckle assembly from a salvage yard, or would it be better to just buy all new parts? I have the new CV axle. I figure the bearings must be damaged now. I was told it was 3.5 hours labor to have a shop break everything apart and install new bearings.
May 29, 2024 at 11:08 AM
Advertisement
Avatar
STEVE W.
  • CERTIFIED EXPERT
  • 15,119 POSTS
If you can be sure the replacement has good bearings then it would be easier considering how far apart you have it. 3.5 is the correct labor for that job.
May 29, 2024 at 3:17 PM
Avatar
RAMJACCORP
  • MEMBER
  • 27 POSTS
Thanks again, Steve. While I'm trying to source replacement parts (I have removed the entire assembly from the car), I have another issue. I need to roll the vehicle forward about 20-30 feet down the driveway, with the entire left wheel assembly out. Would it be safe-ish or completely insane to try to jack the car from the front jacking plate and try to move it that way, using the floor jack as a dolly? Desperate times, desperate measures.
Jun 5, 2024 at 10:56 AM
Avatar
STEVE W.
  • CERTIFIED EXPERT
  • 15,119 POSTS
Well, there is a reason why those jacks have wheels. I can't tell you outright to pull your vehicle around with one corner supported by a jack, but I can say that it wouldn't be the first or last time that was done, several times it's occurred in shops I've worked in though.
Just be sure that the jack isn't one of the $20 dollar lightweights, I also like to use a strap to wrap the saddle of the jack and jacking point just to be sure it doesn't slip. Another trick is to use another strap to tow the tire you took off under the frame with a flat piece of plywood on it, just in case the jack was to fail, the vehicle only drops onto the tire that way.
Jun 5, 2024 at 12:15 PM
Avatar
RAMJACCORP
  • MEMBER
  • 27 POSTS
Great tip, Steve - thanks. Would you recommend using the front center jack plate and lifting the front end completely, or using the jack on the front side pinch weld (as a replacement for the missing wheel)? Also, where would you position the tire with the strap to use as a safeguard? Thanks again!
Jun 5, 2024 at 1:07 PM
Avatar
STEVE W.
  • CERTIFIED EXPERT
  • 15,119 POSTS
I generally find the point farthest to the corner, A arm lower mounting point is common. Tire gets drug under the frame or engine cradle usually. Whatever the lowest solid point that can't hurt anything if it were to fall on it. Also don't jack it up level, just enough that nothing drags.
Jun 5, 2024 at 5:35 PM
Avatar
RAMJACCORP
  • MEMBER
  • 27 POSTS
Thanks again, Steve. Update on the axle fiasco: After removing the entire assembly, I tried freeing 2 stuck bolts. The first was the small one holding the ABS sensor in place. Sheared the head off that one completely. The second bolt holds the ball joint. Buggered up the head on that one, and it's not budging. Looks like I'll need to replace the whole shebang. The job just went from quick and not too expensive to "uh-oh" in a hurry.
Jun 5, 2024 at 6:32 PM
Avatar
STEVE W.
  • CERTIFIED EXPERT
  • 15,119 POSTS
OOF, yeah I've had ones do that here in the salt belt. That's why the second most used tool here is a torch. Good luck with the rest of it. Keep us informed.
Jun 5, 2024 at 10:33 PM
Avatar
RAMJACCORP
  • MEMBER
  • 27 POSTS
Not having a good torch handy, I resorted to sheer brute force and anger, and wailed on the axle stub with a large hammer until it finally broke free. Unfortunately, I shattered the ABS tone ring in the process. Apparently, those things are pretty brittle. Now, I have to decide whether to shell out over $100 for a new ring (highway robbery), or just do without it. I've read where others have just not replaced them. Next challenge is trying to free the two frozen bolts from the knuckle, or I'll have to replace that, too.
Jun 7, 2024 at 9:16 AM
Avatar
STEVE W.
  • CERTIFIED EXPERT
  • 15,119 POSTS
Without the ring you will lose ABS and have a constant light. For folks who don't have a large torch I usually say to buy one of the smaller units, you can always go up in tank size if needed. Or get one of the induction heaters like a mini-ductor. Those can really be handy if you don't want a torch or you are working next to flammable materials. There are a few "brands" on the jungle river site..
Jun 7, 2024 at 11:00 AM
Avatar
RAMJACCORP
  • MEMBER
  • 27 POSTS
At this point, I'm not too concerned about the light, or the loss of ABS. Just trying to get the car rolling again. Thanks for the tips on induction heaters. They're way out of my price range, but a great idea.
Jun 7, 2024 at 11:53 AM
Avatar
STEVE W.
  • CERTIFIED EXPERT
  • 15,119 POSTS
Let us know how it turns out.
Jun 9, 2024 at 1:09 PM
Avatar
RAMJACCORP
  • MEMBER
  • 27 POSTS
Update: New hub and bearings will arrive today. Now, I have to figure out the proper order to reassemble everything, and try to track down torque specs. I'm replacing a lot of parts: hub, tone ring, dust shield, ball joint, CV axle, rotors and brake pads. This simple axle job turned into a major operation. Any tips would be greatly appreciated!
Jun 17, 2024 at 7:35 AM
Avatar
STEVE W.
  • CERTIFIED EXPERT
  • 15,119 POSTS
Yeah, that bearing design can cause tempers to flare. I'll post the info from the service data in attached images. Basically, you clean up the knuckle, then use the press to install the bearing by pressing only on the outer race Then install the outer seal and then you assemble the tone ring to the hub. Next you press the hub into the bearing while supporting the inner race. Then the snap ring goes on and then the inner seal. Then you install the unit to the car. Two strut bolts, slip the axle into place and then the lower ball joint and tie rod. Sway bar link next and then torque those all down. Then the rotor and caliper bracket, caliper with pads and then set it down to torque the axle nut and stake it and the lug nuts.

These should help some:

https://www.2carpros.com/articles/bearing-press-how-to-use
https://www.2carpros.com/articles/how-to-replace-a-cv-axle-bearing
https://www.2carpros.com/articles/how-to-replace-front-brake-pads-and-rotors-fwd
https://www.youtube.com/watch?v=2kUUEryHHAw
Jun 17, 2024 at 11:27 AM
Avatar
RAMJACCORP
  • MEMBER
  • 27 POSTS
Steve, you rock! Thanks so much for that incredibly helpful info. I owe ya.
Jun 17, 2024 at 11:55 AM
Avatar
STEVE W.
  • CERTIFIED EXPERT
  • 15,119 POSTS
You're welcome. Let us know how you make out.
Jun 17, 2024 at 12:05 PM
Avatar
RAMJACCORP
  • MEMBER
  • 27 POSTS
Update: I removed the axle stub from the old axle, and put it into the new half shaft, securing it with the roller pin. (Sorry if my terminology is off!) I examined the opening in the trans, and it looks like either the oil seal there is toast, or it's no longer there at all, but I can't quite tell which. I'm attaching a photo of what I'm seeing. I ordered inner (CR 22026) and outer (CR 22032) "wheel seals" from SKF, and now I have to figure out where they belong, because none of the many pics I took seem to show them well, and I couldn't find specifics on the seals. Once I get this mess sorted out, I can start reassembling everything.
Jun 23, 2024 at 12:39 PM
Avatar
STEVE W.
  • CERTIFIED EXPERT
  • 15,119 POSTS
The seal is there, it's the NGK part, but it looks like it was seeping and needed replacement. Just use a screwdriver or seal puller and remove the old one, then line up the new one and press or drive it into position.
Jun 23, 2024 at 6:27 PM
Avatar
RAMJACCORP
  • MEMBER
  • 27 POSTS
Thanks, Steve! I had seen some people saying that in order to remove that seal, you have to unscrew the "sundial" on the transmission. Are you sure that it can just be popped out without the need to do that?

Latest update: Ran into yet another issue (the joy of old, rusty cars). After the bolt holding the speed sensor bracket in place broke, I drilled it out, leaving just a little of the old bolt's exterior in there, and tried using an M8 tap to re-thread the hole. No luck, the M8 bolt just slides in and out. So, it seems my options are to either re-tap to M10 size (will have to drill out the hole in the bracket, too), or just put a 5/8" SAE bolt in there (it's still a bit loose, but tighter than the M8), and lock it in with epoxy. I have no plans of ever removing that speed sensor again on this 26 year old rust bucket, so I don't mind going the epoxy route, if it works safely. I had thought about just putting a nut on the back side, with some thread lock, but friends said that was a bad idea. Thoughts?
Jun 25, 2024 at 9:54 AM
Avatar
STEVE W.
  • CERTIFIED EXPERT
  • 15,119 POSTS
That's correct, forgot this was the front shaft. For that you unscrew the retainer then the seal can be removed, If you are careful you won't disturb the bearings. Replace the seal and put it back together. Tighten the ring down and put it back in the same place as you removed it. The locking tab that bolts to the housing usually leaves a nice spot to return it to or you can just put a mark on them before you remove them. You could get a heli-coil kit to rethread the hole. It's probably at the right size for that. Or epoxy a stud in the hole and just use a nut on the outside.
Jun 25, 2024 at 12:30 PM
Avatar
RAMJACCORP
  • MEMBER
  • 27 POSTS
Figured I'd share an update, after all the work attempted. Had the mobile mechanic install the new CV axle, because I just wasn't comfortable with that one. I replaced the ball joints and outer tie rod ends up front. Figured she'd be fine after that. Well, now there are random clunking noises from the front and rear sometimes, when I execute turns (maybe some more worn-out parts I missed), and what seems like a differential whine that gets higher with speed and stops when I take my foot off the gas. I think I might have had hope for the hopeless. I tried to include a sample of the sound, but the site won't accept it. Anyhow, thanks again for all of your help through this nightmare. You guys are the best!
Dec 18, 2024 at 12:17 PM
Avatar
STEVE W.
  • CERTIFIED EXPERT
  • 15,119 POSTS
Noises are some of the worst things to find. I use a chassis ear myself but it's possible to just use anything that records sound. Secure it in a place near the noise. Then listen, move it and listen, you are looking for the place where it gets loudest. Then look at the parts in that area.
Dec 18, 2024 at 2:32 PM