Good morning,
The black substance is from the original failure.
https://www.2carpros.com/articles/how-a-car-air-conditioner-works
The system has to be completely flush out of all that debris. The dryer and expansion valve must be replaced as they are contaminated. The dryer is part of the condenser and the condenser must be replaced as well. They are one unit. I attached a YouTube video for you to view for this replacement.
https://www.youtube.com/watch?v=DuiFCUtjGMQ
The compressor needs to be replaced with the original compressor in order for the system to work correctly.
https://www.2carpros.com/articles/replace-air-conditioner-compressor
https://www.2carpros.com/articles/re-charge-an-air-conditioner-system
Roy
AIR CONDITIONING: COMPRESSOR: REMOVAL
1. Recover refrigerant from refrigeration system see: heating and air conditioning > removal and replacement > refrigerant
2. Disconnect cable from negative battery terminal
3. Remove front wheel rh
4. Remove front fender apron seal rh
5. Remove cool air intake duct seal see: front bumper > removal and replacement removal
6. Remove engine room side cover lh see: wiper motor > removal and replacement removal
7. Remove engine room side cover rh see: wiper motor > removal and replacement removal
8. Remove v-bank cover sub-assembly see: engine > removal and replacement > removal
9. Remove front wheel opening extension pad lh
10. Remove front wheel opening extension pad rh
11. Remove engine under cover lh
12. Remove engine under cover rh
13. Drain engine coolant see: coolant > component tests and general diagnostics
14. Remove air cleaner cap sub-assembly see: throttle body > removal and replacement > removal
15. Remove no. 2 air cleaner inlet
16. Remove no. 1 air cleaner inlet
17. Remove radiator grille protector see: front bumper > removal and replacement > removal
18. Remove front bumper assembly see: front bumper > removal and replacement > removal
19. Remove front bumper energy absorber
20. Remove millimeter wave radar sensor assembly (w/ dynamic radar cruise control system) see: distance sensor, cruise control > removal and replacement > removal
21. Separate radiator reserve tank hose see: radiator > removal and replacement removal
22. Disconnect radiator hose inlet see: radiator > removal and replacement > removal
23. Disconnect radiator hose outlet see: radiator > removal and replacement > removal
24. Disconnect no. 1 oil cooler inlet hose see: radiator > removal and replacement > removal
25. Disconnect no. 1 oil cooler outlet hose see: radiator > removal and replacement > removal
26. Remove radiator support upper see: radiator > removal and replacement > removal
27. Remove fan shroud see: radiator > removal and replacement > removal
28. Remove radiator assembly see: radiator > removal and replacement > removal
29. Remove v-ribbed belt see: drive belt > removal and replacement > removal
30. Remove generator assembly see: alternator > removal and replacement > removal
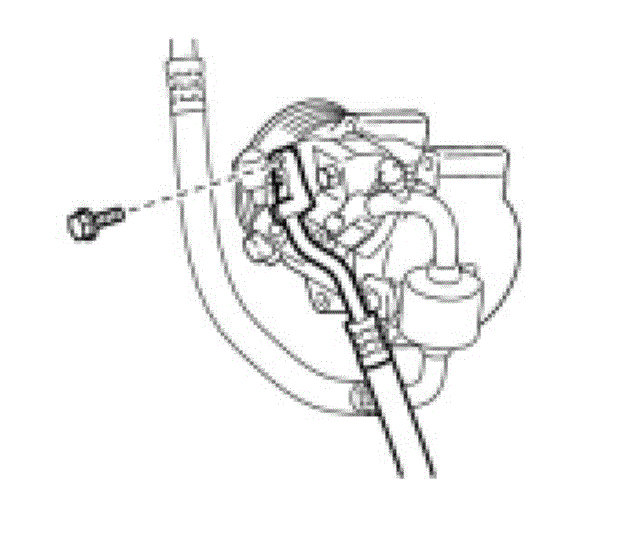
31. Disconnect no. 1 cooler refrigerant discharge hose
Remove the bolt and disconnect the No. 1 cooler refrigerant discharge hose from the compressor and pulley.
imageOpen In New TabZoom/Print
Remove the O-ring from the No. 1 cooler refrigerant discharge hose.
NOTICE:
Seal the openings of the disconnected parts using vinyl tape to prevent entry of moisture and foreign matter.
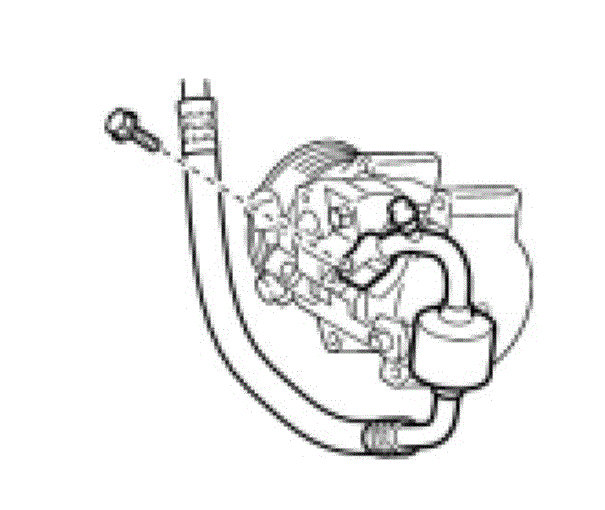
32. DISCONNECT NO. 1 COOLER REFRIGERANT SUCTION HOSE
Remove the bolt and disconnect the No. 1 cooler refrigerant suction hose from the compressor and pulley.
imageOpen In New TabZoom/Print
Remove the O-ring from the No. 1 cooler refrigerant suction hose.
NOTICE:
Seal the openings of the disconnected parts using vinyl tape to prevent entry of moisture and foreign matter.
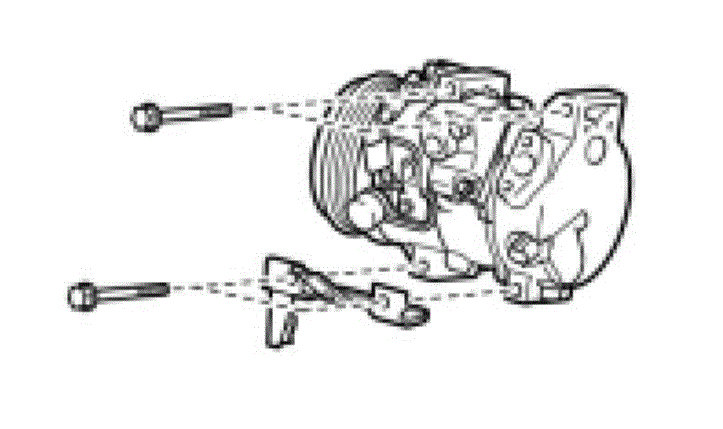
33. REMOVE COMPRESSOR AND MAGNETIC CLUTCH
Disconnect the magnetic clutch connector.
Remove the 4 bolts.
imageOpen In New TabZoom/Print
Remove the compressor and magnetic clutch.
Images (Click to make bigger)
Sunday, October 11th, 2020 AT 4:45 AM


