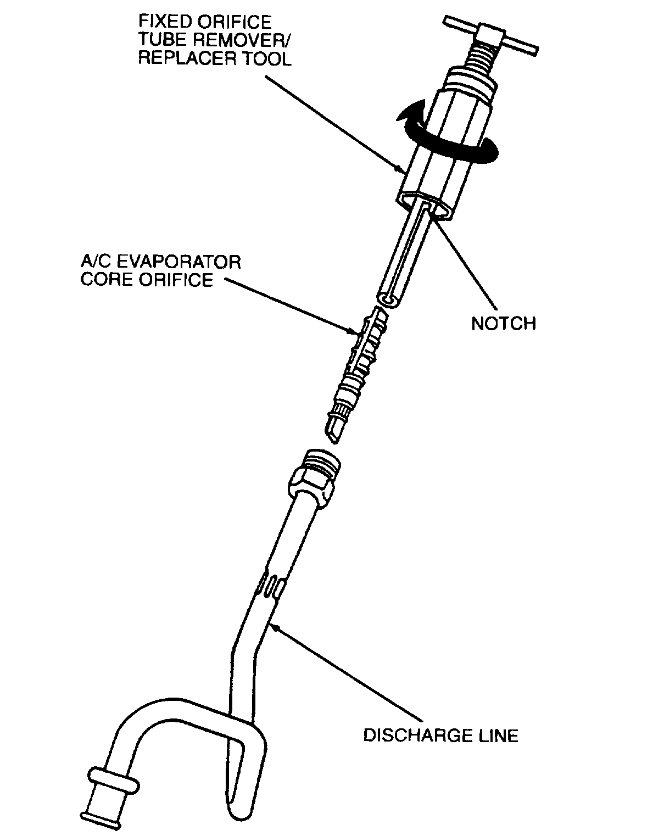
This sounds like the orifice tube is clogged which happens when a compressor goes bad. I would vacuum the system down and remove the A/C lines from the orifice tube to inspect it using a flashlight. You can remove the tube and see if you can blow through it. Here is the location of the part in question so you can check it out. Also, I have included a guide that can help as well.
https://www.2carpros.com/articles/car-air-conditioner-not-working-or-is-weak
The A/C evaporator core orifice is located in the condenser to evaporator tube. Note: The A/C evaporator core orifice should be replaced whenever an A/C compressor is replaced for lack of performance (internal damage).
The A/C evaporator core orifice is located in the discharge line.
The A/C evaporator core orifice is constructed with a plastic body. two screens and a small brass tube down the center of the A/C evaporator core orifice body. Two O-ring seals are around the A/C evaporator core orifice body to seal against leakage around the body.
CAUTION: Do not attempt to remove the A/C evaporator core orifice with pliers or to twist or rotate the A/C evaporator core orifice in the discharge tube. To do so will break the fixed orifice tube body in the discharge tube. Use only the recommended tool.
REMOVAL
1. Discharge A/C system. Refer to System Discharging and Recovery. See: Heating and Air Conditioning > Procedures > Discharging and Recovery
2. Remove condenser to evaporator tube.
3. Pour a small amount of clean Motorcraft YN-12b refrigerant oil or equivalent meeting Ford Specification WSH-M1C231-B into the outlet end of the discharge line to lubricate the tube and O-ring seals during removal of the A/C evaporator core orifice.
4. Engage the Fixed Orifice Tube
Remover/Replacer T83L-19990-A with the two tangs on the A/C evaporator core orifice. Do not twist or rotate the A/C evaporator core orifice in the discharge line as it may break off.
5. Hold the T-handle of the Fixed Orifice Tube Remover/Replacer T83L-19990-A to keep it from turning and run the nut on the tool down against the discharge line until the A/C evaporator core orifice is pulled from the tube.
a. NOTE: If the A/C evaporator core orifice breaks in the discharge line, remove it from the tube with Broken Orifice Tube Extractor T83L-19990-B as follows:
To remove a broken A/C evaporator core orifice, insert the screw end of the Broken Orifice Tube Extractor T83L-19990-B into the discharge line and thread the screw end of the tool into the brass tube in the center of the A/C evaporator core orifice. Pull the A/C evaporator core orifice from the discharge line.
If only the brass center tube is removed during Step a, insert the screw end of Broken Orifice Tube Extractor T83L-19990-B into the discharge line and screw the end of the tool into the A/C evaporator core orifice body. Pull the A/C evaporator core orifice body from the discharge line.
INSTALLATION
1. Lubricate the O-ring seals on the A/C evaporator core orifice liberally with clean Motorcraft YN-12b refrigerant oil or equivalent meeting Ford specification WSH-M1C231-B.
2. Place the A/C evaporator core orifice in the Fixed Orifice Tube Remover/Replacer T83L-19990-A and insert the A/C evaporator core orifice into the discharge line until the A/C evaporator core orifice is seated at the stop.
3. Remove the remover/replacer tool from the A/C evaporator core orifice.
4. Using a new O-ring lubricated with clean Motorcraft refrigerant oil YN-12b or equivalent meeting Ford specification WSH-M1C231-B, install the condenser to evaporator tube.
5. Leak-test, evacuate and charge the system following the recommended service procedures. Observe all safety precautions.
6. Check the system for proper operation.
Check out the diagrams (below). Let us know what happens and please upload pictures or videos of the problem.
Image (Click to make bigger)
SPONSORED LINKS
Saturday, May 28th, 2022 AT 7:49 PM


