Hi and thanks for using 2CarPros. Com.
Wow, that is not good. Either something is not together correctly or the hydraulics are not doing their job. The first thing I want to start with is the proper procedure for bleeding the slave and clutch master cylinder. Take a look through the following to determine if it's how you did it.
___________________________________
CLUTCH SYSTEM BLEED
NOTE: The clutch hydraulic system must be bled whenever the pressure line is disconnected. The fluid in the reservoir must be maintained at the 3/4 level or higher during air bleeding.
1. Remove bleeder cap from slave cylinder and attach vinyl hose to bleeder screw. Place other end of hose in container.
2. Slowly pump clutch pedal several times.
3. With clutch pedal depressed, loosen bleeder screw to release trapped air.
4. Tighten bleeder screw.
5. Repeat steps 2 through 4 until no air bubbles appear in fluid.
__________________________________
Here are the directions for removing and replacing the clutch. Take a look through them to confirm everything went together correctly.
REMOVAL AND INSTALLATION
REMOVAL
1. Remove transaxle.
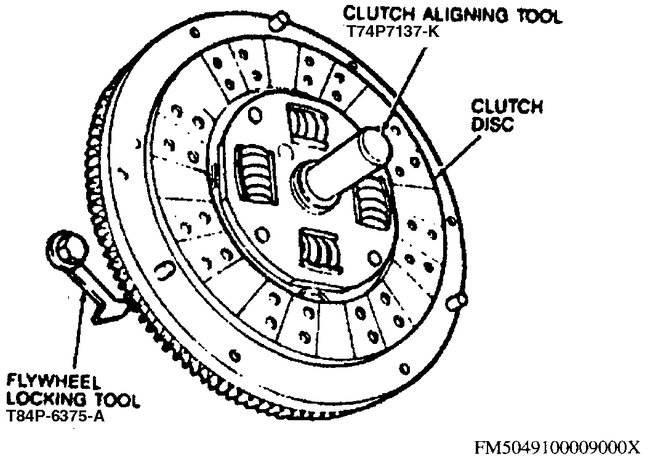
2. Install Flywheel Locking tool No. T84P-6375-A or equivalent in a transaxle mounting hole on engine block, then engage tooth of locking tool into flywheel ring gear.
3. Loosen pressure plate cover attaching bolts evenly to avoid distorting cover. If same pressure plate and cover are to be installed, mark cover and flywheel so pressure plate can be installed in original position.
4. Remove pressure plate and clutch disc from flywheel.
INSTALLATION
1. Reverse procedure to install, noting the following:
a. Clean splines on clutch disc and transaxle input shaft, then apply a small amount of Clutch Grease part No. C1AZ-19590-B or equivalent to clutch disc and input shaft splines. Avoid getting grease on clutch face.
B. Position clutch disc plate onto flywheel
c. Ensure three dowel pins on flywheel are aligned with dowel pins on pressure plate.
D. Finger tighten cover attaching bolts, then align clutch disc using tool No. T74P-7137-K or equivalent.
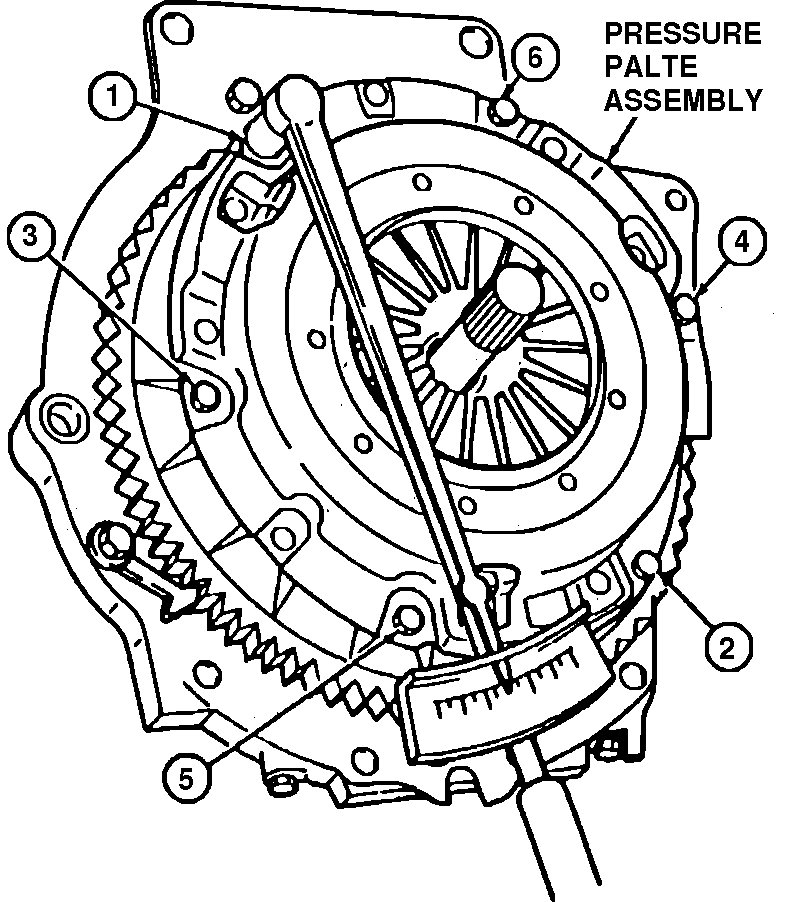
E. Evenly torque bolts to 13-20 ft lbs in sequence shown.
F. Remove alignment tool, then install transaxle and perform clutch bleed procedure.
________________________________________________
The first 2 pictures correlate with the removal and replacement directions.
_______________________________________________
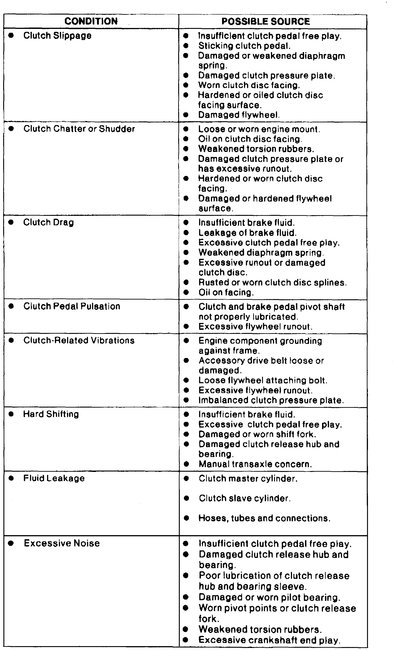
Picture 3 is a list of possible issues. When looking through it, focus on the hard shift issues. However, if that was not an issue prior, I do not think it is relevant.
Let me know what you find when looking through the directions or if you have other questions.
Take care,
Joe
Images (Click to make bigger)
Friday, August 10th, 2018 AT 7:48 PM


