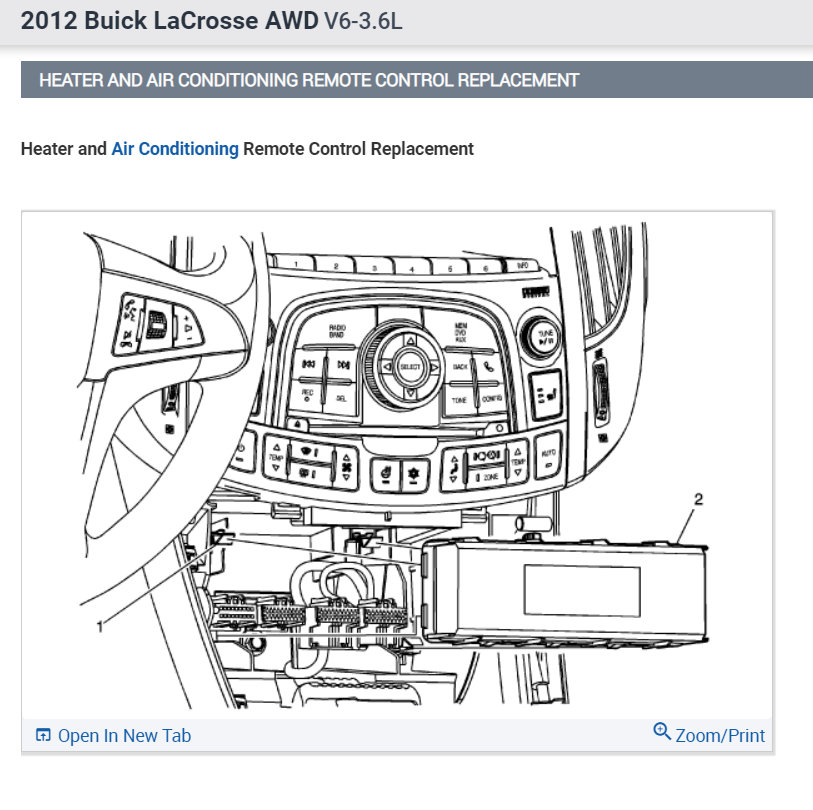
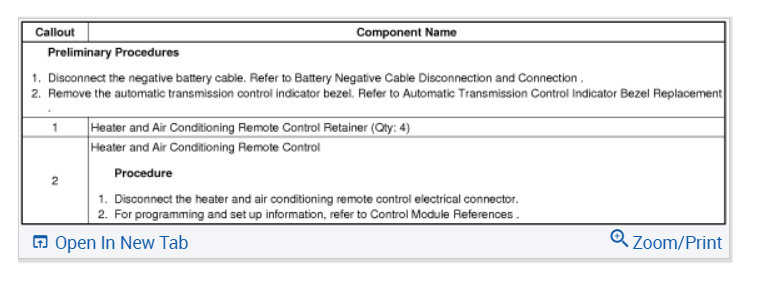
This happens when the HVAC control head goes out, but to be sure we can do a simple CAN scan by checking out this guide and watching the video. If confirmed here are instructions on how to replace it in the diagrams below.
https://www.2carpros.com/articles/can-scan-controller-area-network-easy
HVAC System Control Module Programming and Setup
The following service procedures require either a programming or a setup event performed for a complete repair.
HVAC Control Module Replacement
If the HVAC control module needs to be replaced, the following procedures must be performed:
1. Connect a scan tool to the vehicle and access SPS. Refer to Service Programming System (SPS) See: Vehicle > Programming and Relearning > Service Programming System (SPS).
2. Perform the SPS function Remote Heater and Air Conditioning Control Module Programming and follow the on-screen instructions.
3. Perform the SPS function Remote Heater and Air Conditioning Control Module Configuration & Setup and follow the on-screen instructions.
4. Clear DTCs after completing the programming procedure.
HVAC Control Module Reprogramming
Do not reprogram the HVAC control module unless directed by a service procedure or a service bulletin.
1. Connect a scan tool to the vehicle and access SPS. Refer to Service Programming System (SPS) See: Vehicle > Programming and Relearning > Service Programming System (SPS).
2. Perform the SPS function Remote Heater and Air Conditioning Control Module Programming and follow the on-screen instructions.
3. Clear DTCs after completing the programming procedure.
Setup for Component Replacement
If an actuator is replaced, the following procedure must be performed:
Recalibrating actuators for the HVAC system. Refer to Actuator Recalibration See: below
Actuator Recalibration
Note: Do not adjust any controls on the HVAC control module while the HVAC control module is self-calibrating. If interrupted, improper HVAC performance will result.
When replacing the HVAC control module, it will be necessary to allow the HVAC control module to perform a calibration process. When installing the HVAC control module be sure to perform the following:
1. Place the ignition switch to the OFF position.
2. Disconnect the scan tool.
3. Install the HVAC control module.
4. Connect all previously disconnected components.
5. Ignition ON.
6. Wait 40 s for the HVAC control module to self-calibrate.
7. Verify that no DTCs have set as current DTCs.
When replacing the HVAC actuator, it will be necessary to allow the HVAC control module to perform a calibration process. When installing the HVAC actuator be sure to perform one of the following:
Preferred Method (with Scan Tool)
Note: Do not adjust any controls on the HVAC control module while the HVAC control module is self-calibrating. If interrupted, improper HVAC performance will result.
1. Clear all DTCs.
2. Place the ignition switch in the OFF position.
3. Install the HVAC actuator.
4. Connect all previously disconnected components.
5. Start the vehicle.
6. With the scan tool, initiate the HVAC Actuators re-calibration feature of the Remote Heater and Air Conditioning Control Module Special Functions menu.
7. Verify that no DTCs have set as current DTCs.
Alternate Method (without Scan Tool)
Note: Do not adjust any controls on the HVAC control module while the HVAC control module is self-calibrating. If interrupted, improper HVAC performance will result.
1. Clear all DTCs.
2. Place the ignition switch to the OFF position.
3. Install the HVAC actuator.
4. Connect all previously disconnected components.
5. Remove the HVAC control module fuse for a minimum of 10 s.
6. Install the HVAC control module fuse.
7. Ignition ON.
8. Wait 40 s for the HVAC control module to self-calibrate.
9. Verify that no DTCs have set as current DTCs.
Check out the diagrams (below). Let us know what happens and please upload pictures or videos of the problem.
Images (Click to make bigger)
Tuesday, May 3rd, 2022 AT 10:07 AM


