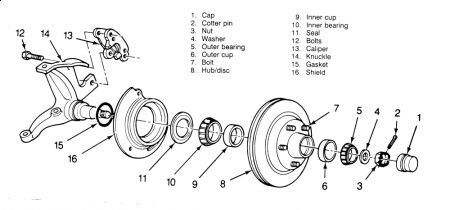
Front or Rear wheel bearings?
Front replacement steps are below..
Raise and support the front end on jackstands.
Remove the wheel.
Dismount the caliper and wire it out of the way.
Pry out the grease cap, remove the cotter pin, spindle nut, and washer.
Remove the hub. Do not drop the wheel bearings.
Remove the outer roller bearing assembly from the hub. The inner bearing assembly will remain in the hub and may be removed after prying out the inner seal. Discard the seal.
Using a hammer and drift, remove the bearing races from the hub. They are driven out from the inside out.
To install:
Clean all parts in a non-flammable solvent and let them air dry. Never spin-dry a bearing with compressed air! Check for excessive wear and damage.
When installing new races, make sure that they are not cocked and that they are fully seated against the hub shoulder.
Pack both wheel bearings using high melting point wheel bearing grease for disc brakes. Ordinary grease will melt and ooze out ruining the pads. Bearings should be packed using a cone-type wheel bearing greaser tool. If one is not available they may be packed by hand. Place a healthy glob of grease in the palm of one hand and force the edge of the bearing into it so that the grease fills the bearing. Do this until the whole bearing is packed.
Place the inner bearing in the hub and install a new inner seal, making sure that the seal flange faces the bearing race.
Carefully install the wheel hub over the spindle.
Using your hands, firmly press the outer bearing into the hub. Install the spindle washer and nut.
Spin the wheel hub by hand and tighten the nut until it is just snug-12 ft. lbs. (16 Nm). Back off the nut until it is loose, then tighten it finger tight. Loosen the nut until either hole in the spindle lines up with a slot in the nut and insert a new cotter pin. There should be 0.0012-0.005 in. (0.03-0.13mm) end-play on R-series and 0.001-0.008 in. (0.025-0.200mm) end-play on C-series. This can be measured with a dial indicator, if you wish.
Replace the dust cap, wheel and tire.

SPONSORED LINKS
Wednesday, January 13th, 2010 AT 3:38 PM


