Hi,
Take a look through these directions. They are for the housing on HVAC module assembly. The attached pics correlate with the directions.
2002 Chevrolet Cavalier L4-2.2L VIN 4
HVAC Module Assembly
Vehicle Heating and Air Conditioning Housing Assembly HVAC Service and Repair Removal and Replacement HVAC Module Assembly
HVAC MODULE ASSEMBLY
HVAC MODULE ASSEMBLY REPLACEMENT
TOOLS REQUIRED
J 39400-A Halogen Leak Detector
REMOVAL PROCEDURE
1. Drain the cooling system. Refer to Draining and Filling Cooling System (2.2L (L61)) in Cooling System.
2. Recover the refrigerant. Refer to Refrigerant Recovery and Recharging.
3. Remove the nuts connecting the evaporator lines to the evaporator.
4. Remove the evaporator lines from the evaporator.
5. Raise and support the vehicle. Refer to Lifting and Jacking the Vehicle.
6. Disconnect the heater hoses from the heater core.
7. Lower the vehicle.
8. Remove the evaporator case drain tube.
9. Remove the IP carrier.
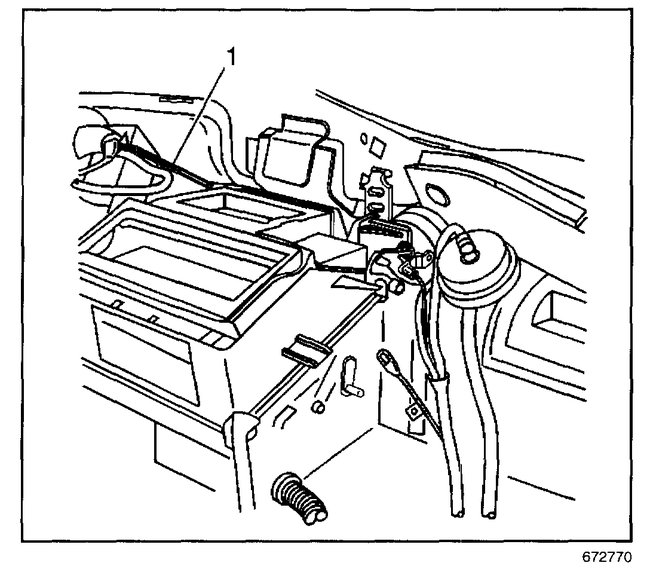
Pic 1
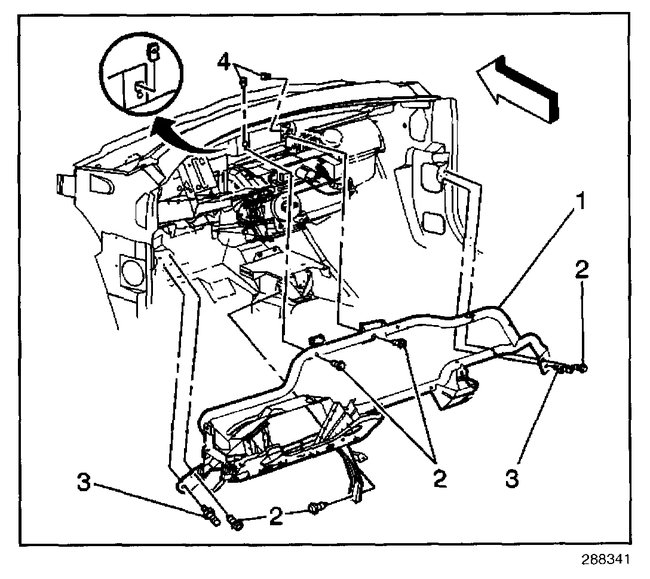
10. Disconnect the wiring harness from the cross vehicle beam (1).
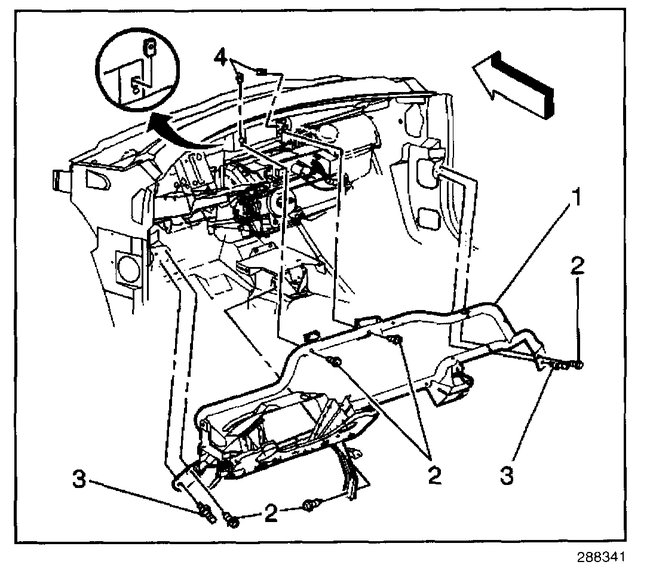
11. Remove the attaching bolts from the right and left side of the HVAC module.
12. Remove the bolts (2) from the cross vehicle beam.
IMPORTANT: Place the steering column in the straight tilt position using the tilt lever.
13. Remove the cross vehicle beam (1) from the front of the vehicle.
14. Remove the floor air outlet.
15. Disconnect the wiring harness from the HVAC module assembly.
16. Disconnect the electrical connections at the following locations:
The blower motor
The blower resistor
pic 2
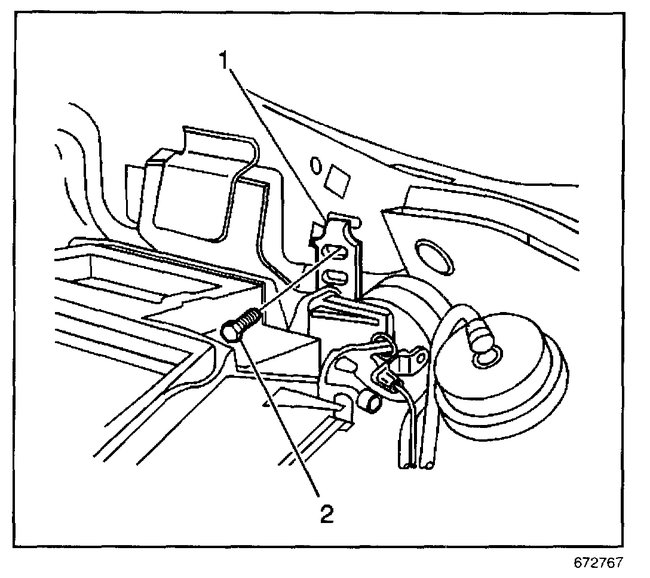
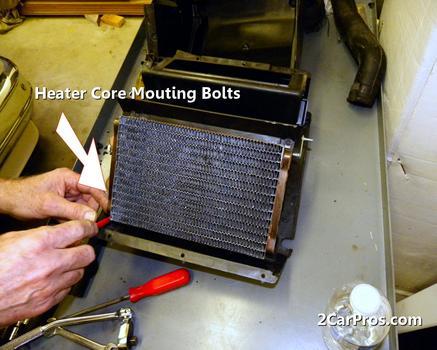
17. Remove the HVAC module attaching bolts near the heater hoses and the A/C evaporator lines.
Remove the HVAC module assembly screw (2) from the mounting bracket (1).
Pic 3
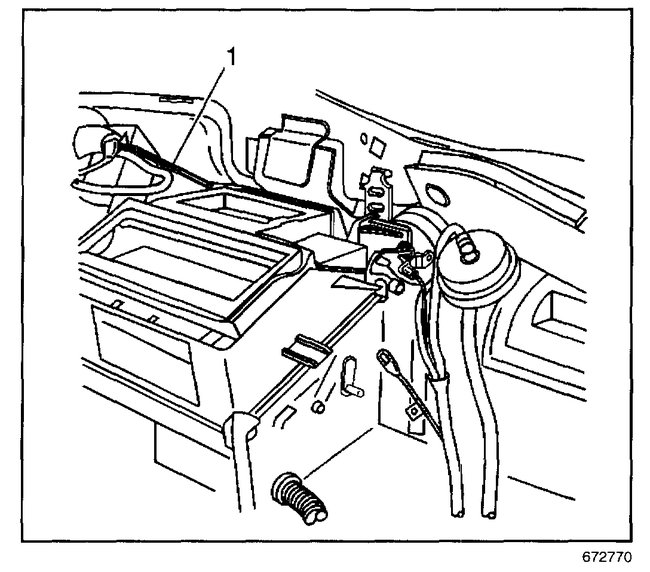
18. Disconnect the gray source vacuum line (1).
IMPORTANT: Do NOT tilt the HVAC module assembly, or coolant may leak out.
19. Remove the module from the vehicle.
INSTALLATION PROCEDURE
pic 4
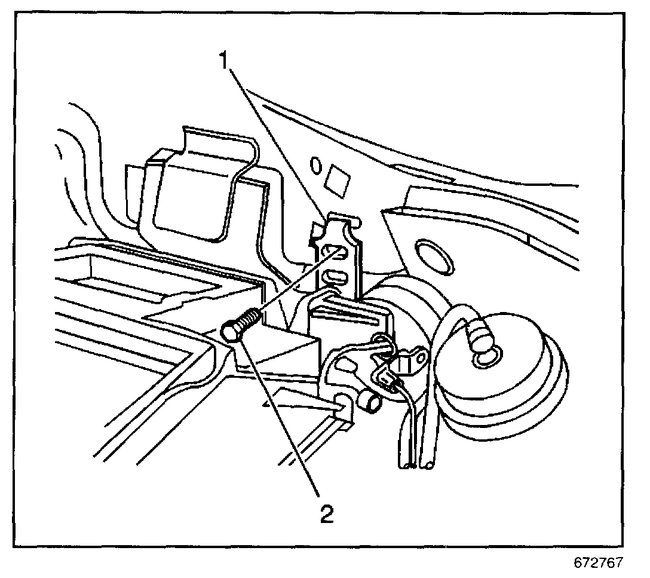
1. Install the HVAC module assembly. Align the mounting bracket (1) to the hole. Install the screw (2) to the mounting bracket.
Tighten
Tighten the bolt to 2 N.M (18 lb in).
2. Install the HVAC module attaching bolts near the heater hoses and the A/C evaporator lines.
Tighten
Tighten the bolts to 2 N.M (18 lb in).
Pic 5
3. Connect the gray vacuum line (1).
4. Connect the electrical connections at the following locations:
The blower motor
The blower resistors
5. Connect the wiring harness to the HVAC module assembly.
6. Install the floor air outlet.
Pic 6
7. Install the cross vehicle beam (1) to the front of the dash.
NOTE: Refer to Fastener Notice in Service Precautions.
8. Install the bolts (2) and the studs (3) to the cross vehicle beam (1).
Tighten
Tighten the bolts and the studs to 10 N.M (89 lb in).
9. Install the support bolts on the right and left side of the HVAC module.
Tighten
Tighten the fittings to 2 N.M (18 lb in).
10. Connect the wiring harness to the cross vehicle beam (1).
11. Install the IP carrier.
12. Raise and support the vehicle. Refer to Lifting and Jacking the Vehicle.
13. Install the evaporator case drain tube.
14. Connect the heater hoses to the heater core.
15. Lower the vehicle.
16. Connect the evaporator tubes to the evaporator.
Tighten
Tighten the fittings to 24 N.M (18 lb ft).
17. Evacuate and recharge the A/C system. Refer to Refrigerant Recovery and Recharging.
18. Leak test the fittings of the component using J 39400-A.
19. Fill the cooling system. Refer to Draining and Filling Cooling System (2.2L (L61)) in Cooling System.
For a description of the RPO Code(s) shown in this article/images refer to the RPO Code List found at Vehicle/Application ID. See: Vehicle > Components > RPO Codes
_________________________________
I hope this helps. Let me know if you have other questions.
Take care and God Bless,
Joe
Images (Click to make bigger)
SPONSORED LINKS
Thursday, February 25th, 2021 AT 6:28 PM
