Heater core removal

Tiny
PLYMOUTH31
  • MEMBER
  • 2000 CADILLAC DEVILLE
  • V8
  • 2WD
  • AUTOMATIC
  • 75,000 MILES
How do you remove the heater core. What do you have to remove to get it out. How much work is it. Thank you
Wednesday, August 26th, 2009 AT 9:34 AM

20 Replies

Tiny
DOCFIXIT
  • MECHANIC
  • 18,828 POSTS
Instrument Panel Assembly Removal

Removal Procedure

Caution: Refer to SIR Handling Caution in Cautions and Notices.
1. Disable SIR. Refer to Disabling the SIR System.
2. Remove the left knee bolster. Refer to Driver Knee Bolster Replacement (Without UV2) (See: Knee Diverter > Procedures > Knee Bolster Replacement - Driver (Without UV2))Driver Knee Bolster Replacement (UV2) (See: Knee Diverter > Procedures > Knee Bolster Replacement - Driver (With UV2)).
3. Remove the left knee bolster support. Refer to Driver Knee Bolster Bracket Replacement (See: Knee Diverter > Procedures > Knee Bolster Bracket Replacement - Driver).
4. Remove the right knee bolster. Refer to Passenger Knee Bolster Replacement (See: Knee Diverter > Procedures > Knee Bolster Replacement - Passenger).
5. Remove the IP center storage compartment or the floor console. Refer to Instrument Panel Compartment Replacement (Base and DHS) (See: Glove Compartment > Removal and Replacement > Instrument Panel Compartment - Replacement (Base and DHS))Instrument Panel Compartment Replacement (DTS) (See: Glove Compartment > Removal and Replacement > Instrument Panel Compartment - Replacement (DTS)) or Front Floor Console Replacement (DTS, w/o UV8) (See: Console > Removal and Replacement > Front Floor Console Replacement (DTS, w/o UV8))Front Floor Console Replacement (DTS, UV8) (See: Console > Removal and Replacement > Front Floor Console Replacement (DTS, UV8)).
6. Remove the IP endcaps. Refer to Instrument Panel Outer Trim Cover Replacement - Right Side (See: Dashboard / Instrument Panel > Removal and Replacement > Instrument Panel (IP) - Outer Trim Cover Replacement - Right) and Instrument Panel Outer Trim Cover Replacement - Left Side (See: Dashboard / Instrument Panel > Removal and Replacement > Instrument Panel (IP) - Outer Trim Cover Replacement - Left).
7. Remove the windshield pillar trim. Refer to Windshield Pillar Garnish Molding Replacement (Standard) (See: Trim Panel > Removal and Replacement > Windshield Pillar Garnish Molding Replacement (Standard)) in Interior Trim.
8. Remove the defroster grille. Refer to Defroster Grille Replacement (Without UV2) (See: Dashboard / Instrument Panel > Removal and Replacement > Defroster Grille Replacement (Without RPO Code UV2))Defroster Grille Replacement (UV2) (See: Dashboard / Instrument Panel > Removal and Replacement > Defroster Grille Replacement (With RPO Code UV2)).
9. Remove the IP upper trim pad. Refer to Instrument Panel Upper Trim Pad Replacement (See: Dashboard / Instrument Panel > Removal and Replacement).
10. Remove the heads up display, if equipped with UV8. Refer to Head Up Display Module Replacement.
11. Disconnect the body to IP electrical connectors (1) at the top, outside corners of IP.
12. Disconnect all other electrical connectors from the IP to body.
13. Disconnect the steering column shaft from the steering column.
14. Remove the steering column to body fasteners (1).
15. For a DeVille base model, or the DeVille DHS, disconnect the shift cable from the steering column.
16. Disconnect the Steering column to body connectors.
17. Remove the IP center support bracket fasteners (1) to floor bracket.
18. Remove IP carrier (1) to cowl fasteners.
19. Remove the fasteners (1, 2) from the left and right IP carrier to hinge pillar.
20. Remove the IP and carrier assembly from the vehicle.

This will get you to the HVAC plenum so you can remove the heater core

'See pics below
Was this
answer
helpful?
Yes
No
-3
Wednesday, August 26th, 2009 AT 10:20 AM
Tiny
NRM_SMMNS
  • MEMBER
  • 1 POST
  • 1997 CADILLAC DEVILLE
  • 4.8L
  • V8
  • FWD
  • AUTOMATIC
  • 156,000 MILES
How do you replace the heater core? I'm getting vapors coming thru the defroster vents.
Was this
answer
helpful?
Yes
No
+1
Tuesday, April 23rd, 2019 AT 6:57 PM (Merged)
Tiny
CADIEMAN
  • MECHANIC
  • 3,544 POSTS
U will need to remove the dash carrier assy. Then seperate the lower a/c case. Then remove the heater core retaining door. Go under the hood and remove the 2 heater hoses from the core. Then go back inside and remove a 10 mm bolt holding the core then remove the core. It pay around 8 hours labor.
Was this
answer
helpful?
Yes
No
Tuesday, April 23rd, 2019 AT 6:57 PM (Merged)
Tiny
CARADIODOC
  • MECHANIC
  • 33,879 POSTS
This is a really big job that some shops and mechanics won't attempt. Start by getting a copy of the manufacturer's service manual, then read through the many pages of instructions and drawings to see if you're up to it. You'll need special equipment to discharge and recharge the air conditioning system. Refrigerant is very dangerous to work with. The manual will also list all the special tools you'll need.
Was this
answer
helpful?
Yes
No
+1
Tuesday, April 23rd, 2019 AT 6:57 PM (Merged)
Tiny
CADIEMAN
  • MECHANIC
  • 3,544 POSTS
This is a hard job is right. U will not have to evacuate the a/c system for this repair.
Was this
answer
helpful?
Yes
No
Tuesday, April 23rd, 2019 AT 6:57 PM (Merged)
Tiny
CARADIODOC
  • MECHANIC
  • 33,879 POSTS
Hi Cadieman. Thanks for correcting me. It's nice to know there are a few models that are easier to service.
Was this
answer
helpful?
Yes
No
Tuesday, April 23rd, 2019 AT 6:57 PM (Merged)
Tiny
JASON DOLSKI
  • MEMBER
  • 1 POST
  • 1997 CADILLAC DEVILLE
V8 two wheel drive automatic 200,000 miles.

Need to know the location and how to replace a heater core in my car?
Was this
answer
helpful?
Yes
No
Tuesday, April 23rd, 2019 AT 6:57 PM (Merged)
Tiny
BLUELIGHTNIN6
  • MECHANIC
  • 16,542 POSTS
The heater core is located inside of the heater and evaporator module, in dash behind glove box compartment.

REMOVAL:
Disconnect the negative battery cable.
Drain and recycle the engine coolant.
Disconnect the heater core hoses using tool J-37097 or equivalent.
Remove the right side sound insulator and the glove box module.
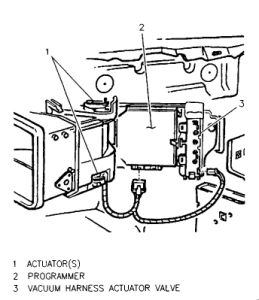
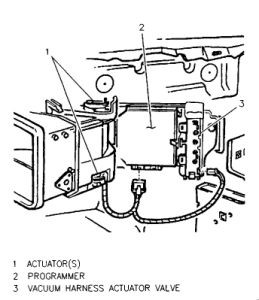
Remove the programmer shield, if equipped, and disconnect the air mix valve link.
Disconnect the programmer vacuum and electrical connectors.
Remove the heater core cover, leaving the programmer attached.
Remove the heater core retaining screws and the heater core.

INSTALLATION:
Position the heater core and secure with the retaining screws.
Install the heater core cover.
Connect the programmer vacuum and electrical connectors.
Connect the air mix valve link and, if equipped, install the programmer shield.
Connect the heater core hoses.
Connect the negative battery cable and fill the cooling system.
Adjust the air mix valve as follows:
Set the temperature on the heater and A/C control panel to 90 °F (32 °C). Allow 1-2 minutes for the programmer arm to travel to the maximum heat position.
Unsnap the threaded rod from the plastic retainer on the programmer output arm.
Check the air mix valve for free travel. Push the valve to the maximum A/C position and check for binding.
Preload the air mix valve in the maximum heat position by pulling the threaded rod to ensure the valve is sealing. The programmer output arm should be in the maximum heat position.
Snap the threaded rod into the plastic retainer on the programmer arm. Avoid moving the programmer arm or air mix valve.
Set the temperature on the control panel to 60 °F (16 °C). Verify that the programmer arm and the air mix valve travel to the maximum cold position.
Install the right side sound insulator and the glove box module.

Thanks for using 2CarPros. Com!
Was this
answer
helpful?
Yes
No
+6
Tuesday, April 23rd, 2019 AT 6:57 PM (Merged)
Tiny
2CP-ARCHIVES
  • MEMBER
  • 4,540 POSTS
  • 1998 CADILLAC DEVILLE
How to remove heater core from my car
Was this
answer
helpful?
Yes
No
Tuesday, April 23rd, 2019 AT 6:57 PM (Merged)
Tiny
WRENCHTECH
  • MECHANIC
  • 20,761 POSTS
Removal Procedures

Negative battery cable.
Partially drain coolant.
Remove instrument panel compartment.
Remove right sound insulator.
Remove heater and A/C programmer.
Disconnect the driver air mix actuator (2).
Disconnect the passenger air mix actuator (3).

Remove the heater core cover.

Remove the inlet and outlet heater hoses from the heater core.

Remove heater retaining screws.
Remove heater core.

Installation Procedures

Install the heater core to heater case, securing with two screws.

Tighten
Tighten the screws to 2 Nm (18 lb in).

Install the inlet and outlet heater hoses to heater core.

Install the heater core cover and the screws.

Tighten
Tighten the screws to 2 Nm (18 lb in).

Connect the passenger air mix actuator (3).
Connect the driver air mix actuator (2).
Install the heater and A/C programmer.
Install the instrument panel compartment.
Install the right sound insulator.
Connect the negative battery cable.
Refill the cooling system.
Adjust the air mix valve.
Was this
answer
helpful?
Yes
No
Tuesday, April 23rd, 2019 AT 6:57 PM (Merged)
Tiny
ROLAND
  • MEMBER
  • 1 POST
  • 1997 CADILLAC DEVILLE
  • 2WD
  • AUTOMATIC
  • 140,000 MILES
How do you replace the heater core on a 1997 Cadillac Deville? Please any information will help.
Was this
answer
helpful?
Yes
No
Tuesday, April 23rd, 2019 AT 6:57 PM (Merged)
Tiny
JACOBANDNICKOLAS
  • MECHANIC
  • 109,772 POSTS
Here is what I could find:

Disconnect the negative battery cable.
Drain and recycle the engine coolant.
Disconnect the heater core hoses using tool J-37097 or equivalent.
Remove the right side sound insulator and the glove box module.
Remove the programmer shield, if equipped, and disconnect the air mix valve link.
Disconnect the programmer vacuum and electrical connectors.
Remove the heater core cover, leaving the programmer attached.
Remove the heater core retaining screws and the heater core.

To install:

Position the heater core and secure with the retaining screws.
Install the heater core cover.
Connect the programmer vacuum and electrical connectors.
Connect the air mix valve link and, if equipped, install the programmer shield.
Connect the heater core hoses.
Connect the negative battery cable and fill the cooling system.
Adjust the air mix valve as follows:
Set the temperature on the heater and A/C control panel to 90°F (32°C). Allow 1-2 minutes for the programmer arm to travel to the maximum heat position.
Unsnap the threaded rod from the plastic retainer on the programmer output arm.
Check the air mix valve for free travel. Push the valve to the maximum A/C position and check for binding.
Preload the air mix valve in the maximum heat position by pulling the threaded rod to ensure the valve is sealing. The programmer output arm should be in the maximum heat position.
Snap the threaded rod into the plastic retainer on the programmer arm. Avoid moving the programmer arm or air mix valve.
Set the temperature on the control panel to 60°F (16°C). Verify that the programmer arm and the air mix valve travel to the maximum cold position.

Install the right side sound insulator and the glove box module.
Was this
answer
helpful?
Yes
No
Tuesday, April 23rd, 2019 AT 6:57 PM (Merged)
Tiny
CALVINHOWARD
  • MEMBER
  • 1 POST
  • 1994 CADILLAC DEVILLE
  • V8
  • FWD
  • AUTOMATIC
  • 180,895 MILES
Do I have to remove the whole dash to replace the heater core or just the glovebox?
Was this
answer
helpful?
Yes
No
Tuesday, April 23rd, 2019 AT 6:57 PM (Merged)
Tiny
RASMATAZ
  • MECHANIC
  • 75,992 POSTS
1.Disconnect battery ground cable.
2.Remove glove box attaching screws, then the glove box.
3.Remove lower sound insulator attaching screws and nuts, then the lower sound insulator.

Heater And A/C Programmer And Actuators


https://www.2carpros.com/forum/automotive_pictures/12900_hc_10.jpg


4.Remove programmer as follows:
a.Remove programmer shield attaching screws, then the programmer shield.
b.Disconnect threaded rod from programmer.
c.Disconnect programmer electrical and vacuum connector, then remove programmer.
5.Disconnect body control module electrical connector, then remove module attaching screws and module.
6.Remove relay panel from module assembly, then the module assembly heater core cover.
7.Disconnect heater hoses from heater core.
8.Remove two heater core attaching screws, then the heater core.
9.Reverse procedure to install.

https://www.2carpros.com/kpages/auto_repair_manuals_alldata.htm
Was this
answer
helpful?
Yes
No
+3
Tuesday, April 23rd, 2019 AT 6:57 PM (Merged)
Tiny
BRAD ELLIS
  • MEMBER
  • 1 POST
  • 1995 CADILLAC DEVILLE
  • V8
  • FWD
  • AUTOMATIC
  • 217,500 MILES
Easiest way to remove heater core
Was this
answer
helpful?
Yes
No
Tuesday, April 23rd, 2019 AT 6:57 PM (Merged)
Tiny
RASMATAZ
  • MECHANIC
  • 75,992 POSTS
There's no easier way but the right way-see below:

Service and Repair

Disconnect battery ground cable.
Remove glove box attaching screws, then the glove box.
Remove lower sound insulator attaching screws and nuts, then the lower sound insulator.

Heater And A/C Programmer And Actuators


https://www.2carpros.com/forum/automotive_pictures/12900_h_8.jpg


Remove programmer as follows:
a.Remove programmer shield attaching screws, then the programmer shield.
b.Disconnect threaded rod from programmer.
c.Disconnect programmer electrical and vacuum connector, then remove programmer.

Disconnect body control module electrical connector, then remove module attaching screws and module.
Remove relay panel from module assembly, then the module assembly heater core cover.
Disconnect heater hoses from heater core.
Remove two heater core attaching screws, then the heater core.
Reverse procedure to install.

https://www.2carpros.com/kpages/auto_repair_manuals_alldata.htm
Was this
answer
helpful?
Yes
No
+1
Tuesday, April 23rd, 2019 AT 6:57 PM (Merged)
Tiny
BILLIAMBATES124
  • MEMBER
  • 1 POST
  • 1995 CADILLAC DEVILLE
  • V8
  • FWD
  • AUTOMATIC
  • 116,000 MILES
Where is the heater core and how do I go about taking it out and replacing it
Was this
answer
helpful?
Yes
No
Tuesday, April 23rd, 2019 AT 6:58 PM (Merged)
Tiny
ED ARMES
  • MECHANIC
  • 129 POSTS
Remove the glove compartment and insulating panel.
Disconnect the rod to the blend door.
Disconnect the vacumn and electrics from the programmer that is to the right of the heater core housing.
Remove the 2 heater core cover screws and pull the cover off.
Remove the heater core monuting screws and lower the assembly out of the housing. Watch and protect carpeting from coolant leaks.

If this helps send money!
Was this
answer
helpful?
Yes
No
+2
Tuesday, April 23rd, 2019 AT 6:58 PM (Merged)
Tiny
JEFFREYMW
  • MEMBER
  • 3 POSTS
How long should a trained mechanic need to replace 1995 Cadillac Deville (base) heater core
Was this
answer
helpful?
Yes
No
Tuesday, April 23rd, 2019 AT 6:58 PM (Merged)
Tiny
KEN L
  • MASTER CERTIFIED MECHANIC
  • 47,722 POSTS
Hello,

The books gets 2.4 hours but that does not include the vacuum down and recharge of the air conditioner system which is usually and hour.

I must say somethings the book can be off because I know this job and it takes longer than 2.4 btw.

Please let us know if you need anything else to get the problem fixed.

Cheers, Ken
Was this
answer
helpful?
Yes
No
Tuesday, April 23rd, 2019 AT 6:58 PM (Merged)

Please login or register to post a reply.

Sponsored links