Okay, if I understand, the plastic reservoir is leaking where it attaches to the metal master cylinder. There are two rubber reservoir grommets where the two attach which prevent leakage. It sounds like they need replaced.
Here are the directions for taking it apart and replacing the reservoir. I have to be honest, there is a good chance you may not find the grommets needed and will have to replace the master cylinder. Here are the directions. The attached pictures correlate with these directions.
______________________________________________
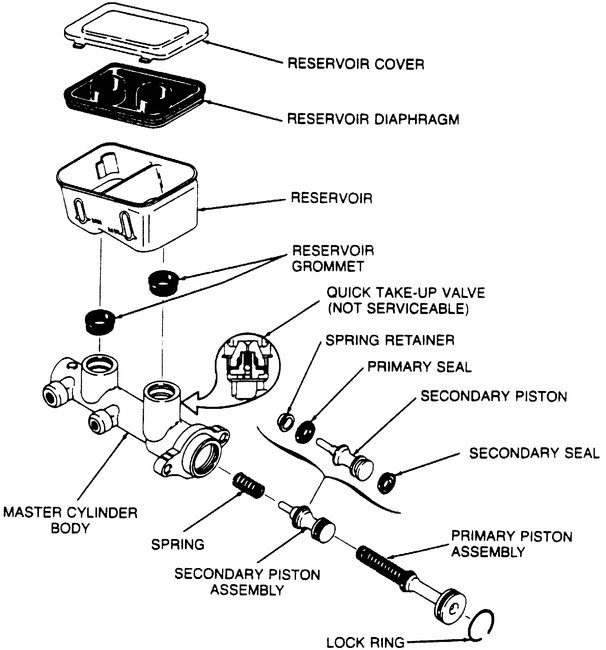
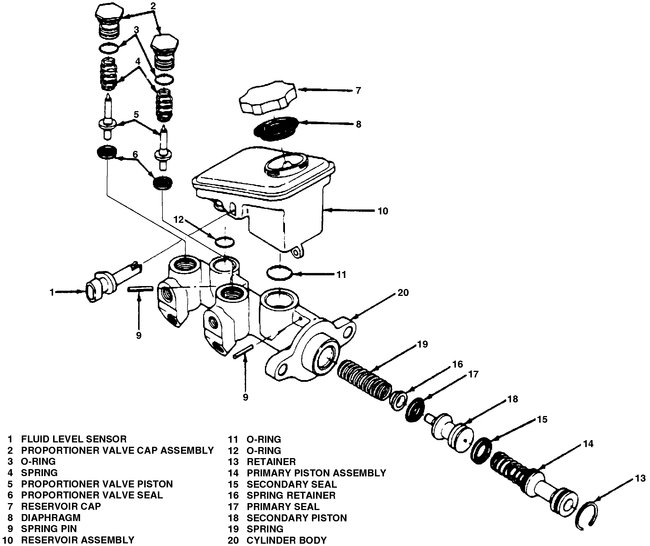
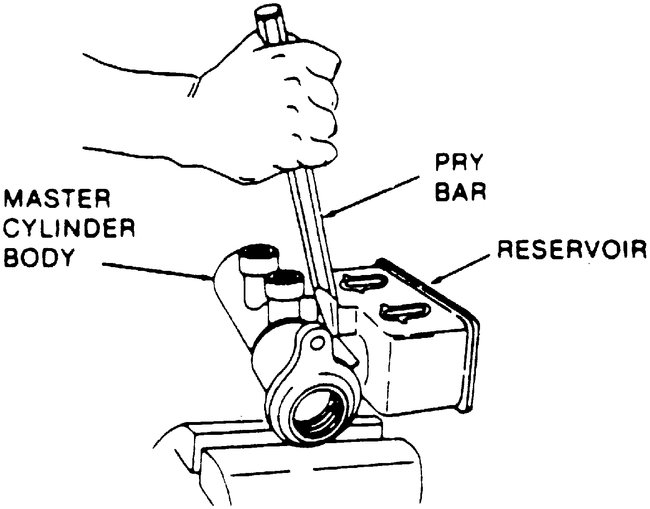
See Pictures 1, 2, 3
DISASSEMBLE
Refer to Figs. 19 and 20 when performing the following procedures.
1. Remove master cylinder from vehicle as follows:
a. Disconnect and plug hydraulic lines.
b. Remove two master cylinder attaching nuts, then the master cylinder.
2. Remove reservoir cover and diaphragm. Discard old brake fluid in reservoir.
3. Inspect cover and diaphragm. Replace if cut, cracked or deformed.
4. Remove fluid level switch, if equipped.
5. On models with compact master cylinder, remove proportioner valve assembly, Fig. 20.
6. On all models, depress primary piston and remove lock ring.
7. Plug primary fluid outlet (outlet nearest to cowl when master cylinder is installed), then apply compressed air into secondary fluid outlet to remove primary and secondary pistons.
8. Remove spring retainer and seals from secondary piston.
9. Clamp master cylinder in a vise as shown in Fig. 21, then remove reservoir using a pry bar. Remove reservoir grommets.
10. Inspect master cylinder bore for corrosion. Do not use abrasive material on master cylinder bore. Replace if bore is corroded.
ASSEMBLE
Clean all parts not included in repair kit with brake fluid. Do not dry with compressed air. Lubricate all rubber parts with clean brake fluid prior to installation.
1. Lubricate new reservoir grommets with silicone brake lube, then press grommets into master cylinder body. Ensure grommets are properly seated.
2. Lay reservoir upside down on flat, hard surface. Press master cylinder body onto reservoir using rocking motion.
3. Install new seals on secondary piston, then the spring retainer.
4. Install spring and secondary piston assembly into cylinder.
5. Install primary piston. Depress primary piston into cylinder, then install lock ring.
6. Install fluid level switch, if equipped.
7. On models with compact master cylinder, install proportioner valve assembly, Fig. 20.
8. On all models, fit diaphragm into reservoir cover, then install cover onto reservoir.
9. Install master cylinder and bleed brake system.
_____________________________________________________
If you find the MC needs replaced, here is a link that shows in general how it is done.
https://www.2carpros.com/articles/how-to-replace-a-brake-master-cylinder
Let me know if this helps or if you have other questions.
Take care,
Joe
Images (Click to make bigger)
Wednesday, March 20th, 2019 AT 6:12 PM
