Hi guys. Please let me add a few comments. Since the vehicle, (and master cylinder) is more than a year old, it is a good practice to not push the brake pedal more than halfway to the floor. That can indeed cause the internal leakage in the master cylinder that Joe described. Over time, (not mileage), crud and corrosion build up in the lower halves of the bores where the pistons don't normally travel. By pushing the brake pedal further than normal, the rubber lip seals get run over that crud which can tear them. That results in the internal leakage bypassing the pistons, and that slowly sinking brake pedal. That commonly can take two or three days to show up.
It is standard practice at a lot of shops to include a rebuilt master cylinder in any estimate when the vehicle comes in with a ruptured hose or rusted line, and the owner likely pushed the pedal over halfway when surprised by that leak.
Even some brake system specialists will scoff at this, until it happens to them. Another common cause of running the pedal too far has to do with normal brake jobs. The first one is the pistons had to be pressed back into the caliper housings to make room for the new, thicker pads. Later, one of the last steps is to press the brake pedal repeatedly to run the pistons back out to adjust them. A good practice is to pretend there's a chunk of wood under that pedal to prevent it from traveling further than normal. The pedal doesn't have to be run all the way to the floor to adjust the calipers.
Another cause is when it's necessary to bleed the brakes. Even many service manuals will tell you to push the pedal to the floor, but those instructions were written for the vehicles in their condition when new, not after they have many years and miles on them. That's also why no service manual ever makes reference to rusted bolts in their service instructions, even though we see that all the time.
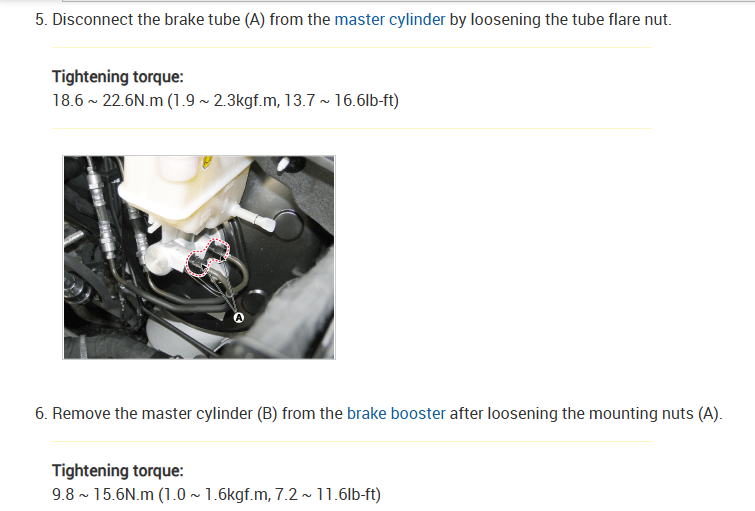
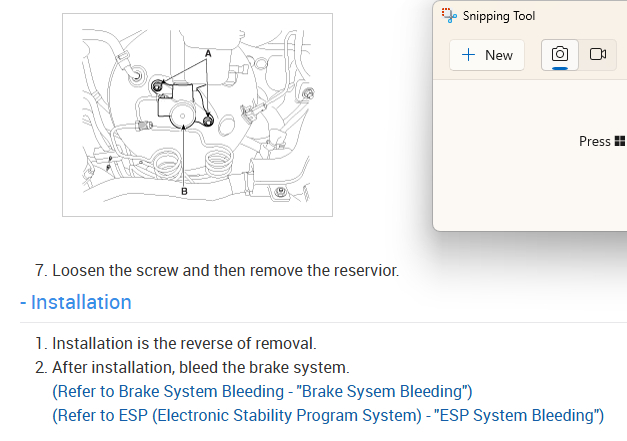
There's a simple trick when replacing the master cylinder to avoid having to bleed at the wheels. This works best on vehicles with two steel lines leaving the master cylinder, but it can work on Fords, and others with four lines. Use the flare-nut wrench to loosen both line nuts. Unbolt the master cylinder from the booster, pull it forward off the mounting studs, then use it as a handle to bend the lines upward a little. That will reduce how much brake fluid runs out of them. Unbolt the lines, then set that old master cylinder aside. Watch for any brake fluid that drips onto painted surfaces because brake fluid eats paint. Wash that off right away with water.
Once the replacement master cylinder has been bench-bled, attach the steel lines, then use it to bend those lines back down to their normal shape. Bolt it to the booster, then, I like to lightly tighten one line nut. Have a helper work the brake pedal for you. It should take roughly 15 seconds for him to push it halfway to the floor. As he does, you'll see air bubbles coming out past the loose line nut. Have him tell you when he gets halfway. Now he has to hold it there until you snug that nut. Once lightly tightened, holler to him to release the pedal quickly, then push it slowly again. Just before he moves the pedal back down, loosen that same line nut again, then watch for any air bubbles. When you see mostly clear, new brake fluid, tighten that nut, then do the same procedure for the other line. Usually, three times is enough for each line.
When you tell your helper to release the brake pedal, you might help things along by lightly tapping on the steel lines with your wrench. That can jar loose tiny air bubbles that stick to the lines, and help them go up to the reservoir. If there are any tiny air bubbles left in the lines, you'll never know it, and they will work their way out in short order. Air bubbles won't go down. They float up, in part, through road vibration, and each time the brake pedal is used. Brake fluid being pushed down the lines can free sticky air bubbles, then, when the fluid rushes back up to the reservoir, those air bubbles wash back up there too. This way there's no need to push that little air all the way down to the wheels and bleed it out there. That's especially important on most vehicles that have anti-lock brakes. Air being pushed to the wheels will get trapped and pool in two chambers in the hydraulic controller, then you'll need a scanner, a helper, and the procedure to bleed the air out.
The first time I saw this happen was in the mid 1980s. Two very experienced brake specialists were doing a normal front and rear brake job including rebuilding the calipers and wheel cylinders on site, on a Ford van. When it came time to bleed, they used the pedal method, (I'm usually alone so I prefer to gravity-bleed). One of them pushed the brake pedal to the floor, . . . and it stayed there! After many hours, and a trip to a salvage yard, besides the rebuilt master cylinder, it needed two new steel lines and a used combination valve, as all of them were plugged with the stuff that got pushed out of the old master cylinder.
As a side note, don't consider rebuilding the old master cylinder yourself unless that is your only option. I've found the rebuild kits are usually just as expensive as the professionally-rebuilt units, or higher. Then you have to factor in the time involved, and what to do if you make a mistake and have to do it over. The store-bought master cylinder comes with a warranty. When you rebuild it yourself, you eat the cost of any warranty repair.
This is one place where a used part from a salvage yard is not a good value or idea. Some people will take a used master cylinder apart, thinking they can clean out the corrosion in the bores, but even that can lead to less than ideal results. Master cylinders are made of aluminum to save weight. When scratched, that shiny aluminum will corrode right before your eyes. Iron takes days to show rust. Aluminum takes seconds, (which is part of why it's so hard to weld). To prevent that corrosion, the housing has an anodized coating. It usually appears as a light blue or light yellow electro-plating. To clean any corrosion from the bores in the master cylinder, you can't use any brush or tool that is hard enough to scratch that coating. If scratched, fluid can bypass the lip seal, then you're back to that sinking brake pedal. It can't be helped but for the brake fluid to gradually absorb moisture. That will cause the scratched area to corrode. Many people think the area will corrode away completely, but the aluminum oxide that forms actually insulates the metal from further corrosion. (That's why aluminum parts like control arms don't turn to powder). The problem is that corrosion will tear rubber seals that run over it, and if scrubbed away by those seals, more corrosion will occur.
I hope some of those thoughts will help you guys solve this.
Oct 18, 2026 at 3:31 PM