Nope, but you're right about the need for the alignment due to the new control arm. No two are ever exactly alike, but let me offer a suggestion. The new control arm might place the lower ball joint a little more forward or rearward compared to the old one. That changes one of the three main alignment angles called "caster". That does involve pulling to one side on rear-wheel-drive vehicles, but it has almost no effect on front-wheel-drive cars, so there's usually no provision for adjusting it.
The second main alignment angle is "camber". That is how much a wheel leans in or out on top, as viewed from in front of the car. That does affect pulling and tire wear. Besides being in specs for good tire wear, it must be close to equal on both sides. A tire wants to roll, or pull, in the direction it's leaning. We want those two pulls to be equal so they offset each other. This is the angle you'll change if the new control arm places the lower ball joint a little left or right compared to where the old one was.
Here's the hint I mentioned. The steering linkage connects to the steering knuckle roughly six to eight inches above the lower ball joint, as measured up from the ground. The upper strut mount, which is one of the steering pivot points, doesn't shift position. The lower ball joint might move in or out a little. For this example, let's say it moves out 1/4". That moves the bottom of the steering knuckle out 1/4", and where the steering arm connects to the outer tie rod end is going to move out perhaps 1/16" or more. The steering linkage, (inner and outer tie rod ends), must be lengthened the same amount to accommodate that change. That adjustment is called "toe". It's the last of the three main angles to be adjusted during the alignment. You won't be doing that as part of the control arm replacement, so in this example, the steering linkage is going to be slightly too short. (1/16" at this adjustment point is a lot). That will turn the left front wheel to the left, compared to the right one. The two wheels won't be parallel to each other as they were before. To make the car go straight to drive it to the alignment shop, you have to turn the steering wheel to the right until both front wheels are steering away from the center of the car by an equal amount. That off-center steering wheel is the proof the lower ball joint isn't in the same location as before.
To say that a different way, when you go for your first drive right after replacing the control arm, if you should find the steering wheel is straight while traveling on a straight road, and it was straight before the service, you can assume the new lower ball joint is so close to where the old one was, that you might get away without an alignment.
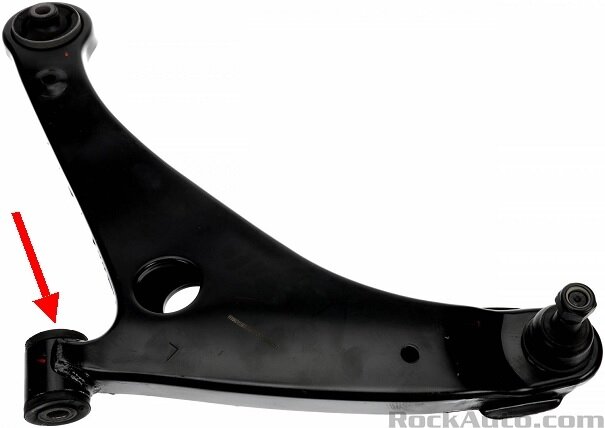
One thing to be aware of when replacing this part is when to tighten the bolt indicated by my red arrow in the photo below. This is the pivot point as the suspension travels up and down. That bolt should not be tightened while the car is jacked up and the suspension is hanging down. Doing so will hold the rubber bushing in that orientation, then, when the car is lowered onto the tires, the control arm will move up to its at-rest position, clamping that bushing in a permanent twist. That will greatly shorten the life of the rubber part. Instead, leave the bolt loose, bounce the car a few times, or drive it around the parking lot or block to settle it, then crawl underneath to tighten the bolt while the car is sitting at normal ride height. If you can't fit under there, it's okay to drive it to the alignment shop with that bolt loose, but tell the specialist about the new control arm and the need to tighten the bolt. Often, when we see a new part with this type of bushing, we will automatically loosen and retighten those bolts, even when you don't say anything. Alignments are always done on a drive-on hoist, so that keeps the cars at normal ride height while providing plenty of working room underneath.
For my final comment of value, ask if they will provide a printout of the alignment. Most shops offer one that shows colored bar charts for caster, camber, and toe on the front, and camber and toe on the rear. I always printed out a different screen with a really long list of numbers that included the secondary angles that we often don't look at, and it shows the "Before" and "After" readings. The "Before" readings are what the car came in with before any adjustments were made. If any issue or question comes up, you can post a photo of that printout and I can interpret the numbers for you.
Let me know how this turns out.
Image (Click to make bigger)
Wednesday, September 13th, 2023 AT 4:36 PM


