A/C not working intermittently

2009 HONDA CIVIC
69,000 MILES • 4 CYL • AUTOMATIC
Avatar
FRANCIS DE GUZMAN
  • MEMBER
  • 1 POST
The air conditioner sometimes work. One month it will work and then the next month it completely stops with no air blowing at all.

I already changed the relay, added Freon, and also fixed the blower motor resistor.

What I am wondering is if there is a part for my car where I can change and fix the speed? I believe that is what is causing the problem.

I'm not sure what the name of the part is. All I know is that it goes in the glove compartment and it is a coil that controls the electricity when you choose the speed setting to the fan.

What is the name of the part I can look up so I can buy it?

Does this part exist for 2008 Honda Civics?

Am I in the right direction?
Apr 13, 2020 at 1:13 PM

Advertisement
Avatar
JACOBANDNICKOLAS
  • Experienced Mechanic
  • 110,240 POSTS
Hi,

The description you provided sounds like the blower motor resister. But you indicated that was replaced.

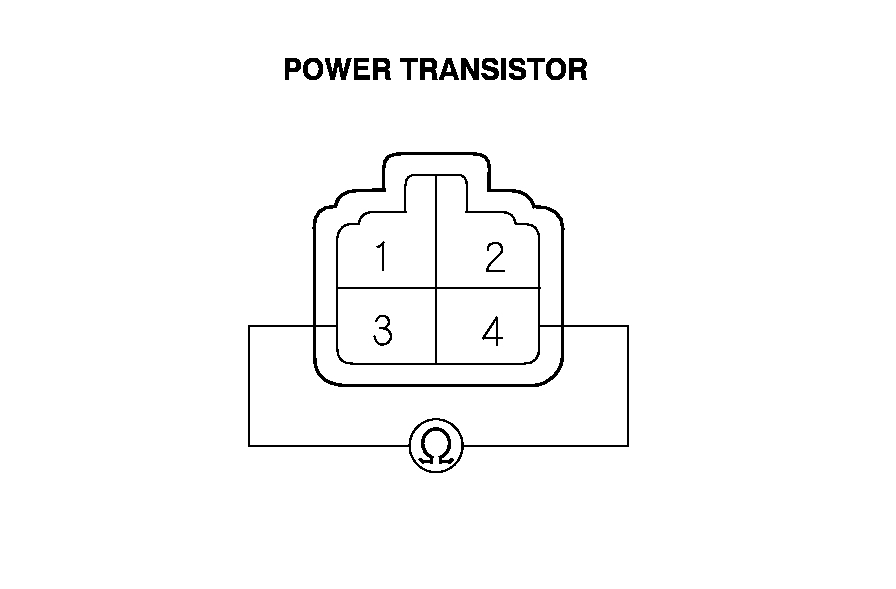
Interestingly, the fan speed is determine by the switch and the resister. In your car, it is called a blower motor power transistor. I attached a pic explaining how to test it. Let me know if this is what you are looking for.

_________________________________________________

2009 Honda Civic L4-1.8L
Blower Power Transistor Test
Vehicle Heating and Air Conditioning Testing and Inspection Component Tests and General Diagnostics Blower Power Transistor Test
BLOWER POWER TRANSISTOR TEST
Blower Power Transistor Test

1. Remove the passenger's dashboard undercover .

2. Disconnect the 4P connector from the power transistor.

3. Measure the resistance between terminals No. 3 and No. 4 of the power transistor. It should be about 1.5 kOhms.
- If the resistance is within the specifications, go to step 4.

- If the resistance is not within the specifications, replace the power transistor.

NOTE: Also check the blower motor. Power transistor failure can be caused by a defective blower motor.


pic 1


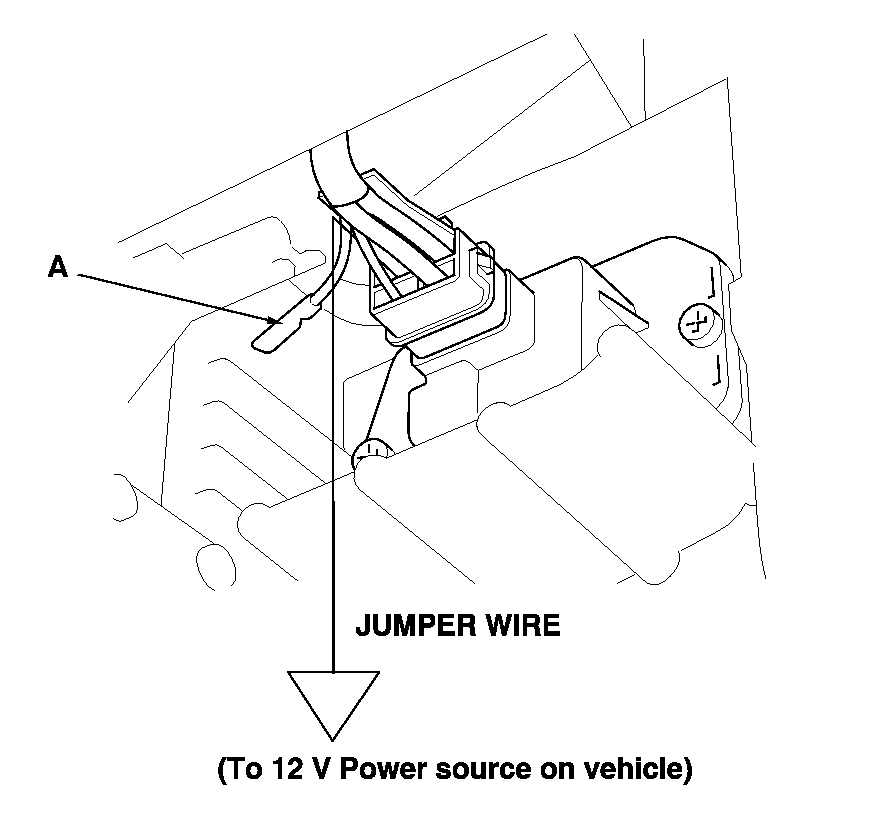
4. Carefully release the lock tab on terminal No. 1 (YEL) (A) in the 4P connector, then remove the terminal and insulate it from body ground.

5. Reconnect the 4P connector to the power transistor.

6. Make sure the YEL wire is completely isolated, then supply 12 V to cavity No. 1 with a jumper wire.

7. Turn the ignition switch to ON (II), and check that the blower motor runs.
- If the blower motor does not run, replace the power transistor.

- If the blower motor runs, the power transistor is OK.


pic 2

_______________________________________

Here are a few links you may find helpful:

https://www.2carpros.com/articles/how-to-use-a-test-light-circuit-tester

https://www.2carpros.com/articles/how-to-use-a-voltmeter


https://www.2carpros.com/articles/how-to-check-wiring

____________________________________

Let me know if any of this helps. Also let me know if when the problem happens if any speed works with the blower motor.

Take care,
Joe


Apr 13, 2020 at 1:34 PM
Join 2CarPros for free, one of the most advanced car repair communities on the internet. From first-time drivers to seasoned mechanics, everyone is welcome to reply, share details, and get better answers. You can add a temporary image or video first; uploads are limited to 20 MB.
Ask a Free Question
Repair Safety Notice: This information is for general instructional purposes only. Vehicle repair can be dangerous. Verify all information, follow manufacturer service procedures, use proper tools and safety equipment, and consult a qualified repair shop when needed.